FOCAS Control Setup
Configure the FANUC control's network settings, enable FOCAS, then add the machine in MachineMetrics.
Connection Summary
- Where to plug in the cable: the FANUC Ethernet port, an RJ45 connector labeled CD38A (embedded, on the NCU board in the electrical cabinet) or CD38S (same function, on the rear of the display unit). If the machine has the optional Fast Ethernet board, use CD38R instead — it supports ten simultaneous FOCAS connections rather than one. See FANUC Ethernet Port Types for photos and how to tell them apart.
- What to set on the control: a static IP address, subnet mask (usually 255.255.255.0) and gateway, all on the same subnet as the Edge device. All three fields must be filled in or FOCAS will not respond.
- Port MachineMetrics connects on: TCP 8193, set on the control as the FOCAS/TCP port number.
Run the cable from the network switch to that port and confirm the link LED is lit before configuring anything on the screen.
Network Configuration on the Control
The video below uses a Mori Seiki machine with a FANUC MSX control. Softkey locations and menu names may differ by control model and serial number — use this as a general reference.
Accessing Network Settings
Standard Access Path:
- Press SYSTEM hard key
- Press right scroll soft key until you see EMBDD or EMBED PORT
- Select EMBDD or EMBED PORT
- You'll see network configuration fields
Alternative Path (some controls):
- Press SYSTEM hard key
- Navigate to ETHPRM or ETHER-BOARD
- Select to enter settings
For Windows-Based Controls:
- Access Windows backend
- Search for "CNC Screen Display" program
- Access embedded port settings through this interface
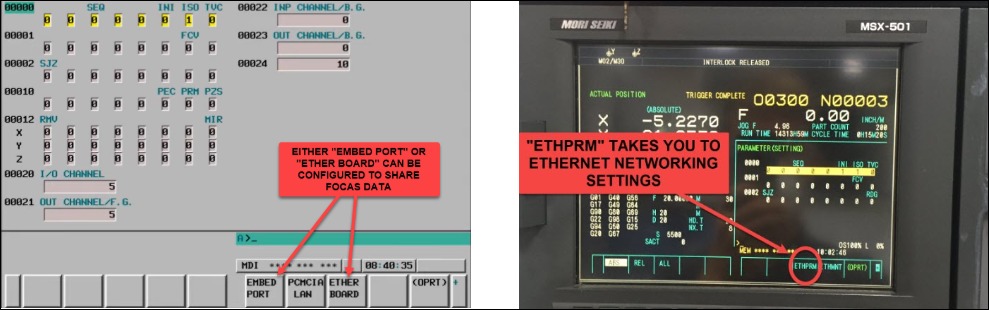
On the control, you'll see softkeys along the bottom for selecting the port type: EMBED PORT, PCMCIA LAN, and ETHER BOARD. On machines like the MSX-501, the key labeled ETHPRM navigates directly to the Ethernet networking settings.
Setting IP Address
Step 1: Enter Network Parameters
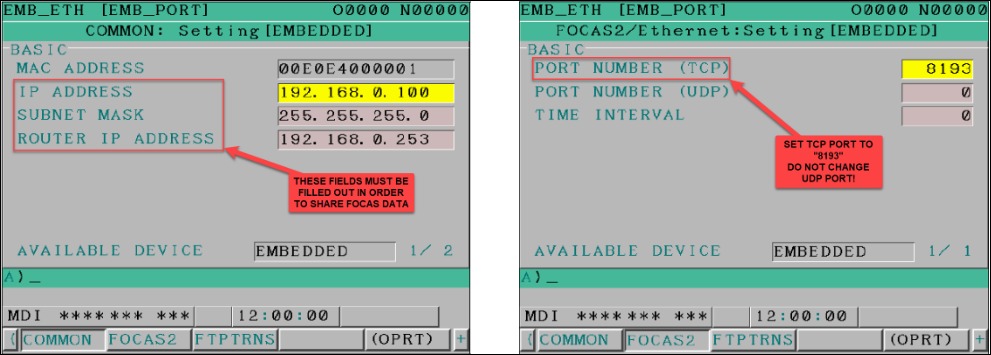
In the EMBDD or EMBED PORT screen, you'll see fields for:
- IP Address: Machine's IP address
- Subnet Mask: Network subnet (typically 255.255.255.0)
- Gateway: Network gateway (may be optional)
Enter all values — these fields must be filled in for FOCAS data collection to work.
Step 2: Configure IP Settings
For wired connection:
- IP must be in same subnet as Edge device and network
- Example: Machine 192.168.1.100, Edge 192.168.1.50, Subnet 255.255.255.0
For wireless connection:
- IP must match Edge device's external NIC subnet
- Example: Machine 192.168.100.10, Edge NIC 192.168.100.1, Subnet 255.255.255.0
Step 3: Verify Port Selection
- Check COMMON SETTING field
- Should show EMBEDDED (most common) or BOARD
- This indicates which physical port is used for FOCAS
Step 4: Verify Available Device
- Press OPRT soft key
- Ensure "AVAILABLE DEVICE" is set to EMBEDDED PORT (not PCMCIA)
- If set to PCMCIA, press PCMCIA/EMBDD soft key to switch
- Press EXECUTE
Enabling FOCAS Protocol
Step 1: Access FOCAS Settings
- In EMBDD menu, look for FOCAS2 soft key
- If not visible, press PAGE DOWN key
- Select FOCAS2 or FOCAS SETTINGS
Step 2: Configure FOCAS Port
- Set FOCAS TCP port to 8193 (standard)
- Leave UDP blank or at 0
- Set Timeout to 0
- Some controls may show this as "FOCAS PORT" or "TCP PORT"
The COMMON tab determines which physical Ethernet port FOCAS uses:
- EMBEDDED → connect to the RJ45 port on the back of the HMI (behind the display)
- BOARD → connect to the Ethernet port directly on the FANUC NCU board in the electrical cabinet
![FANUC FOCAS2 Ethernet setting — left shows "AVAILABLE DEVICE: EMBEDDED" with note "IF COMMON SETTING IS SET TO EMBEDDED, CONNECT ETHERNET PORT BEHIND HMI"; right shows "COMMON: Setting[BOARD]" with IP 192.168.82.15 and note "IF COMMON SETTING IS SET TO BOARD, CONNECT ETHERNET PORT ON FANUC NCU"](/assets/images/focas-embedded-vs-board-port-options-7b139bb1c763125a142e3a027fea4ef2.png)
Step 3: Restart or Reboot
- Look for RESTART soft key
- Select and press EXECUTE
- If not available, power cycle the machine
- This applies the network settings
Verifying Configuration
After restart, verify:
-
Check IP Settings
- Return to EMBDD menu
- Confirm IP address, subnet, gateway are correct
-
Test Network Connectivity
- From Edge device or computer on same network
- Ping the machine's IP address
- Should receive replies
-
Check FOCAS Port
- Verify port 8193 TCP is configured
- Ensure it wasn't changed to another value
If machine doesn't respond to ping:
- Verify physical cable connection
- Check that "AVAILABLE DEVICE" is set to EMBEDDED (not PCMCIA)
- Press OPRT soft key → PCMCIA/EMBDD → EXECUTE
- Reboot machine again
Adding the Machine in MachineMetrics
Once the physical connection and network configuration are complete:
Step 1: Log into MachineMetrics
- Navigate to Assets → Machines
- Click Add Machine
Step 2: Enter Machine Details
- Machine Name: Descriptive name (e.g., "Mill-3-Fanuc")
- Make: Manufacturer (e.g., "Makino")
- Model: Machine model
- Select Edge Device: Choose your Edge from dropdown
Step 3: Configure Adapter
- Adapter Type: Select FANUC FOCAS
- IP Address: Enter the machine's IP address (from control)
- Port: 8193 (default FOCAS port)
- Click Test Connection
Step 4: Verify Connection
- Test should return "Connected" or similar success message
- If test fails, verify IP address and network connectivity
- Click Save when test succeeds
Step 5: Configure Data Collection
- Machine will appear in your Machines list
- Initial data items will be collected automatically
- Proceed to configure part counting and additional data items