Makino (Pro 5 / Pro 6)
Makino controls put a router in front of the FANUC NCU, so reaching the FANUC configuration takes a few extra steps compared to a bare FANUC control.
Pro 6 Control
Control Type: FANUC-based (Pro 6)
Special Considerations:
- Pro 6 is a customized FANUC interface built on FANUC hardware
- FOCAS setup is similar to standard FANUC, but accessed through different menus
- The FANUC NCU (control unit) is located in the electrical cabinet, not integrated into the machine display
- Configuration requires accessing both the Pro 6 interface and underlying FANUC system
Pro 6 Router Login Credentials
The Makino Pro 6 control has an internal router that manages the machine's network. You may need to log into this router to configure network settings or verify the FANUC IP address. Credentials are case-sensitive:
| Field | Value |
|---|---|
| Username | admin |
| Password | PRO |
⚠️ Note the uppercase password — entering
proorProwill not work.
Accessing FANUC Configuration on Pro 6
The Pro 6 interface masks the standard FANUC menus. To configure FOCAS, you need to access the underlying FANUC system:
Method 1: CNC Screen Display Program
- On the Pro 6 control, navigate to the Windows desktop
- Search for "CNC Screen Display" program
- Launch this application to access the standard FANUC interface
- This provides direct access to FANUC menus for configuration
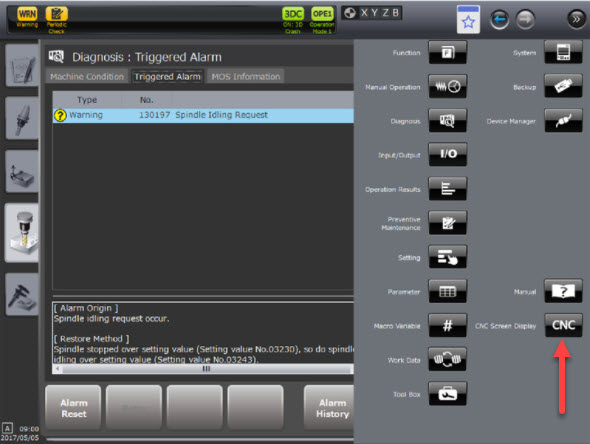
The CNC Screen Display program provides access to standard FANUC configuration menus on Pro 6 controls.
Method 2: Chevron Navigation
Alternatively, you can access FANUC configuration through the Pro 6 interface:
- Press the SYSTEM hard key on the control panel
- Look for chevron icons (>>) in the menu
- Select the chevrons to access underlying FANUC configuration
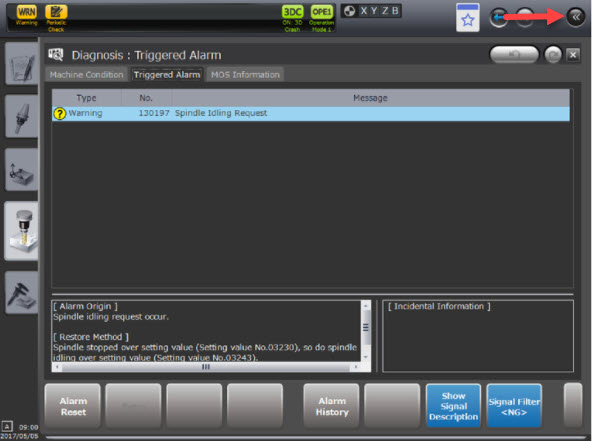
Chevron icons (>>) in the Pro 6 interface provide access to FANUC configuration menus.
Locating the FANUC NCU
The FANUC NCU (Network Control Unit) is located in the electrical cabinet, not in the machine display housing.
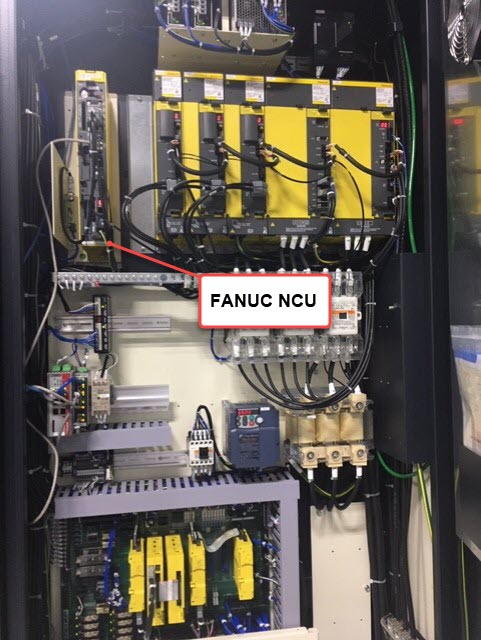
The FANUC NCU in a Makino electrical cabinet. The embedded Ethernet port (CD38A) is located on this unit.
Finding the Embedded Ethernet Port:
- Open the electrical cabinet (requires key/permission)
- Locate the FANUC NCU unit (typically labeled)
- Find the CD38A Ethernet port on the NCU
- This is where you'll connect the Edge device or Ethernet cable
Pro 6 FOCAS Configuration Steps
Once you've accessed the FANUC interface (via CNC Screen Display or chevrons):
Step 1: Configure IP Address
- Navigate to ETHPRM or EMBED PORT menu
- Set IP address, subnet mask, and gateway
- Ensure IP is static or has a DHCP reservation
The FANUC embedded port settings screen looks the same on a Makino Pro 6 as on a standard FANUC machine:
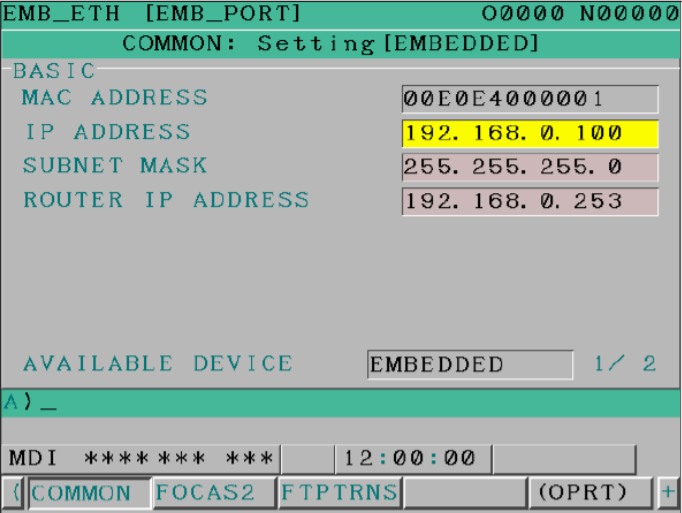
Step 2: Configure FOCAS Port
- Find FOCAS 2 and COMMON settings
- Set TCP PORT to 8193
- Leave UDP blank or at 0
- Set Timeout to 0
Step 3: Set Available Device
- Navigate to embedded port settings
- Set AVAILABLE DEVICE to EMBEDDED (not PCMCIA)
- This ensures the embedded Ethernet port is active
Step 4: Restart
- Look for RESTART option in menus
- Execute restart to apply network settings
- If restart option not available, power cycle the machine
Verifying Configuration
Check Alarms Screen:
Pro 6 controls have a dedicated diagnostics screen that shows network and FOCAS status:
- Navigate to the Diagnosis menu
- Check for Triggered Alarm tab
- Look for any FOCAS or network-related alarms
- Common alarm: "130197 Spindle Idling Request" - this is normal and can be ignored
- Use the chevrons (>>) to expand alarm details if needed
Test Connection:
- From a computer on the same network, ping the machine IP
- Verify port 8193 is accessible
- In MachineMetrics, add the machine using FOCAS adapter
- Check Timeline and/or Diagnostics for data updates
Common Pro 6 Issues
Cannot Find ETHPRM Menu:
- Use "CNC Screen Display" program to access FANUC interface
- Or look for chevron icons (>>) to access hidden menus
Embedded Port Not Responding:
- Verify "AVAILABLE DEVICE" is set to EMBEDDED
- Check physical connection to CD38A port on NCU in cabinet
- Ensure port 8193 is not blocked by firewall
Alarm 130197 - Spindle Idling Request:
- This alarm appears during configuration but is normal
- It's a warning, not an error
- Can be safely ignored for MachineMetrics connectivity
Pro 6 Interface vs FANUC Interface:
- Pro 6 interface is a custom overlay
- All FANUC functionality is still present underneath
- Use CNC Screen Display for easier access to FANUC menus
Makino-Specific Notes
Part Counting:
- Some Makino machines use proprietary part counting methods
- Check parameter 6710 for custom M-code (if applicable)
- May need to work with Makino service for part count configuration
Custom Parameters:
- Makino may have custom parameter numbers
- Refer to Makino documentation for machine-specific settings
- Contact Makino support if standard FANUC parameters don't appear
Pro 5 Control
Control Type: FANUC-based (Pro 5)
Special Considerations:
- The Pro 5 is a Makino HMI running on top of a FANUC control
- The FANUC embedded Ethernet port (CD38A) is located on the FANUC NCU, typically in the main electrical cabinet or behind the HMI
- The CD38A port may already be connected to Makino's internal network — check which connection scenario applies before proceeding
Accessing FANUC Configuration on Pro 5
Configuring FOCAS on the Pro 5 requires accessing the native FANUC interface from within the Makino HMI:
- From the Makino HMI, open the FANUC Screen Display application
- Press the SYSTEM hardkey
- Scroll right with the softkeys until you see EMBED PORT or ETHPRM
- Set the static IP address, subnet mask, and gateway
- Set the FOCAS2 TCP port to 8193
This FOCAS configuration flow is the same as the Pro 6. Refer to Pro 6 FOCAS Configuration Steps for detailed screenshots and step-by-step instructions.
CD38A Connection Scenarios
The CD38A port on the FANUC NCU may already be connected to Makino's internal network. Check which scenario applies before connecting:
Scenario 1 — CD38A is available (open)
The simplest path. If the CD38A port is not in use:
- Connect an Ethernet cable directly from CD38A to the customer network (or to the Edge device)
- Follow standard FOCAS configuration (static IP, FOCAS2 port
8193) - Add the machine in MachineMetrics using the FOCAS adapter
Scenario 2 — CD38A in use, NAT 1:1 via existing router
If the CD38A port is already connected to an existing router (such as Makino's internal router):
Do NOT change the FANUC IP address. The router is configured to reach the FANUC control at its current IP. Changing the FANUC IP breaks Makino↔FANUC communication and will take the machine out of service.
- Log into the existing router and configure a NAT 1:1 (one-to-one) mapping that forwards FOCAS traffic from the company-network side to the FANUC control's internal IP
- Connect the Edge device to the company-network side of the router
- In MachineMetrics, use the externally mapped IP address as the FOCAS connection address
- Port
8193must be forwarded through the NAT rule
Scenario 3 — CD38A in use, Edge device 1:1 with internal switch
If the CD38A port feeds an internal switch that connects the FANUC NCU to other Makino peripherals:
Do NOT change the FANUC IP address. Makino peripherals communicate with the FANUC control at its current IP. Changing it breaks Makino↔FANUC communication.
- Connect the Edge device to the machine's internal switch (alongside the existing peripheral devices)
- The Edge bridges the internal machine network to the company network, allowing MachineMetrics to reach the FANUC control over the internal switch
- Ensure the Edge device's internal NIC is configured in the same subnet as the FANUC control
- Add the machine in MachineMetrics using the FOCAS adapter and the FANUC control's existing IP address