FOCAS Part Counting Methods
Part counting is one of the most important FOCAS setup steps, and the right method depends on how the machine's programs end. If counts are already wrong, start with Part Counting troubleshooting.
Part Counting Methods
Accurate part counting is critical for production tracking. FANUC machines support several methods.
Once part counting is configured, use the Connectivity Validation Guide to confirm it is working correctly — including how to identify bad counts on the Timeline before they affect production reporting.
Standard Cycle (M30/M02)
For manually loaded parts with programs ending in M30 or M02:
The machine should count automatically when the program reaches M30 or M02. However, some machine tool builders use custom M-codes.
Step 1: Check Current Configuration
- Press SYSTEM hard key → Parameters
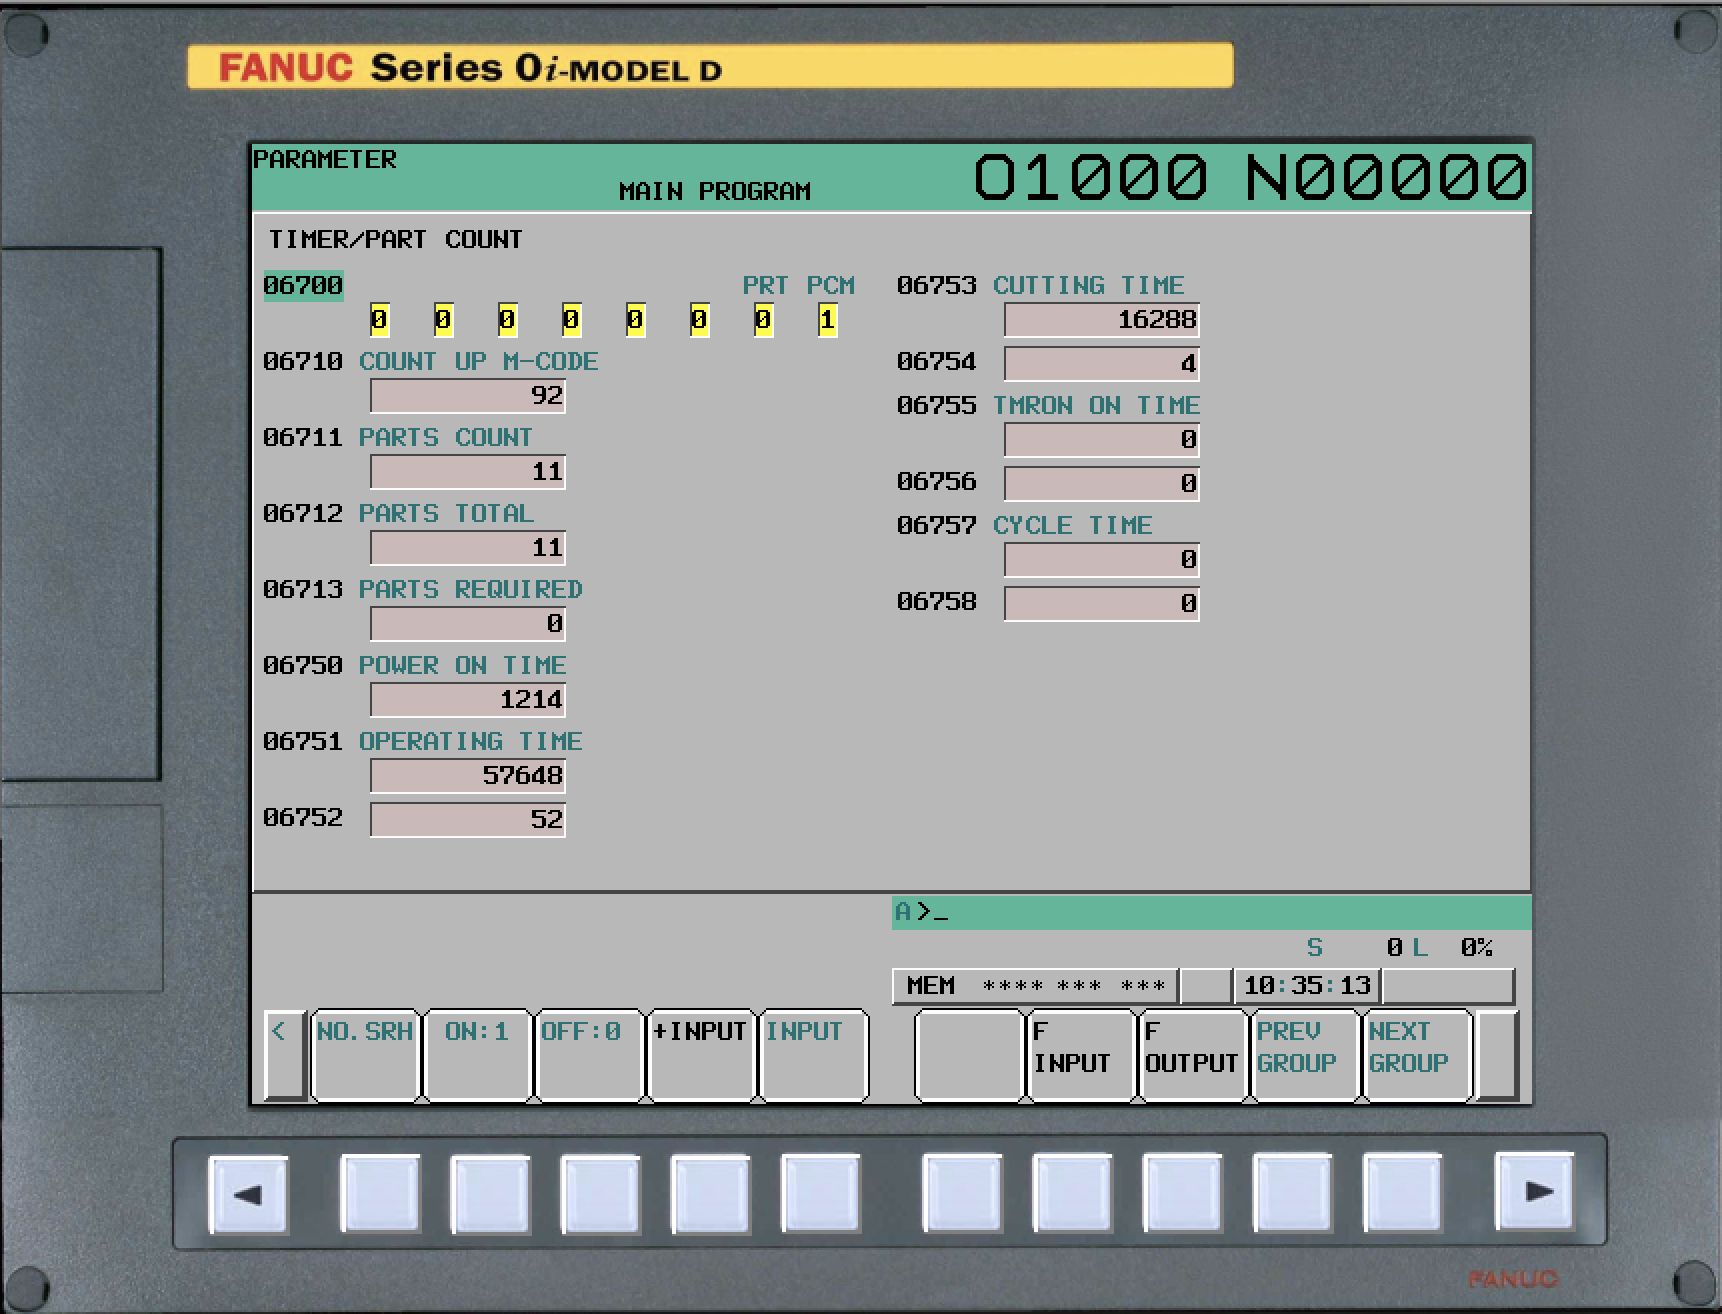
- Navigate to parameter 6700
- Look at bit 0 (PCM - Part Count Method):
- 6700#0 = 0: Count on M02, M30, OR M-code in parameter 6710
- 6700#0 = 1: Count ONLY on M-code in parameter 6710
- Check parameter 6710: Shows which M-code is used to count
Step 2: Choose Configuration
Recommended: Set 6700#0 = 0 (allows M02, M30, or custom M-code)
Step 3: Verify in MachineMetrics
- Configure part count data mapping
- Run test cycle on machine
- Wait 10-30 seconds for data sync
- Check the Timeline and/or Diagnostics view to watch for value changes
- Verify count increments in MachineMetrics
Looping Cycle (M99)
For programs that loop (robot loading, pallet changers, automation):
Programs ending in M99 don't typically reach M30, so they won't count automatically.
Solution 1: Use Machine Tool Builder M-Code
- Add the MTB's custom part count M-code before M99
- Example: If 6710 = 56, add
M56beforeM99
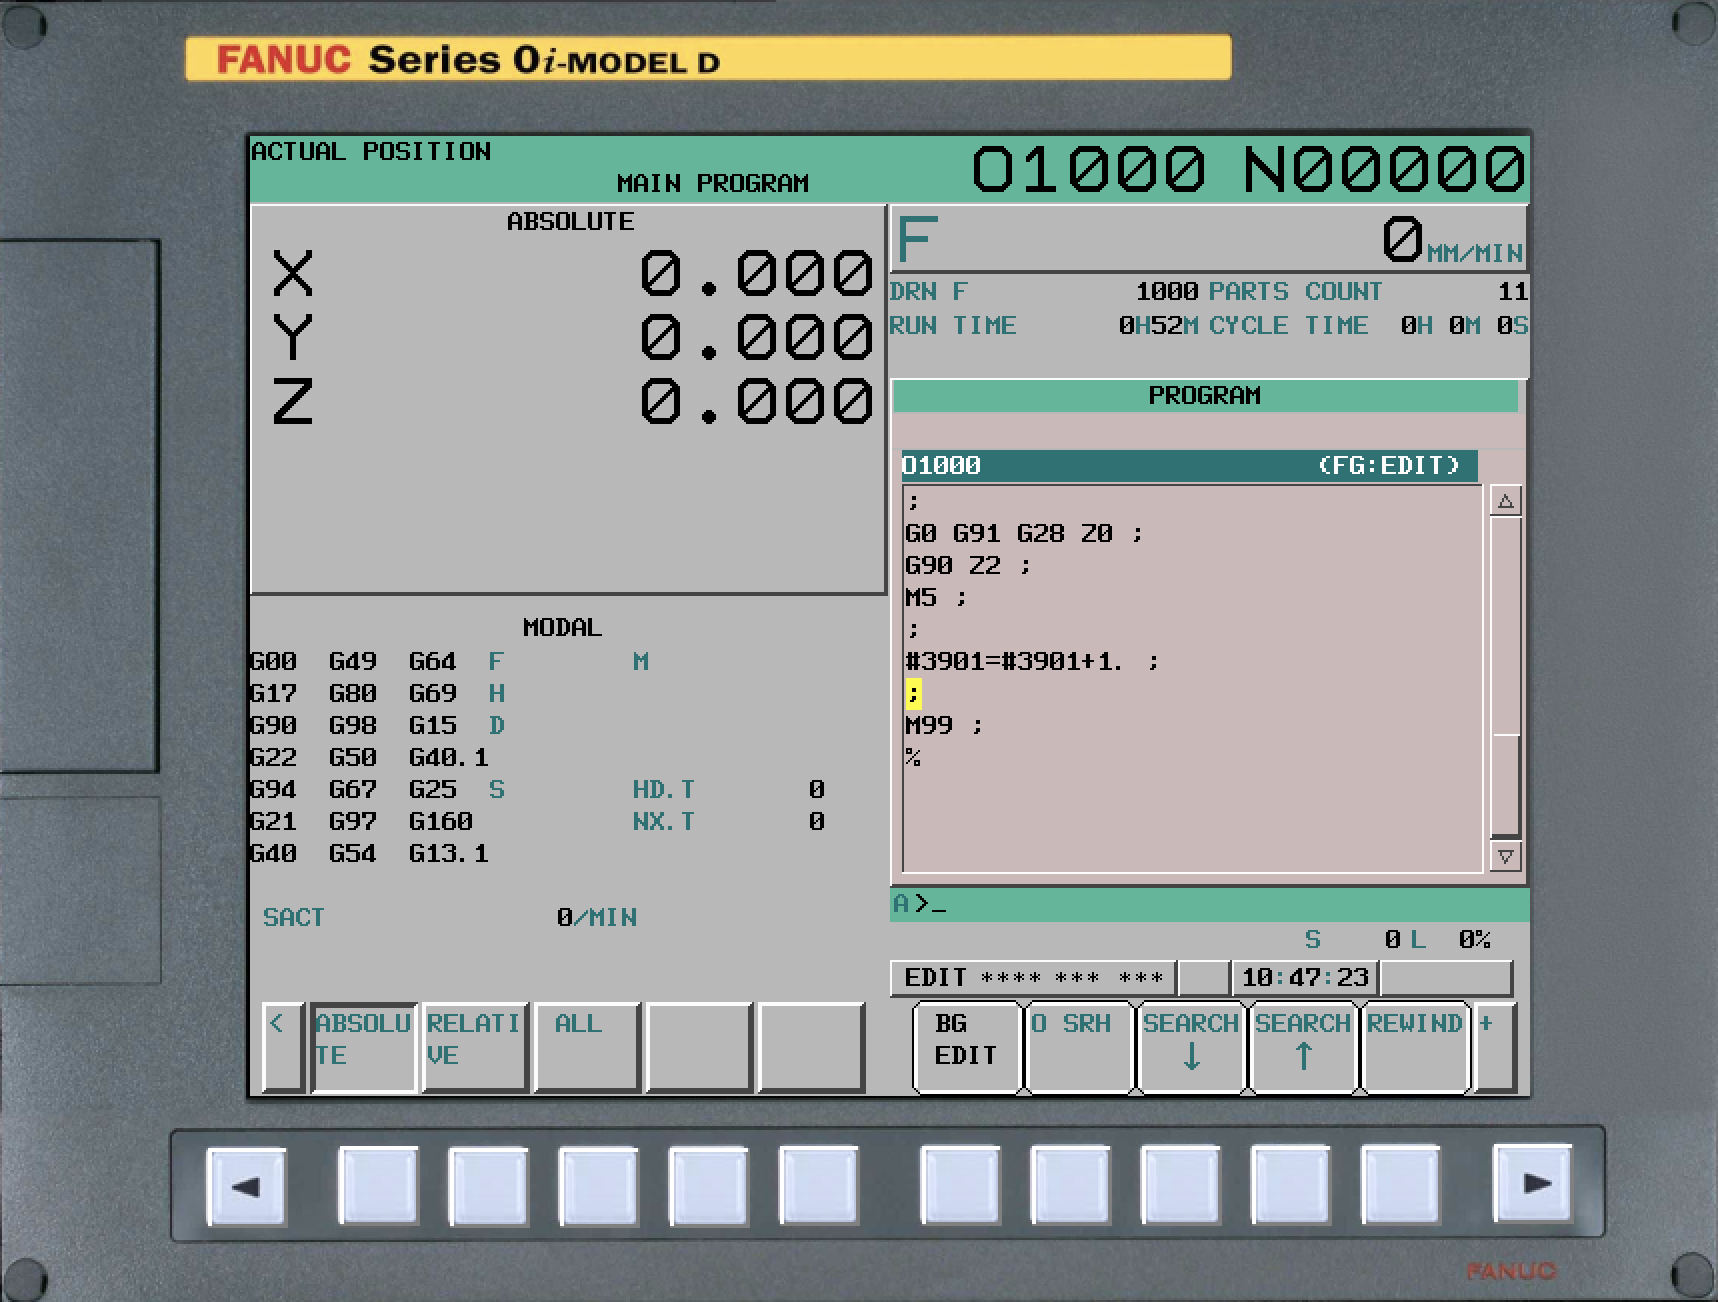
Solution 2: Use Macro Variable #3901
- Add
#3901=#3901+1before M99 - This increments the system part counter
- Requires Macro B option enabled
Where to Add:
... (program code)
M92          (MTB M-code method)
or
#3901=#3901+1   (Macro method)
M99          (loop back)
Here's an example program using the macro increment method on a FANUC Series 0i-MODEL D:
You can verify the increment is working by checking PARAMETER → TIMER/PART COUNT on the control:
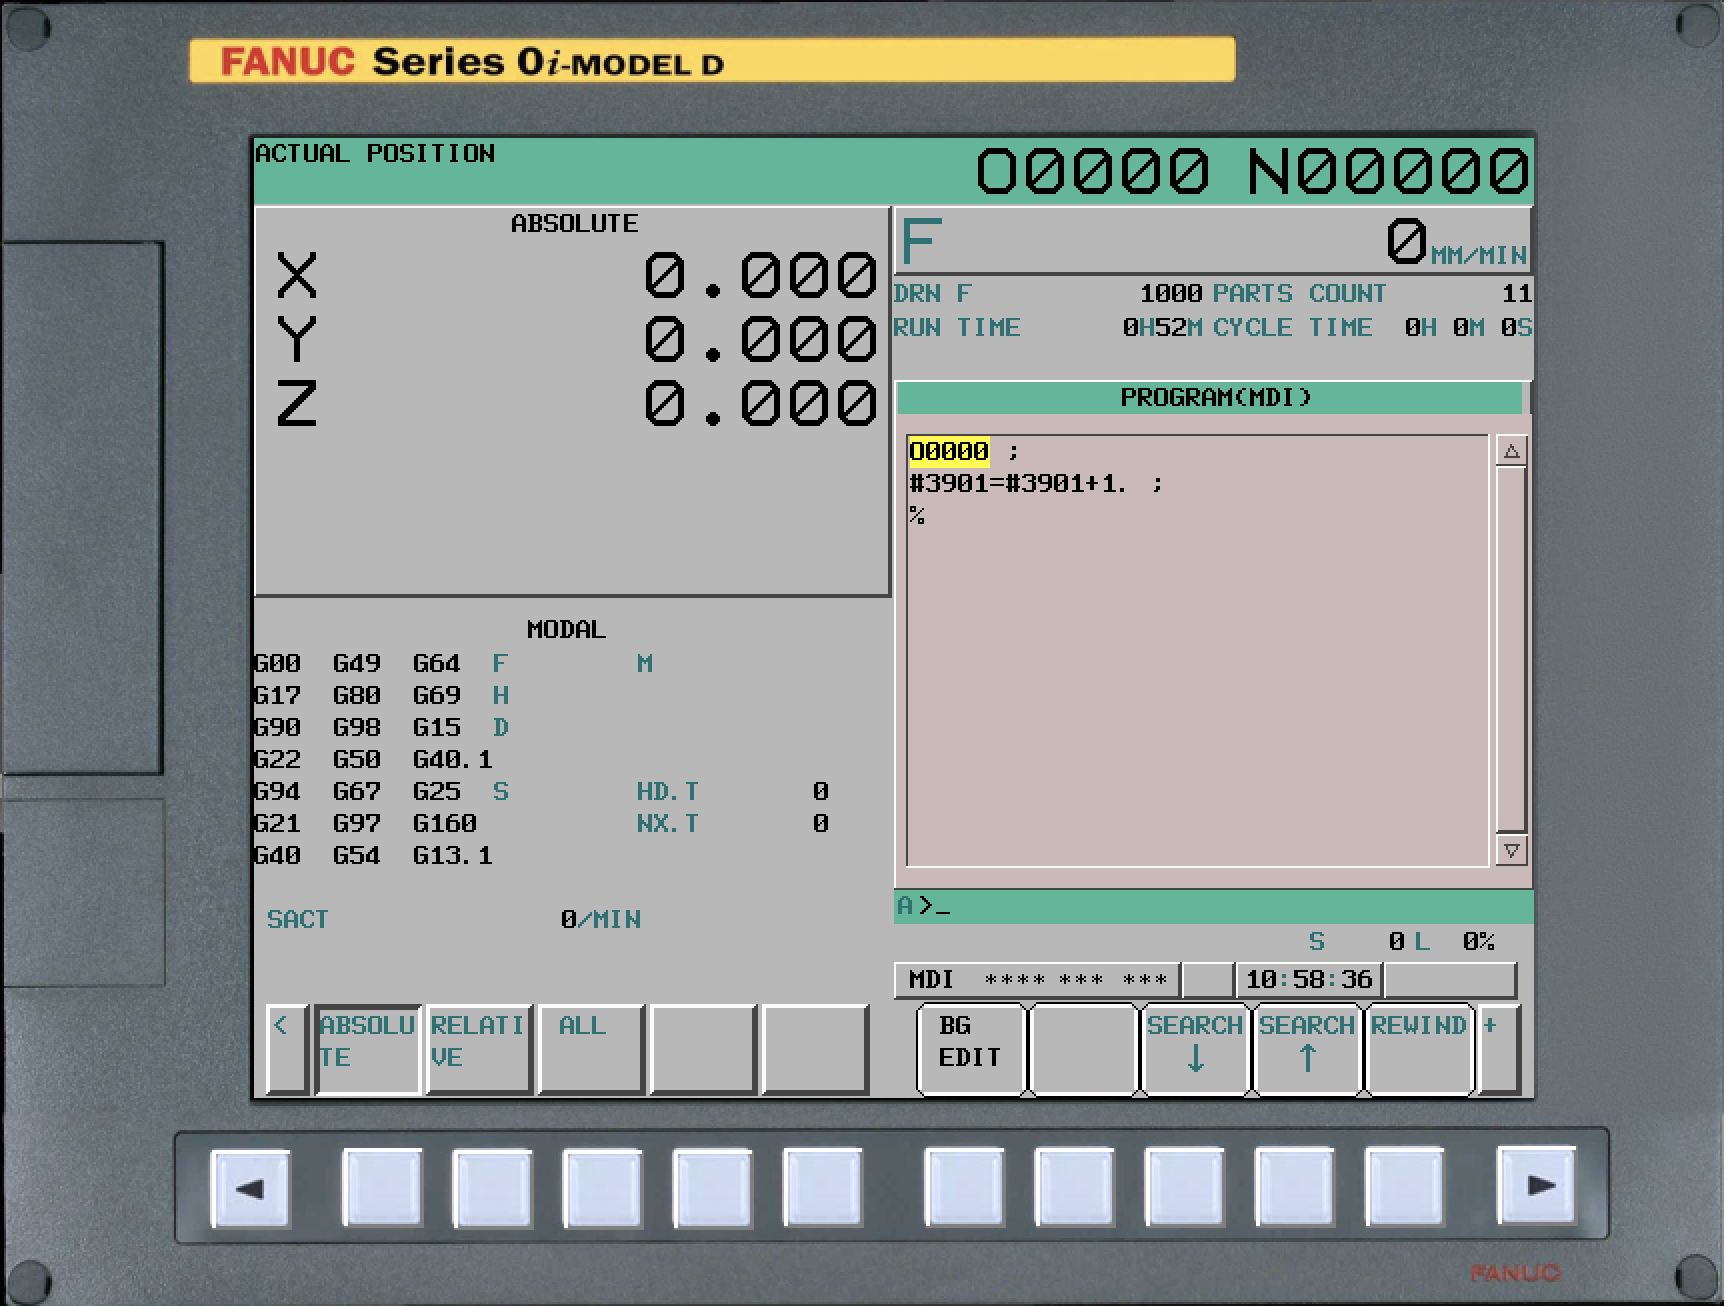
To test without running a full program cycle, use MDI mode and enter the macro increment directly:
Custom M-Code Configuration
To change which M-code counts parts:
⚠️ Warning: Only proceed if you have permission and parameter write access enabled.
Step 1: Enable Parameter Write
Step 2: Modify Parameters
- Press SYSTEM → Parameters
- Navigate to 6700
- Change bit 0 (PCM):
- Set to 0 for M02/M30/Custom
- Set to 1 for Custom only
- Navigate to 6710
- Enter desired M-code number (e.g., 92 for M92)
- Important: Choose an M-code NOT used by machine functions
- Avoid M98 (subprogram call) and M99 (loop)
Step 3: Reboot Machine
- Power cycle for parameter changes to take effect
Step 4: Test
- Put machine in MDI mode
- Set feed/rapid overrides to zero
- Enter part count command (M30, custom M-code, or #3901=#3901+1)
- Press cycle start
- Check that count in parameter 6711 increments
Before Changing: Always check with your machine manufacturer or FANUC to ensure the M-code isn't already in use by another function.
Testing Part Count
Quick Test Procedure:
-
Set Machine to MDI Mode
- Select MDI on mode selector
-
Safety First
- Set feed override to 0%
- Set rapid override to 0%
- This prevents any motion
-
Clear MDI Buffer
- Clear any existing MDI commands
-
Enter Count Command
- Type your count command:
M30(standard)M92(or your custom M-code)#3901=#3901+1(macro method)
- Type your count command:
-
Execute
- Press CYCLE START
-
Verify Count
- Check system part counter (usually displayed on main screen)
- Or check parameter 6711 (stores part count value)
- Count should increment by 1
-
Verify in MachineMetrics
- Wait 10-30 seconds for data sync
- Check the Timeline and/or Diagnostics view to watch for value changes
- Check machine view in MachineMetrics
- Part count should have incremented