Mazak Fusion Client
- Overview
- Applicable Machines
- Mazak Fusion Client Setup
- DPRNT File Output (Enhancement)
- Troubleshooting
- Additional Resources
- Getting Help
Overview
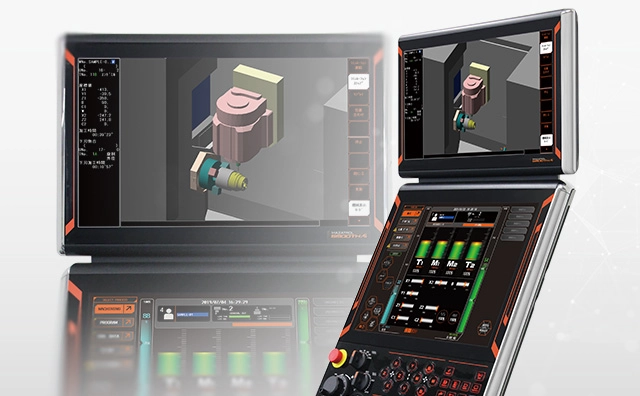
Mazak Mazatrol Smooth control panel. Mazak machines with Windows-based controls (Fusion 640, Matrix, Nexus, Preview 3, Smooth) connect via the Fusion Client application using UDP port 51001.
MachineMetrics connects to Mazak CNC machines using the Mazak Fusion Client, a native connector that integrates directly with Mazak's application running on the Windows portion of the Mazak controller.
Key Features:
- Real-time machine data collection
- Direct communication with Mazak controls
- Automatic data item discovery
- Simplified setup process
- UDP communication on port 51001
Connectivity + Enhancement:
| Method | Purpose | Requires |
|---|---|---|
| Fusion Client | Primary connection — machine status, spindle data, cycle times, alarms | Windows PC on control, network access |
| DPRNT File Output | Enhancement — sends custom program-level data (operation names, job numbers, process values) on top of the Fusion Client connection | Macro B license, DPR14=4 parameter, DPRNT statements in part programs |
DPRNT works alongside Fusion Client (or MTConnect) — it cannot replace it. You still need a primary connectivity method for machine status and production data. DPRNT adds the ability to push custom data from inside your part programs, such as job numbers, operation names, or process values that aren't available through the standard connection.
Applicable Machines
The Mazak Fusion Client works with the following Mazak control types:
Supported Controls:
- Fusion 640 (may require a 16-bit PCMCIA Buffalo card and expansion slot if not present)
- Matrix
- Nexus
- Preview 3
- Smooth
🔴 Warning for Fusion 640: Fusion 640 controls typically run on Windows 98 or Windows 2000 operating systems. Finding compatible drivers for PCMCIA network cards can be very difficult or impossible with these legacy operating systems. Consider upgrading the control or be prepared for troubleshooting driver compatibility issues.
Note: The Preview G, Smooth G, and Smart controls require MTConnect instead of Fusion Client. Please contact Mazak to purchase MTConnect for these controls. See the MTConnect Connectivity Guide for setup instructions.
Mazak Fusion Client Setup
Prerequisites
Before beginning setup, ensure you have:
- Mazak Machine Requirements:
- Mazak Smooth control with Windows PC
- Network connectivity (Ethernet)
- Static or reserved DHCP IP address assigned
- Mazak Fusion Client application installed (or installation files)
- Fusion Client version 2.1 or later. To verify, launch
FusionClient.exeand check the version displayed in the title bar of the application window. If the installed version is older than 2.1, contact MachineMetrics Support for the installer.
- Network Requirements:
- Machine must be accessible from MachineMetrics Edge device
- Edge device must reach machine IP address
- UDP Port 51001 must be allowed through firewall
- Bi-directional communication required
- Access Requirements:
- Admin access to Windows PC on Mazak control
- Ability to install/configure Fusion Client
- MachineMetrics account with Manager or Executive permissions
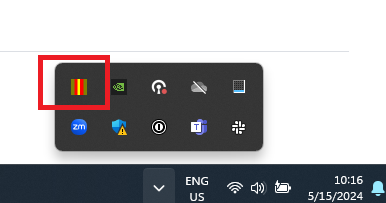
Mazak control Windows desktop showing the system tray. The Fusion Client application icon (highlighted in red) should be visible in the taskbar when the service is running. Access the Windows side of the control to install and configure Fusion Client.
Installing Fusion Client
Step 1: Access MS Windows Menu
The Fusion Client runs on the Windows side of the control, so you first need to reach the Windows taskbar and desktop. How you do this depends on your control type.
Nexus, Fusion, and Matrix controls:
- Using the cursor pad or knob, drive the cursor to the bottom-left corner of the screen, moving it as far as it will go.
- Left-click to bring up the Windows taskbar.
Smooth controls:
- Tap the gear icon in the top-right corner of the screen.
- Select Setup, then Show Windows. If nothing appears, repeat this step — it sometimes takes a second attempt.
- Swipe in from the right side of the screen to reveal the Windows menu.
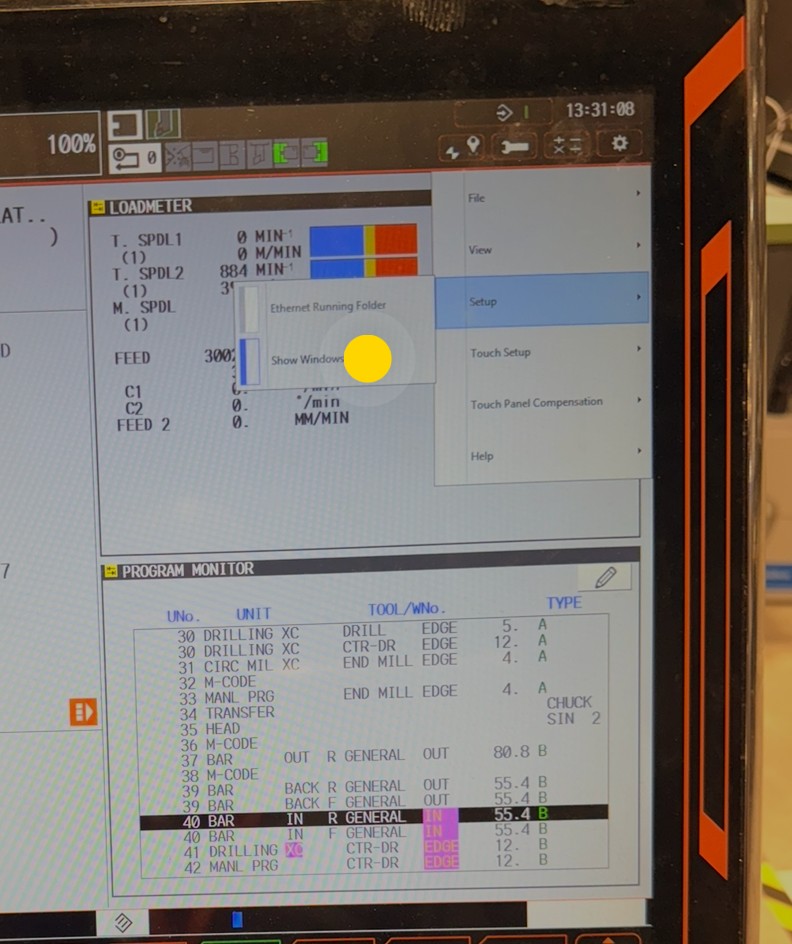
On a Smooth control, tap the gear icon (top-right), then Setup → Show Windows to bring up the Windows taskbar.
Note: When the Fusion Client is running, it appears in the taskbar menu. Repeat the procedure above for your control type whenever you need to bring the taskbar back up to access the application.
Step 2: Launch Fusion Client
- Go to
C:\CPCU\fmcnc - Double-click
Fusion Client.exe - Note: Nothing will appear to happen when you click the icon, but the application will now be running in the Windows system tray
Important: If your machine does not have the
C:\CPCUfolder in Windows Explorer, contact MachineMetrics Support and we can provide it.
Mazak control Windows desktop showing the system tray. The Fusion Client application icon (highlighted in red) should be visible in the taskbar when the service is running.
Step 3: Open Fusion Client Settings
- In the Windows system tray (bottom right), locate the Fusion Client icon
- Double-click the Fusion Client icon in the system tray
- The Fusion Client configuration window will open

CPC Cyber Monitor Satellite (IPC) application showing the Fusion Client configuration interface.
Step 4: Configure Connection Settings
- Click Change Settings

Communications Settings dialog where you'll configure the MachineMetrics Edge connection.
-
Click Add to add a new connection
-
Enter the following information:
- Network Name: Leave blank
- IP Address: Enter the static IP address of the MachineMetrics Edge device (e.g., 192.168.1.50)
- UDP Receive Port: Enter
51001 - Host Compatibility: Select Level 4 from the dropdown
-
Click OK or Apply to save the connection settings
Step 5: Configure Parameter Settings
- In the Fusion Client main menu, go to the Parameter tab
- Deselect the Close Button checkbox
- This prevents the Fusion Client from being accidentally closed
- Click OK or Apply
Step 6: Configure Firewall (If Enabled)
If the firewall is enabled on the Mazak CNC:
Option A: Disable Firewall (If Not Required)
- If you do not need the firewall enabled, disable it completely
Option B: Add Port Exception
- If the firewall must remain enabled, add a port exception for UDP port 51001
- Navigate to Windows Firewall settings
- Add inbound and outbound rules for UDP port 51001
Configuring the Connection
Step 1: Verify Network Connectivity
-
From MachineMetrics Edge device, ping the machine:
ping [MAZAK-IP-ADDRESS] -
Verify successful response
-
Test port connectivity if ping succeeds
Step 2: Note Required Information
Document the following:
- Machine IP Address: (e.g., 192.168.1.50)
- Fusion Client Port: UDP 51001 (standard for Mazak Fusion)
- Machine Name: For identification in MachineMetrics
- Machine Serial Number: (optional but recommended)
- Control Type: (Fusion 640, Matrix, Nexus, Preview 3, or Smooth)
Adding Machine in MachineMetrics
Step 1: Navigate to Machines
- Log into MachineMetrics at app.machinemetrics.com
- Click Assets → Machines
- Click Add Machine button
Step 2: Enter Machine Information
- Machine Name: Enter descriptive name (e.g., "Mazak-Integrex-01")
- Machine Type: Select appropriate type (Mill, Lathe, Multi-Axis, etc.)
- Machine Make: Mazak
- Machine Model: (e.g., Integrex, Quick Turn, Vertical Center)
- Serial Number: Enter if available
- Click Next or Continue
Step 3: Select Mazak Fusion as Connection Type
- In Data Collection Method dropdown, select Mazak Fusion Client
- Enter IP Address: [MAZAK-IP-ADDRESS]
- Click Save
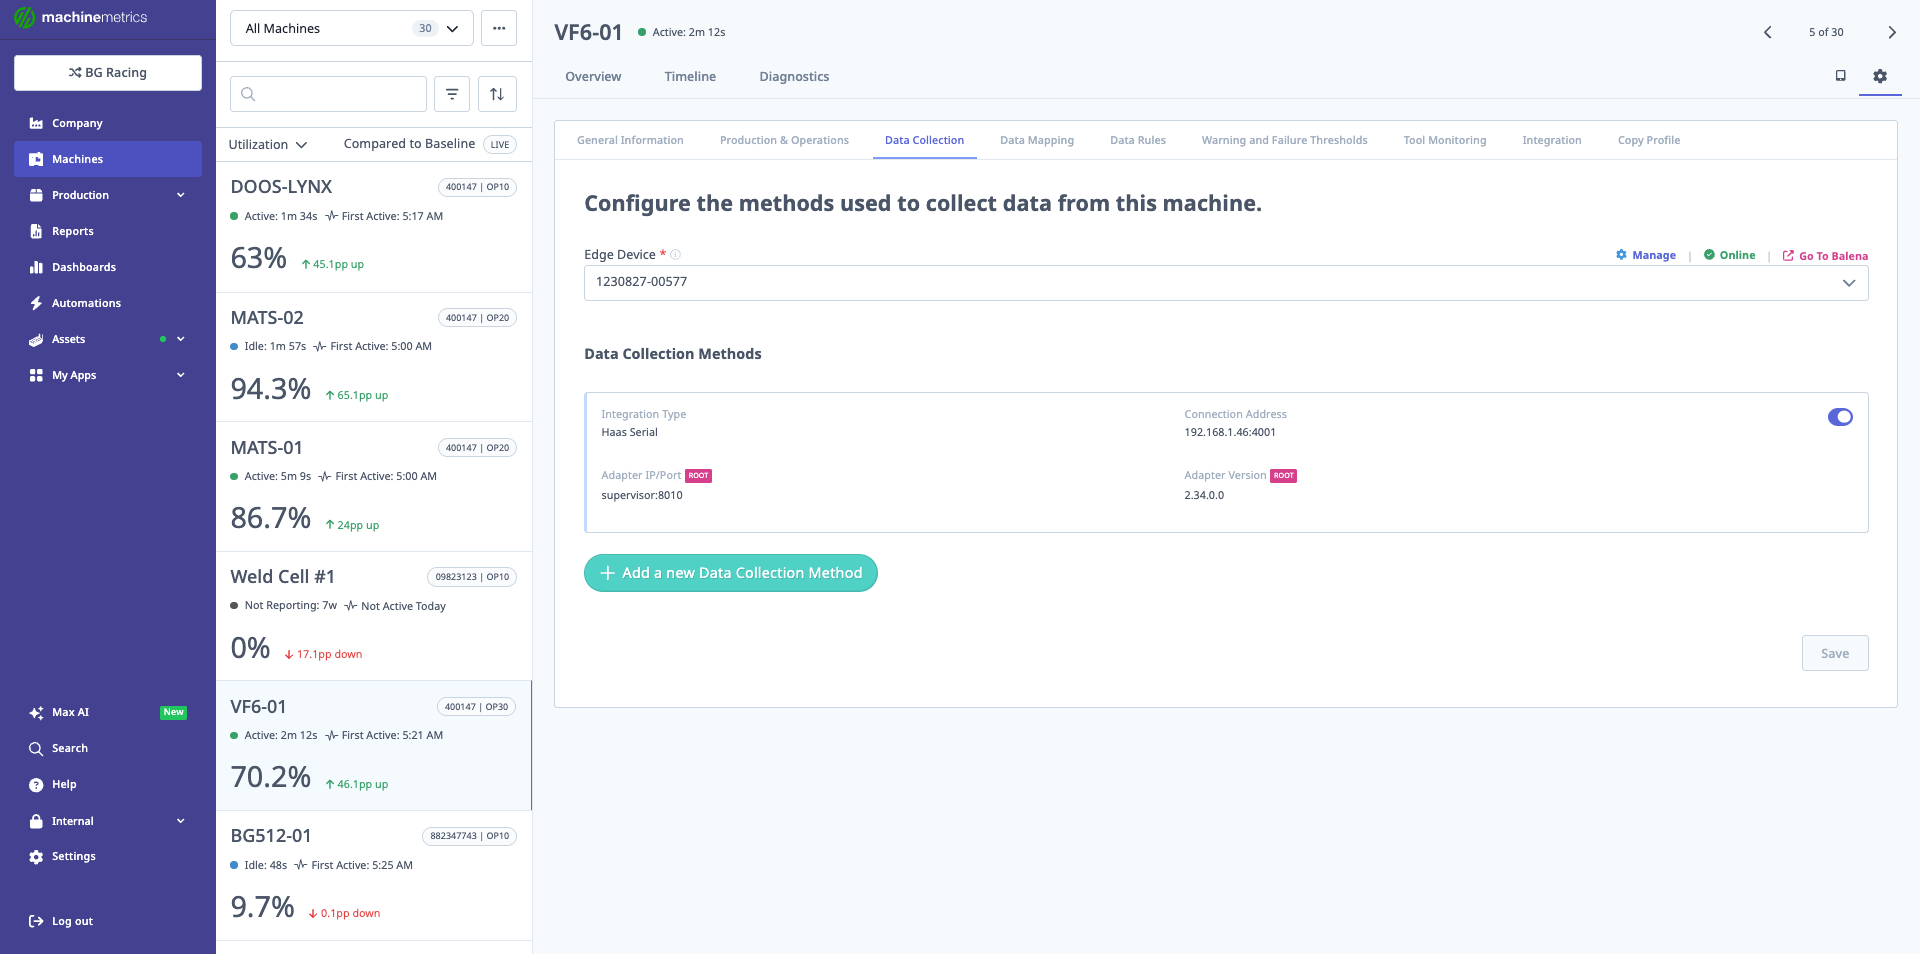
Data Collection tab showing configured adapter. For Mazak Fusion Client, you'll see the connection listed with the IP address and port. The adapter version and status are displayed, showing when the connection was last successful.
Step 4: Verify Data Collection
- After saving, machine should appear in machines list
- Status should show Reporting (green) within 1-2 minutes
- Click machine name to view machine page
- Navigate to Diagnostics tab
- Verify data items are populating
Part Counting Setup
Mazak machines offer multiple methods for part counting depending on your control type and requirements. This section covers how to configure part counting in MachineMetrics.
Once part counting is configured, use the Connectivity Validation Guide to confirm it is working correctly — including how to identify bad counts on the Timeline before they affect production reporting.
Understanding Mazak Part Counting
Mazak controls track part counts in two primary locations:
- COUNTER (MODAL) - Displayed on the main machine status screen
- PARTS COUNTER - Accessible via the work number menu system
Both counters can be used for MachineMetrics part counting depending on your preference and control configuration.
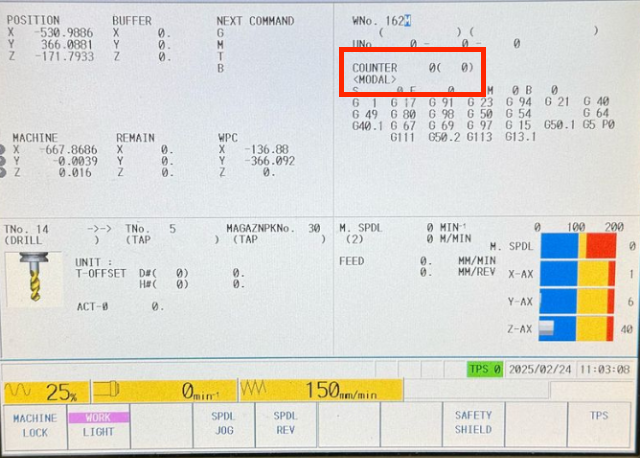 Mazak status screen showing the COUNTER (MODAL) value highlighted in red. This counter increments with each completed cycle and is commonly used for part counting.
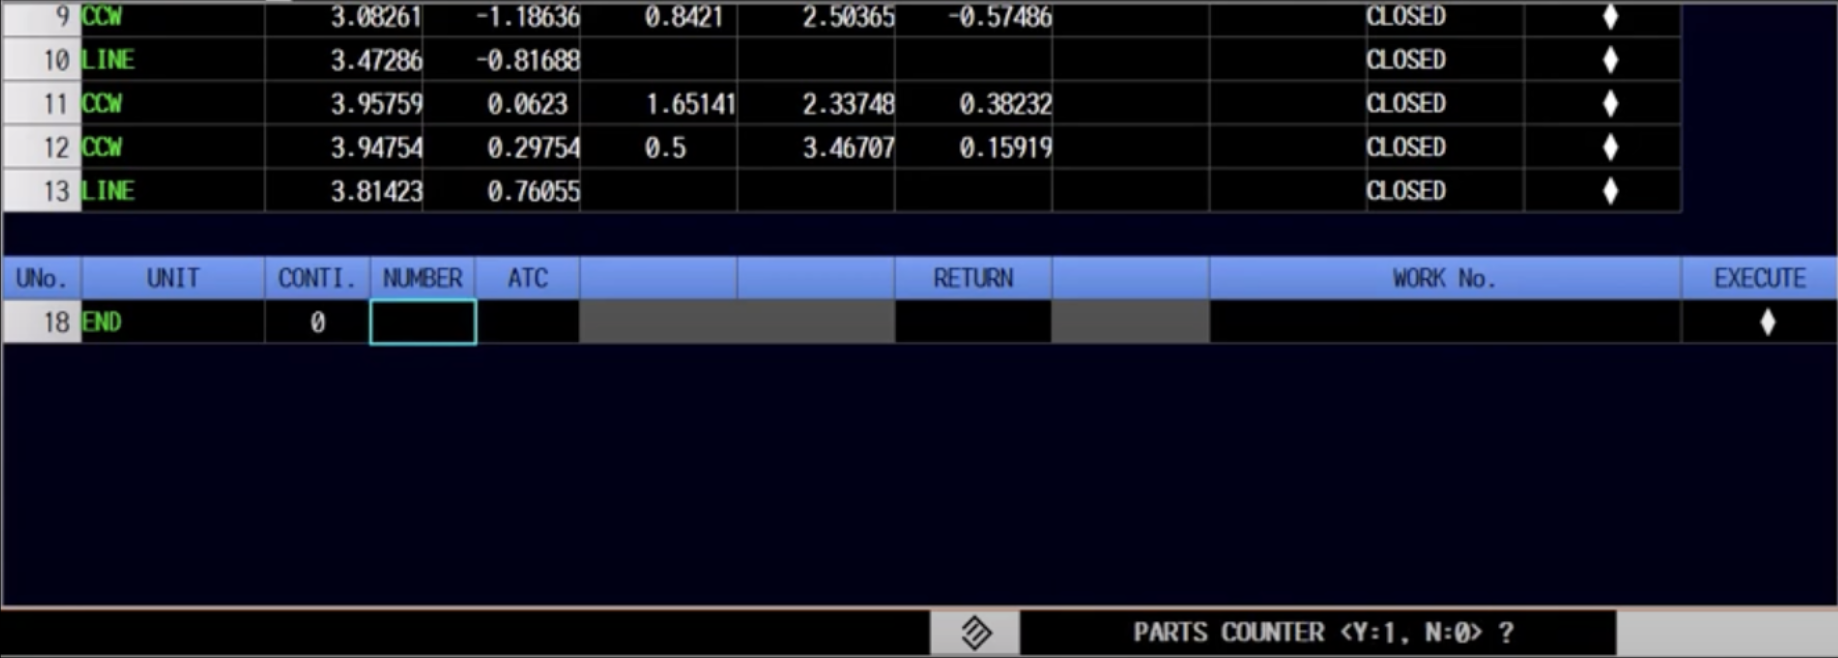 Mazak work number screen showing the PARTS COUNTER interface. The CONT. (continuous) and NUMBER columns track part counts. This menu is accessed via the work number system.
Configuring Your Machine to Count Parts
MachineMetrics reads the Mazak part counter, but the machine must be configured to increment it. The method depends on which programming mode you are using.
Mazatrol Mode
In the END command at the end of your Mazatrol program, there is a parameter to enable part counting. Ensure this parameter is set so that the machine increments the counter on each cycle completion.
EIA/ISO Mode
The Mazak part counter is stored in macro variable #3901. This variable does not increment automatically — you must add the following line to the end of each program, immediately before the M30:
#3901=#3901+1
Without this line, the part counter will not increment and MachineMetrics will be unable to detect completed parts.
Part Counting Options
Mazak Fusion Client provides several part counting options:
Option 1: Default Part Counting (Recommended)
- Uses the machine's native counter
- Automatically increments based on cycle completion
- No additional configuration required
- Works with most Mazak controls
Option 2: Counter Modal
- Uses the COUNTER value displayed on the machine status screen
- Visible during machine operation
- Commonly used for production tracking
- Good for operators to verify counts
Option 3: Parts Counter (Work Number Menu)
- Uses the dedicated parts counter in the work number system
- May provide more detailed counting options
- Requires accessing specific menu on control
- Can track multiple part types
Configuring Part Counting in MachineMetrics
Step 1: Verify Part Count Data Item
- Go to machine Settings → Data Mapping tab
- Search for part count related data items:
PartCountorpart_countCounterorcounter_modalTotalPartsortotal_partsGoodPartsorgood_parts
- Verify the data item is mapped correctly
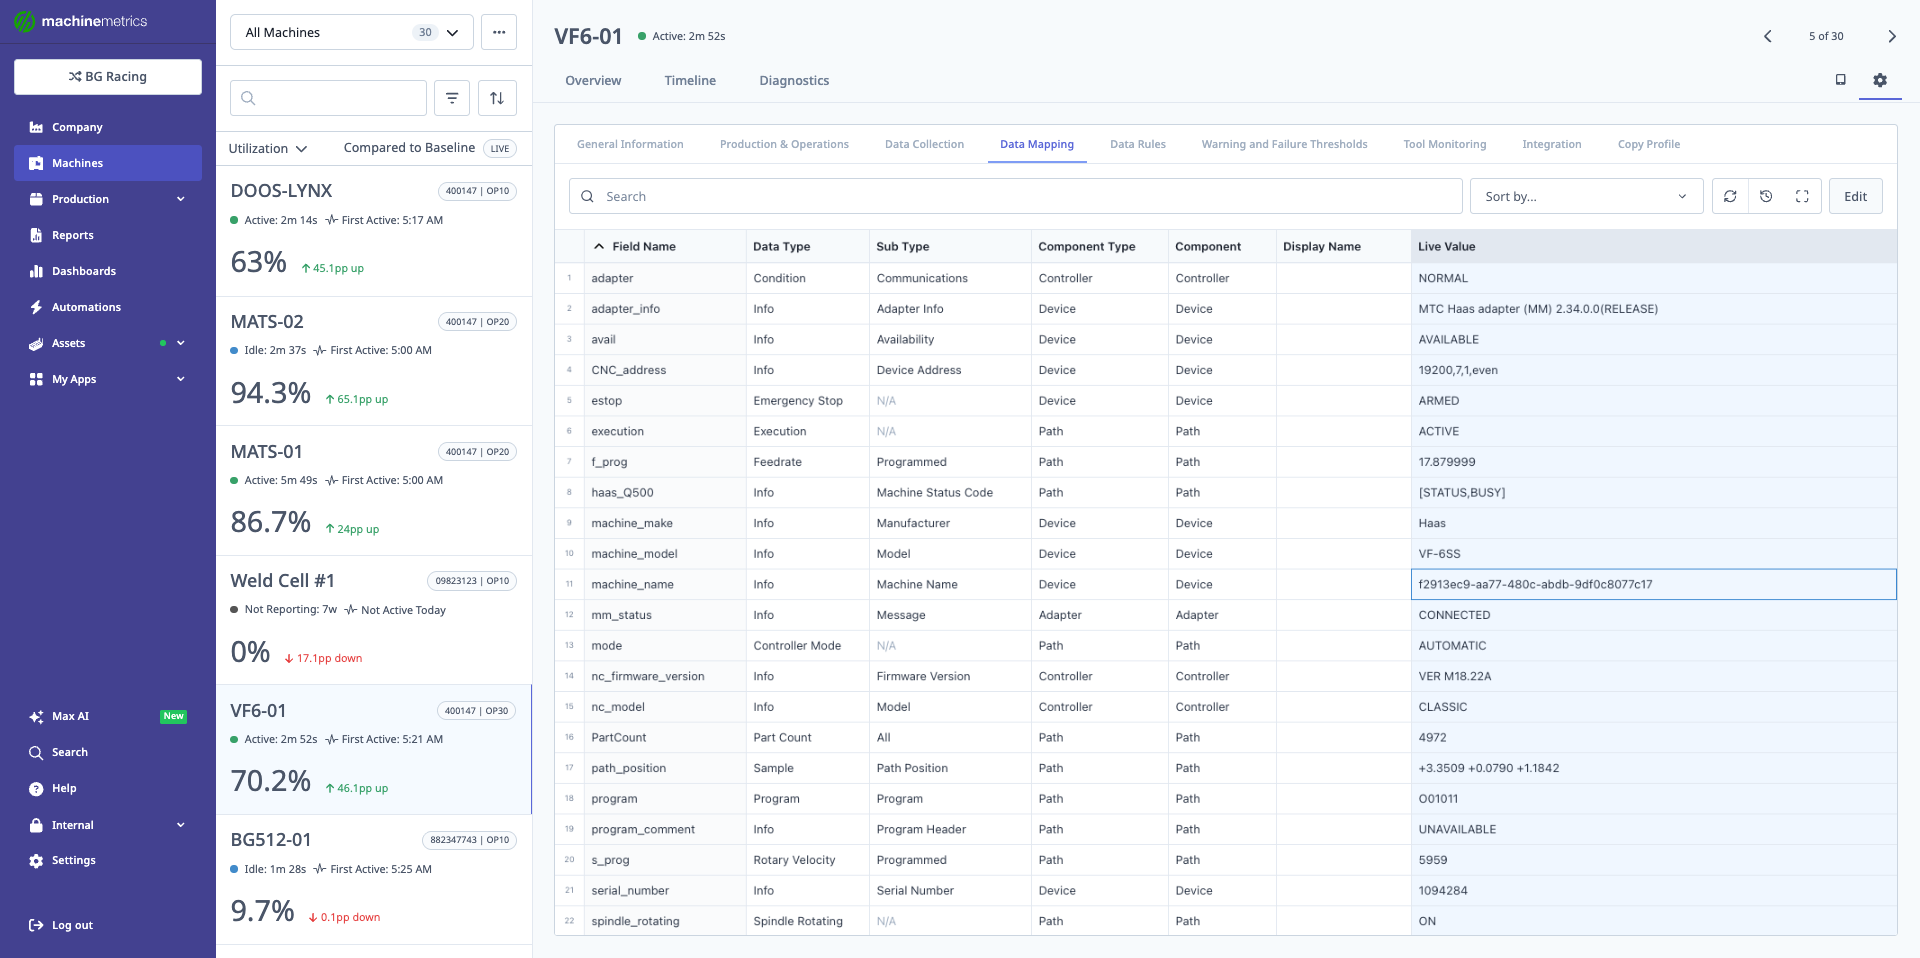
Data Mapping tab displays all data items collected from the Mazak machine. Search for part count-related data items and verify they are properly mapped with correct data types (EVENT or SAMPLE) and component types. The live values column shows current readings from the machine.
Step 2: Configure Part Count in Data Rules
- Navigate to Settings → Data Rules tab
- Under Part Count Metric, select the appropriate data item from dropdown:
- PartCount: Standard cumulative counter
- Counter: Modal counter from status screen
- GoodParts: Only counts good/accepted parts
- Configure reset behavior (optional):
- Reset on Program Change: Counter resets when new program loads
- Reset on Shift Change: Counter resets at shift boundaries
- Never Reset: Cumulative counter
- Click Save
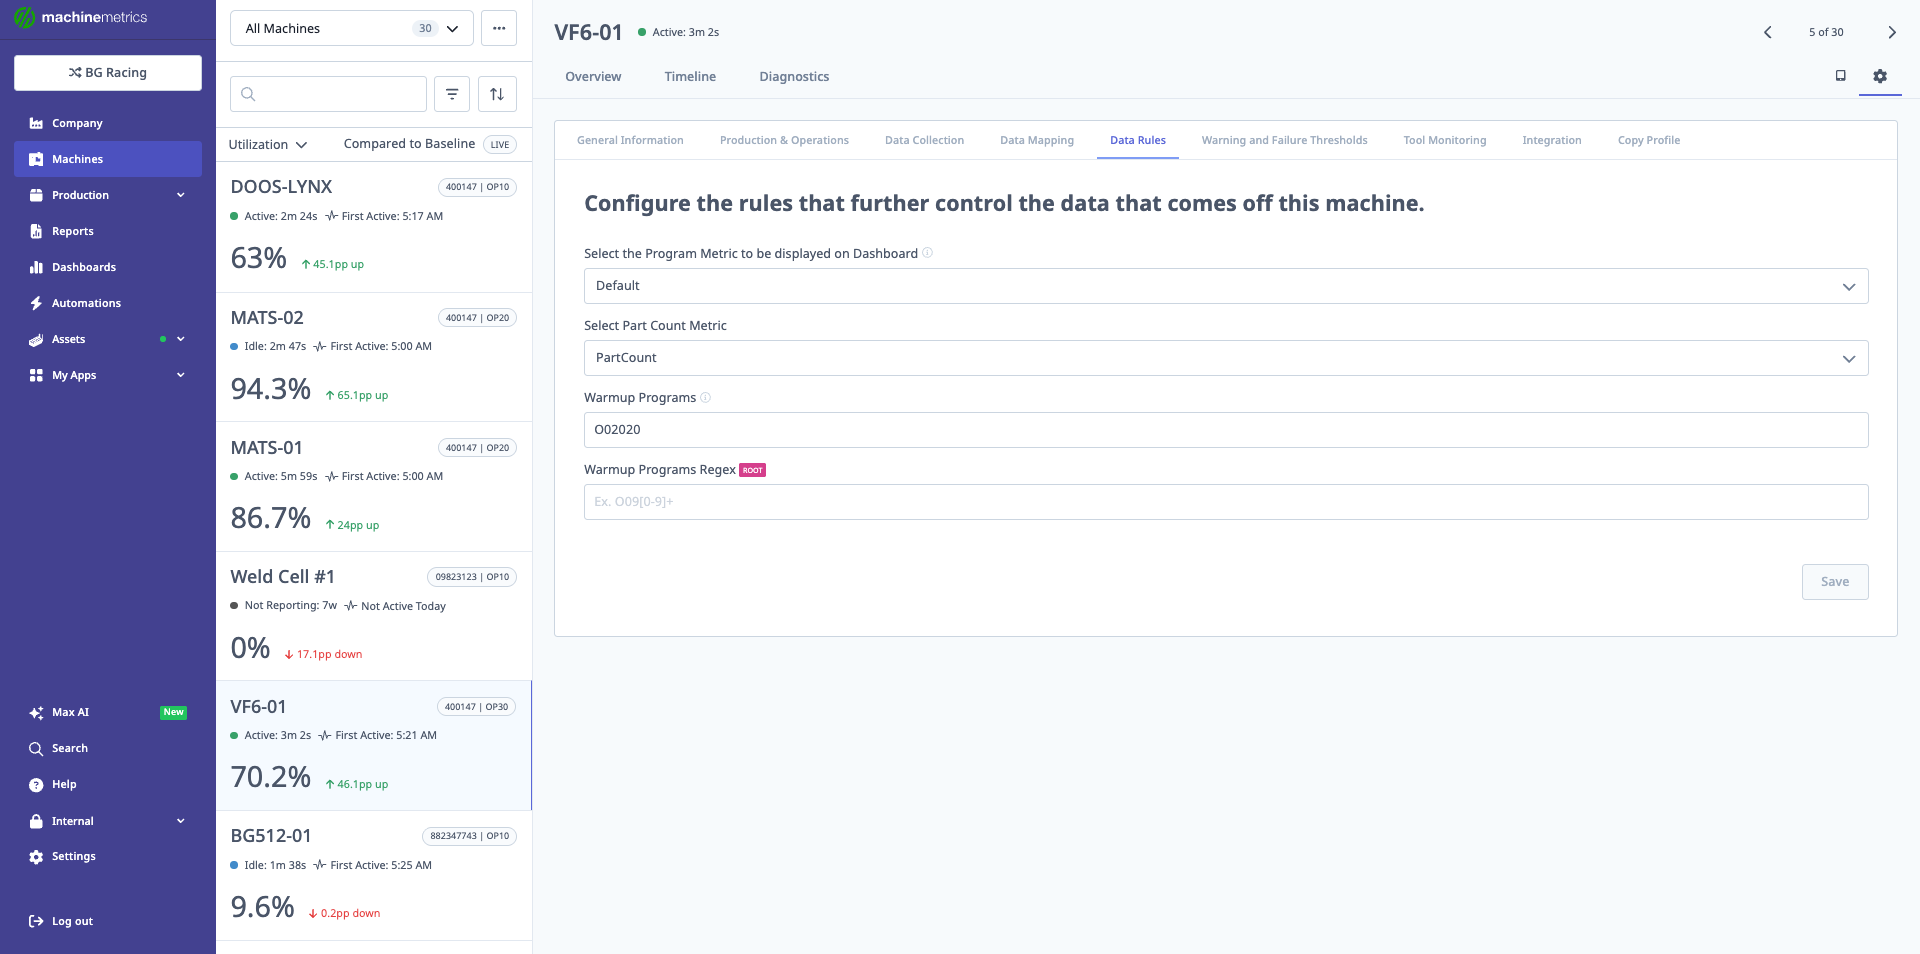
Data Rules tab where you configure which metrics are displayed on dashboards. Select the Part Count Metric from the dropdown to specify which data item should be used for part counting.
Step 3: Test Part Counting
- Run a test part on the machine
- Watch the counter on the Mazak control increment
- In MachineMetrics, navigate to machine page
- Click Parts tab
- Verify part count increments after cycle completes
- Check Timeline view for real-time part count updates
- Verify part appears in production runs with correct timestamp
Step 4: Verify Part Counter Accuracy
Compare the counts:
- Note the counter value on the Mazak control (COUNTER or PARTS COUNTER)
- Check the part count in MachineMetrics
- Ensure values match
- If there's a discrepancy, check Data Mapping configuration
Troubleshooting Part Counting
Problem: Parts Not Counting
Possible causes:
- Part count data item not mapped correctly
- Counter not incrementing on machine
- Data Rules not configured
- Machine cycle not completing properly
Solutions:
- Verify counter increments on the Mazak control itself
- Check Data Mapping for part count data item
- Ensure Data Rules has Part Count Metric selected
- Review machine cycle completion (check for alarms/interruptions)
- Verify the Fusion Client is receiving counter data
Problem: Part Count Incorrect or Off by Several Parts
Possible causes:
- Counter reset on machine but not in MachineMetrics
- Multiple part counters being tracked
- Manual counter adjustments on control
Solutions:
- Reset part counter in MachineMetrics to match machine
- Verify you're using the correct counter (COUNTER vs PARTS COUNTER)
- Check if operator is manually adjusting counter on control
- Consider using "good parts" counter if available
Problem: Part Counter Resets Unexpectedly
Possible causes:
- Data Rules configured to reset on program change
- Machine counter reset by operator
- Shift change reset enabled
Solutions:
- Check Data Rules reset behavior settings
- Change reset behavior to "Never Reset" if cumulative count needed
- Train operators not to reset counter during production
- Use MachineMetrics counter rather than machine counter for reporting
Resetting Part Counter
On the Machine:
- Access the work number menu or counter display
- Find the counter reset function (varies by control)
- Reset the counter to zero or desired value
- MachineMetrics will sync within 1-2 minutes
In MachineMetrics:
- Navigate to machine Parts tab
- Click Reset Counter (if available)
- Or manually adjust in Data Rules if needed
- Changes take effect immediately
Best Practice:
- Reset counters at the start of each shift for shift-based tracking
- Or maintain cumulative counters for total production metrics
- Document reset procedures for operators
DPRNT File Output (Enhancement)
How DPRNT Works
Mazak CNC machines (Mazatrol Matrix, Smooth, and Fusion controls) support a macro command called DPRNT that allows part programs to write text data to an output destination. When parameter DPR14 is set to 4, this output is written to a fixed text file on the machine's Windows PC:
C:\MC_sdg\print\print.txt
The MachineMetrics DPRNT Reader service on the Edge device monitors this file and ingests the data — no serial cable or RS-232 connection is required.
Macro B Required: DPRNT requires the Macro B (Custom Macro) option to be licensed on the control. If typing
POPENin the program editor results in the letters appearing spaced apart (e.g.,P O P E N), the control does not recognize the command and Macro B is not active — contact Mazak to enable it.
Three macro commands control the DPRNT flow:
| Command | Purpose |
|---|---|
POPEN | Opens the output file for writing |
DPRNT[...] | Writes a line of text or formatted variable data |
PCLOS | Closes the output file |
Each time POPEN is called, the file is overwritten (not appended). The MachineMetrics DPRNT Reader detects the change and reads the latest content.
Parameter Configuration
On the control, navigate to: PARAMETER → USER PARAM → I/O Settings
Required setting:
| Parameter | Value | Description |
|---|---|---|
| DPR14 | 4 | Redirects DPRNT output to C:\MC_sdg\print\print.txt instead of a COM port |
DPR14 values for reference:
0/1= COM2,2= COM3,3= COM4,4= local file ← use this
Supporting parameters (verify these):
| Parameter | Recommended | Description |
|---|---|---|
| DPR9 | 0 | Handshaking — set to None for file output |
| DPR16 | 0 | DPRNT port selection — must be 0 when using file output |
Tip: After setting DPR14=4, confirm
C:\MC_sdg\print\exists on the control PC. If the folder is missing, create it manually before running a DPRNT program.
CNC Program Syntax
Minimal test program:
O0100 (DPRNT TEST)
POPEN
DPRNT[HELLO*MACHINEMETRICS]
PCLOS
M30
The
*character outputs as a space in the text file.
Outputting variable data — use format #VAR[WD] where W = digits before decimal, D = digits after:
O0101 (DPRNT WITH VARIABLES)
POPEN
DPRNT[PART*COUNT*#3901[30]]         (Part count, 3 digits, 0 decimal)
DPRNT[DATE*#3011[80]]               (Date YYYYMMDD, 8 digits)
DPRNT[TIME*#3012[60]]               (Time HHMMSS, 6 digits)
DPRNT[SPINDLE*LOAD*#189[40]]        (Spindle load %, 4 digits)
DPRNT[X*POS*#5001[54]]              (X position, 5 digits, 4 decimal)
PCLOS
M30
Practical end-of-cycle example:
O0200 (CYCLE DATA OUTPUT)
POPEN
DPRNT[PROGRAM*START]
DPRNT[SPINDLE*LOAD*#189[40]]
DPRNT[FEED*OVERRIDE*#13[30]]
DPRNT[CYCLE*COMPLETE]
PCLOS
M30
Coordinate with MachineMetrics Support to ensure the field labels in your programs match the DPRNT Reader configuration on the Edge device.
Common System Variables
| Variable | Description |
|---|---|
#3001 | Millisecond timer |
#3002 | Hour timer |
#3011 | Date (YYYYMMDD) |
#3012 | Time (HHMMSS) |
#3901 | Part count |
#5001–#5003 | Current X/Y/Z machine position |
#189 | Spindle load % |
#4120 | Tool number in spindle |
#13 | Feed override % |
DPRNT Troubleshooting
| Symptom | Likely Cause | Fix |
|---|---|---|
| Machine stops/waits during DPRNT | DPR14 not set to 4, trying to use serial port | Set DPR14 = 4 |
| 887 TAPE I/O ERROR alarm | Serial port conflict | Confirm DPR14 = 4 and DPR16 = 0 |
| File exists but is empty | PCLOS not reached (program alarmed mid-run) | Check for alarms before PCLOS; add error handling |
| File not created at all | Output directory missing | Manually create C:\MC_sdg\print\ on the control PC |
| Variables output as zeros | Wrong variable number for this control | Cross-reference variable list in Mazak programming manual |
| Letters spaced out (P O P E N) | Macro B option not licensed | Contact Mazak — Macro B must be enabled |
Troubleshooting
Mazak Fusion Client Issues
Problem: Settings appear correct but machine is not reporting
An outdated Fusion Client version produces no error, no data, and no indication of what is wrong. Check the version before investigating network or firewall issues.
Verify Fusion Client is running version 2.1 or later. An outdated version transmits in a format the Edge cannot parse — the settings will appear correct and the UDP port will be open, but no data will flow.
To check the version:
- Navigate to
C:\CPCU\fmcnc - Launch
FusionClient.exe - Note the version displayed in the application title bar
If the version is older than 2.1, contact MachineMetrics Support for the installer and replace the existing executable before reconfiguring.
Problem: Connection Failed
Possible causes:
- Fusion Client not running on Mazak control
- Incorrect IP address or port
- Firewall blocking connection
- Network connectivity issue
Solutions:
- Verify Fusion Client is running on Mazak Windows PC
- Check Task Manager for Fusion Client process
- Restart Fusion Client service
- Ping machine IP from Edge device
- Verify UDP port 51001 is allowed through firewall (both directions)
- Check Windows Firewall on Mazak control
- Verify network switch/router allows UDP traffic
- Check Fusion Client logs for errors
Firewall Configuration:
- Protocol: UDP
- Port: 51001
- Direction: Bi-directional (both inbound and outbound)
- Source: MachineMetrics Edge device IP
- Destination: Mazak machine IP
Problem: Machine Shows "Not Reporting"
Possible causes:
- Network interruption
- Fusion Client crashed
- Machine control restarted
Solutions:
- Check network connectivity
- Restart Fusion Client application
- Restart machine control's Windows PC
- Verify IP address hasn't changed (use static IP)
- Check MachineMetrics Edge device connectivity
Problem: Missing Data Items
Possible causes:
- Fusion Client not configured to share all data
- Data items not available on this control
- Incorrect data mapping
Solutions:
- Check Fusion Client configuration for data item visibility
- Review Mazak control capabilities
- Verify data mapping in MachineMetrics settings
- Contact MachineMetrics support for data item availability
Additional Resources
MachineMetrics Resources:
- Machine Settings Guide - Configure machine settings
- Connectivity Overview - Compare connectivity methods
- MTConnect Guide - Alternative MTConnect setup
- Transform Adapter Scripts - Advanced data transformation
Mazak Resources:
- Mazak Fusion Client documentation (contact Mazak)
- Mazak control programming manual
- Mazak system variables reference
- Mazak networking and communication manual
Networking Resources:
- Network Requirements - Firewall and port configuration
- Edge Device Setup - Configure MachineMetrics Edge
Getting Help
MachineMetrics Support:
- Email: support@machinemetrics.com
- Phone: 844-822-0664
Before Contacting Support:
- Note the Mazak control type and model
- Document any error messages
- Capture screenshots of configuration screens
- Check machine and Edge device connectivity
- Review adapter logs if available
Information to Provide:
- Machine make, model, and control type
- Connection method (Fusion Client)
- IP address and port configuration
- Description of issue and when it started
- Any recent changes to machine or network
- Screenshots of error messages or configurations