How to Use ShopPulse on MES-Enabled Machines
Overview
This guide shows operators how to use ShopPulse to manage jobs and submit labor tickets on MES-enabled machines. ShopPulse displays a real-time job queue — including jobs matched automatically by APM, jobs added manually, and the current state of each. Operators use ShopPulse to confirm job matches, correct them when needed, and submit labor tickets when jobs are complete.
⚠️ ERP Driven machines: If your machine's "Manage jobs in" setting is ERP Driven, job management and labor ticket submission happen in the ERP — not in ShopPulse. ShopPulse reflects the current job state in read-only mode; operators do not interact with the job queue or submit labor tickets from ShopPulse. The remaining content in this article applies to machines managed in ShopPulse.
For sign-in and general ShopPulse navigation, see Getting Started with ShopPulse.
Feature Availability
| Requirement | Details |
|---|---|
| Setup Required | The machine's ShopPulse device must be authorized by an account Manager or Executive. Operators log in using profiles configured in Settings → Operators. |
| MES Package | Must be active on the account, and MES must be enabled on your individual machine (your administrator handles this when enabling MES on the machine). If the job queue is not visible in ShopPulse, contact your administrator. |
How It Works
Total Jobs — selecting this tab displays the job queue: all jobs on the machine, their match states, and the actions available to manage them. This is the primary MES workflow view and what this article covers.
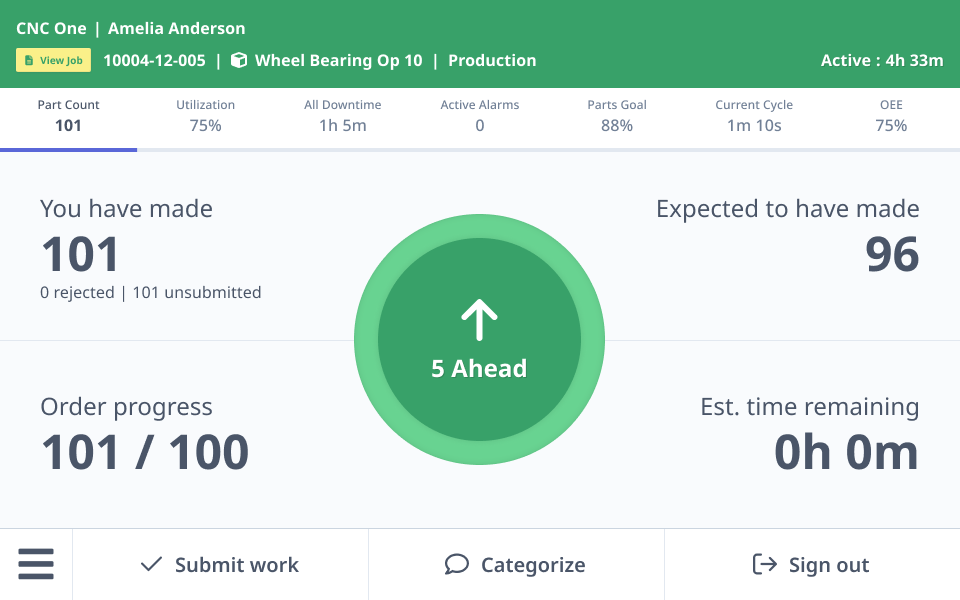
Part Count — always available as an alternative when operators want a focused view of the currently active job. Shows parts made, expected parts, order progress, estimated time remaining, and a Parts Goal visualization indicating whether you're ahead or behind pace. Updates automatically as jobs change.
The Job Queue
The job queue displays all jobs on the machine. Each job card shows:
- The job and work order operation
- The current match state (see below)
- Parts count and burden time
- Available actions based on the current state
Match States
Match states appear on job cards and indicate what APM has found and what action (if any) is required:
| State | What It Means | Action Required? |
|---|---|---|
| Waiting for Program | The operator manually added this job before a program ran. A committed ticket is already open in MachineMetrics (and in your ERP on ERP-connected accounts). APM will prioritize this job when a matching program starts. | No — wait for the program to run. |
| Matched | APM identified a job with high confidence. A draft ticket exists in MachineMetrics only. | Yes — confirm the match to open the ticket in MachineMetrics (and in your ERP on ERP-connected accounts). If "Automatically confirm high confidence matches" is enabled on your account, this happens automatically — no action needed. |
| Suggested | APM found a likely job but confidence is low. A draft ticket exists in MachineMetrics only. | Yes — review and confirm the correct job. |
| No Match Found | APM could not identify a matching job. A draft ticket exists in a holding state. | Yes — select the correct job manually. |
| Confirmed | The match has been confirmed. The ticket is open in MachineMetrics (and in your ERP on ERP-connected accounts) and ready to be submitted. | No — complete the work and submit when done. |
Draft vs. Committed Tickets
Understanding the difference between draft and committed tickets clarifies what actions are available at each stage:
- Draft ticket: Created automatically by APM. Exists in MachineMetrics only — no ERP record yet. The job can still be changed freely. The ticket cannot be submitted.
- Committed (open) ticket: Created when a match is confirmed, a job is selected manually, or a job is pre-selected before running. Exists in MachineMetrics and, on ERP-connected accounts, in the ERP as well. Fields set when the ticket was opened — job, operation, activity mode, and operator — are locked and cannot be changed from ShopPulse. Closing fields like final part count, rejects, and comments are still editable at submission.
Burden time accrues on both draft and committed tickets — machine time is always tracked regardless of ticket state.
For a full explanation of how APM matches jobs and assigns states, see Auto Production Monitoring (APM).
How to Use It
Signing In
- Open ShopPulse on your machine's device and sign in. Sign-in behavior varies by account configuration — see Getting Started with ShopPulse for details.
- Your job queue loads, showing all jobs on your machine.
Pre-Selecting a Job
Pre-selecting lets you declare which jobs you plan to run before programs start. This gives APM a priority pool to match against.
- Tap Add job to open the job selection screen.
- Search for and select the job you'll be running.
- The job appears in your queue with the state Waiting for Program. A labor ticket is created in the ERP immediately.
- When a matching program starts running, APM updates the state automatically.
Important: Pre-selected jobs create committed tickets in the ERP immediately — the job field is locked from the start. If APM matches the wrong pre-selected job, the ticket cannot be corrected from ShopPulse. You'll need to edit it directly in your ERP. Be careful when pre-selecting multiple similar jobs.
Confirming a Matched Job
When APM identifies a job with high confidence, it shows as Matched in your queue.
- Tap the job card showing Matched.
- Review the job details to verify they look correct.
- Tap Confirm on the job card. A confirmation modal appears noting that this action commits the ticket to the ERP and cannot be undone from MachineMetrics.
- Tap Confirm in the modal. The state changes to Confirmed and the ticket is now open in the ERP.
Note: If your account has "Automatically confirm high confidence matches" enabled, Matched jobs are committed to the ERP automatically — no action needed. See MES Settings for details on this account setting.
Reviewing a Suggested Match
When APM finds a likely job but isn't fully confident — for example, when multiple work orders exist for the same part — it shows as Suggested and asks you to verify.
- Tap the job card showing Suggested.
- Review the candidate jobs presented. They're sorted by schedule position and due date.
- If the correct job is listed, tap it and tap Confirm. The state changes to Confirmed.
- If the correct job isn't listed, tap Select a different job to open the job selection modal and choose the correct job. Selecting a job this way commits the ticket immediately.
Resolving No Match Found
When APM can't identify a matching job, it shows as No Match Found. You need to select the correct job manually before the ticket can be committed.
- Tap the job card showing No Match Found.
- Tap Select job. The job list appears showing active, released jobs scheduled for this machine.
- Find and select the correct job. If it's not in the list, use the search to find it directly.
- Selecting a job commits the ticket immediately. The state changes to Confirmed.
Note: If the job you're looking for doesn't appear in the list, use the search to find it directly.
Changing a Job Assignment
You can reassign a job on a draft ticket — any ticket in Matched, Suggested, or No Match Found state that hasn't been confirmed yet.
- Tap the job card for a draft ticket.
- Tap Change Job.
- Select the correct job. The ticket is reassigned with no ERP impact.
Note: Once a ticket is Confirmed, the job field is locked. The Change Job button will still appear but will be disabled with an explanation. If you need to correct a committed ticket, edit it directly in your ERP.
Splitting a Ticket
If a program ran two different jobs back to back without a program change — or if the run time on a single ticket needs to be divided between two jobs — you can split any ticket that hasn't been submitted yet, whether draft or confirmed.
- Tap the job card for the ticket you want to split.
- Tap Split.
- Choose how to split the ticket:
- By time — select the point in time where the split should occur.
- By part count — enter the number of parts attributed to the first job. The split time is set automatically based on when those parts were recorded.
- Select the job for the second portion of the run.
- Review the split summary and confirm. The original ticket covers the first portion; a new ticket is created for the second.
Note: Splitting is only available on tickets that haven't been submitted yet. Once a ticket is submitted, it cannot be split from ShopPulse — contact your ERP administrator to make corrections directly in the ERP.
Merging a Run
If production run data is assigned to the wrong draft job and the correct job already has an open ticket on your machine, you can merge the run into the correct job.
- Tap the job card for the draft ticket whose run data you want to move.
- Tap Merge.
- Select the target job from the list. Only jobs with an active draft or open ticket awaiting a program are shown — these are the only valid merge targets.
- Review the merge summary. Part counts move with the run data automatically.
- Tap Confirm to complete the merge.
Note: If the job you want to merge into doesn't appear in the list, it may not be in a state that accepts a merge. Use Change Job instead to reassign the draft ticket directly to a different job.
Note: Merging is only available on draft tickets. Committed tickets cannot be merged.
Switching Activities
You can switch activities within the same mode at any time without impacting your labor ticket.
- Tap the job card and tap Switch activity.
- Select a different activity within the same mode — for example, switching from Generic Setup to First Piece Inspection, or from Generic Production to Lights Out.
- The activity updates immediately. No ticket action required.
Note: Switching between activity modes (Setup → Production or Production → Setup) is a different operation. Setup → Production happens automatically when you submit a Setup ticket as Complete (a new Production ticket opens for the same job). Production → Setup is not supported.
Submitting a Labor Ticket
When your work on a job is done — or at a natural stopping point — submit the labor ticket to close it. On ERP-connected accounts, the ticket submits to your ERP; on no-ERP accounts, it closes in MachineMetrics only.
Submitting and closing a labor ticket is also how operators sign out at end of shift on MES accounts. There is no automatic end-of-shift sign-out while MES is active — including on no-ERP / MES-only accounts. Choose Complete to close the ticket and sign out of the job, or Incomplete to close the ticket and resume later.
- Tap the job card and tap Submit.
- Enter the final parts count. If you're reporting rejected parts, enter the quantity and select a reject reason (required for any rejects).
- Choose the completion status:
| Status | What Happens |
|---|---|
| Complete | Ticket closes. Job is removed from your queue. If good parts are below the required quantity, you'll be prompted to confirm before proceeding. |
| Incomplete | Ticket closes. A new ticket opens automatically with the same job and activity so you can continue later. |
Setup submission special cases:
| Submission | What Happens |
|---|---|
| Setup — Complete | Setup ticket closes. A new Production ticket opens automatically for the same job. |
| Setup — Incomplete | Setup ticket closes. A new Setup ticket opens automatically. |
First Article Inspection (FAI): If FAI is enabled on your machine, submitting a Setup ticket as Complete will prompt you to either submit your first piece for quality inspection or skip. If submitted, the piece enters the inspector's queue and your ShopPulse header color reflects the current inspection status (orange = awaiting, teal = in progress, green = approved, red = rejected with reason). See First Article Inspection for the full workflow.
Submitting Multiple Tickets at Once
If you have several confirmed jobs in your queue, you can submit them all in one action.
- Tap Submit all.
- If any tickets in your queue are still in Matched or Suggested state (not yet confirmed), a confirmation modal appears for each one in sequence — review and confirm or reassign each before proceeding.
- Once all tickets are confirmed, a final Submit X labor tickets? modal appears with the total count.
- Tap Submit to submit them all to the ERP.
Viewing Submission History
While a job is still active on your machine, you can view previously submitted tickets for that job.
- Tap the job card.
- The detail view shows any previously submitted tickets for the current run, including the name of who submitted each one.
Submission history is visible as long as at least one open (unsubmitted) ticket exists for that job on your machine. Once the job is marked Complete and removed from the queue, the history is no longer accessible from ShopPulse.
Tips & Best Practices
- Confirm matches promptly. Draft tickets accumulate burden time but can't be submitted until confirmed. Staying on top of confirmations keeps your queue clean and your ERP data current.
- Pre-select jobs when you know what's coming up. This gives APM a priority pool to match against and reduces No Match Found cases. Just be careful to pre-select the right jobs — pre-selected jobs create committed tickets immediately, and the job can't be changed from ShopPulse if APM matches the wrong one.
- Use Incomplete submissions for shift handoffs. If you're handing off a job mid-run, submit it as Incomplete. A new ticket opens automatically so the next operator can pick up without losing continuity.
- When in doubt on a Suggested match, use search. The candidate list shows a filtered set of jobs. The search gives you access to the full job list.
- Don't wait until end of shift to review your queue. Jobs in No Match Found or Suggested state are waiting on your input before ERP records are created. Resolving them in real time keeps your shop floor data accurate.
FAQs & Troubleshooting
-
Why is my job showing as Suggested instead of Matched? APM found a likely match but confidence didn't reach the high-confidence threshold. This can happen even when the part number is a perfect match — if multiple work orders exist for the same part, APM flags it for you to pick the right one. Review and confirm the suggested job, or select a different one.
-
Why is my job showing as No Match Found even though I know there's a matching job? If the running program could match multiple jobs that both have open tickets on the same machine, APM returns No Match Found rather than guessing. Select the correct job manually to resolve it.
-
I submitted a ticket by mistake. Can I undo it? Submitted tickets are closed in both MachineMetrics and the ERP. They cannot be edited or reversed from ShopPulse. Contact your ERP administrator to make corrections directly in the ERP.
-
Can I split a ticket after I've confirmed it? Yes — splitting is available on any ticket that hasn't been submitted yet, whether it's draft or confirmed. Once a ticket is submitted, splitting is no longer possible from ShopPulse.
-
A new ticket appeared in my queue that I didn't add. What is it? APM added it automatically based on the program running on your machine. Review the match state and confirm it (or reassign it) as needed.
Related Articles
- Auto Production Monitoring (APM)
- Getting Started with ShopPulse
- MES Settings
- Configuring a Machine's Production Settings
- First Article Inspection — quality inspection step at the setup-to-production transition (optional feature)
- Shift Handover — structured end-of-shift handoff with AI-generated notes (optional feature)
Need Help?
Contact your Solutions Delivery Manager or email support@machinemetrics.com.