Getting Started with MES: Administrator Guide
Overview
MachineMetrics Intelligent MES bridges the gap between your ERP and your shop floor. When enabled on a machine, jobs flow directly from your ERP, programs are matched to jobs automatically, and your operators can track work in real time—all while labor data feeds back to your ERP without manual intervention.
MES also supports accounts without a live ERP integration. On these no-ERP / MES-only accounts, work orders are imported via CSV/file rather than sourced directly from an ERP. Labor tickets open and close in MachineMetrics only — there is no write-back to an external system. ERP-connected is the standard and most common path; the no-ERP CSV-import path is an alternative that must be configured with your SDM.
MES is enabled on a per-machine basis. You don't need to switch your entire fleet at once. The setup process is designed so you can configure everything ahead of time — map resources, set job tracking preferences, and prepare each machine — all before MES is active on any of them. When a machine is ready, you flip the MES toggle to activate it. Each machine goes live on MES independently, on your schedule.
This guide walks you through the complete setup process—from understanding what MES does and why it matters, all the way through configuring every machine on your floor.
Who Should Use This Guide
This guide is for account administrators who need to enable and configure MES across their MachineMetrics account. You'll need Manager, Executive, or IT Admin access depending on which settings you're configuring. MES Package activation, Clock Out Flow, and Skip Setup Parts require IT Admin or higher.
What You'll Need
Before you start, confirm that:
- MES Package is activated on your account (an IT Admin or higher can activate this from Settings > Company, or your SDM can activate it on your behalf)
- Your ERP is connected to MachineMetrics (supported systems: JobBOSS, JobBOSS2, Infor VISUAL, Infor Siteline, Infor XA, Epicor Kinetic, Epicor 10) — this is the standard path. Accounts without a live ERP integration import work orders via CSV/file and labor tickets close in MachineMetrics only (contact your SDM to confirm this path is configured for your account)
- You have the right access level (Manager or Executive for most settings; IT Admin or higher for MES Package activation, Clock Out Flow, and Skip Setup Parts)
- Contact your SDM if you need to confirm your ERP integration or check whether your connector type is Uniform or Flexible
Part 1: Understanding MES
What MES Does
MES automates the connection between your ERP and your shop floor. Here's the flow:
- Jobs are sourced from your ERP → Supervisors and managers schedule work order operations on the Dispatch Schedule for their assigned machines
- Programs are matched to jobs → Auto Production Monitoring (APM) watches which program is running and suggests the correct job
- Operators confirm or select → In ShopPulse, your operators confirm the APM match or manually select a job if none matched
- Work is tracked in real time → As soon as a match is confirmed, labor tracking begins (burden hours accumulate automatically)
- Labor tickets submit to ERP → When operators complete their work, labor tickets are submitted back to your ERP with all details (hours, parts, job assignment)
Why MES Matters
Without MES, labor data either doesn't reach your ERP or requires manual entry after the shift. With MES enabled:
- Real-time accuracy: Job assignments and burden hours are recorded as work happens, not entered days later
- Reduced manual entry: APM matches jobs to programs automatically—operators confirm, not create
- Complete data: Your ERP has labor, parts, and job data immediately for accurate costing and scheduling
- Shop floor visibility: Your operations team sees live job status and machine utilization in Dispatch Schedule
How MES Enablement Works
MES is enabled per machine. Machines without MES enabled continue using their current workflow (Part Operations, no labor tickets, no ERP submission). Enabling MES on a machine switches it to the ERP-integrated workflow.
The setup process is designed so you can prepare everything before enabling MES on any machine:
- Configure your setup — Map resources, choose job tracking modes, and configure account-level settings. All of this can be done before enabling MES on any machine.
- Enable MES machine by machine — When a machine's configuration is ready and you've coordinated with operators, flip the MES toggle. That machine goes live on MES; all other machines are unaffected.
- Expand at your own pace — Enable additional machines as your team gains confidence. There's no deadline or requirement to enable MES on all machines at once.
The toggle is also reversible — you can disable MES on a machine if needed (with implications for in-progress work; see Part 5, Step 6).
Part 2: Key Concepts
Before you start configuring, familiarize yourself with these terms. You'll see them throughout MES:
| Term | Definition |
|---|---|
| Labor Ticket | A record that tracks labor hours, parts used, job assignment, and activity mode (Setup or Production). Created in MachineMetrics; submitted to your ERP on ERP-connected accounts, or closed in MachineMetrics only on no-ERP accounts. |
| Draft Ticket | A labor ticket that exists only in MachineMetrics. Created automatically when APM matches a job. Can be reassigned to a different job. Cannot be submitted to ERP. |
| Committed Ticket | A labor ticket that exists in MachineMetrics (and in your ERP on ERP-connected accounts). Created when an operator confirms a match or manually selects a job. The job field is locked and cannot be changed. Can be submitted. |
| Work Order Operation | A single operation within an ERP work order. The basic unit of work that MES tracks and assigns to machines. |
| Production Run | A continuous period of machine activity assigned to a single job. Tracks burden hours, parts, and activity mode. |
| Burden Hours | The time a job occupies a machine. Automatically calculated based on how long the program runs. Accrues on both draft and committed tickets. |
| Activity Mode | Either Setup or Production. Set when a ticket is created and cannot be changed without submitting the ticket. |
| Match States | The status of an APM match: Waiting for Program, Matched, Suggested, No Match Found, or Confirmed. |
| Resource Mapping | The link between a MachineMetrics machine and an ERP resource. Controls which jobs appear in Dispatch Schedule and which resource labor is recorded against. |
| Dispatch Schedule | A view of all scheduled work order operations from your ERP, filtered by the resources you've mapped to your machines. |
| MES Package | An account-level entitlement that unlocks MES features on all machines. Requires IT Admin or higher to activate. |
| Auto Production Monitoring (APM) | The system that identifies which job is running based on the program data. Operators confirm or override the suggestion. |
Part 3: Prerequisites
MES requires a few things to be in place before you can enable it. The good news: most of it is automatic.
Activating the MES Package
An IT Admin (or higher) activates the MES Package directly from Settings > Company: "Enable MES". Your SDM can also do this on your behalf if needed.
When activated:
- Prerequisite settings are enabled behind the scenes
- The MES Settings page becomes available in your Settings menu
Confirm activation is complete before proceeding.
What You Confirm
After the MES Package is activated:
- Navigate to Settings in the main navigation menu
- Look for MES Settings — if you see it, MES Package is activated
- Confirm your ERP is actively connected (you should see machines and job data flowing)
If you don't see MES Settings, confirm the MES Package has been activated (Settings > Company: "Enable MES"). If the setting is not visible, contact your SDM — your account may not have the MES Package entitlement.
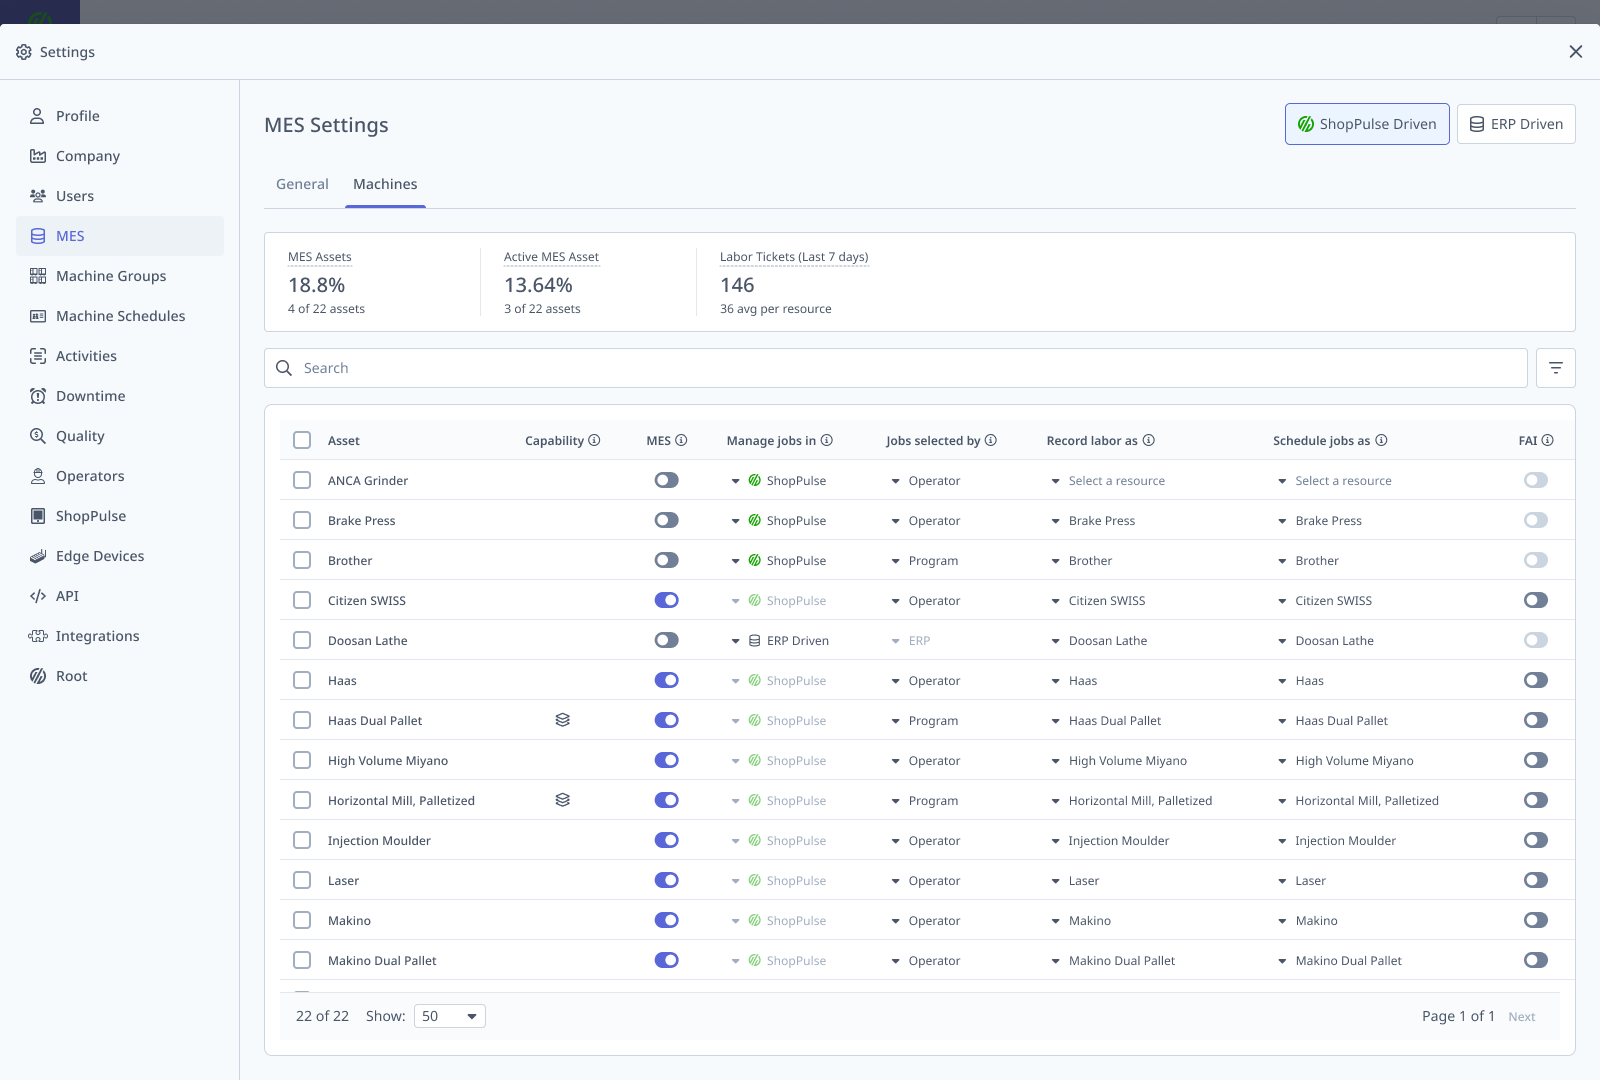
Part 4: The MES Settings Page
The MES Settings page is your central hub for configuring MES across all machines. This is where you'll spend most of your time.
How to Access It
- Click Settings in the main navigation
- Select MES Settings from the left menu
- You'll see a machine list showing all machines in your account with their current MES configuration
What You'll See
The machine list displays columns for each configuration option:
- Machine Name — Your machine identifier
- MES — Toggle to enable/disable MES
- Manage jobs in — ShopPulse or ERP Driven
- Jobs selected by — Operator, Program, or N/A (locked when ERP Driven)
- Default Activity — Setup or Production
- Record labor as — ERP resource for labor attribution
- Schedule jobs as — ERP resource(s) for filtering jobs
- FAI — Toggle to enable/disable First Article Inspection per machine (requires MES enabled and Manage jobs in = ShopPulse)
- Handover — Toggle to enable/disable Shift Handover per machine (requires MES enabled and Manage jobs in = ShopPulse)
Below the machine list, you'll find the Account-Level Settings section with checkboxes for system-wide behavior.
Why This Page Matters
Instead of configuring each machine individually, you can:
- See all machines and their MES status at a glance
- Bulk-configure resource mappings across all machines
- Adjust account-level settings that apply everywhere
- Enable/disable MES one machine at a time with confidence
Part 5: Step-by-Step Setup
Follow these steps in order. Steps 1–4 are preparation steps — they prepare your machines for MES without changing anything operators see. Only Step 6 (Enable MES) actually switches a machine to the MES workflow.
Step 1: Map Your ERP Resources
Resource mapping is the foundation. It tells MES which ERP resource labor should be recorded against, and which resources' jobs should appear on each machine.
Why This Matters
Without resource mapping, MES doesn't know which jobs belong on which machines, and it can't tell your ERP who did the work. These mappings are required before MES can be enabled on any machine — but you can complete them all now without affecting current operations. This is the most important staging step.
How to Set "Record labor as"
"Record labor as" is the single ERP resource that all labor on this machine is attributed to. It can be an individual resource (e.g., "Machine 5") or a resource group (e.g., "Milling Stations").
- On the MES Settings page, find the machine
- In the Record labor as column, click to open the dropdown
- Select an individual resource or a resource group
- Save
Key point: Only one resource per machine. All labor tickets from this machine will be recorded against this resource in your ERP.
How to Set "Schedule jobs as"
"Schedule jobs as" controls which jobs appear in the Dispatch Schedule for this machine. It can be an individual resource or multiple resources. For example, a milling machine might be scheduled under both "Milling Stations" and "CNC Machines".
- On the MES Settings page, find the machine
- In the Schedule jobs as column, click to open the field
- Add one or more ERP resources (individual or groups)
- Save
Key point: You can select multiple resources here. Jobs scheduled for any of these resources will appear on this machine.
Many-to-One Mapping is Supported
Multiple machines can map labor to the same ERP resource. For example, if you have 10 manual stations and one resource called "Manual Stations", all 10 machines can record labor under that resource.
Bulk Configuration
You don't need to enable MES on any machine yet — and that's by design. Complete all resource mappings across your fleet first. This configuration step has zero impact on your operators or current workflows.
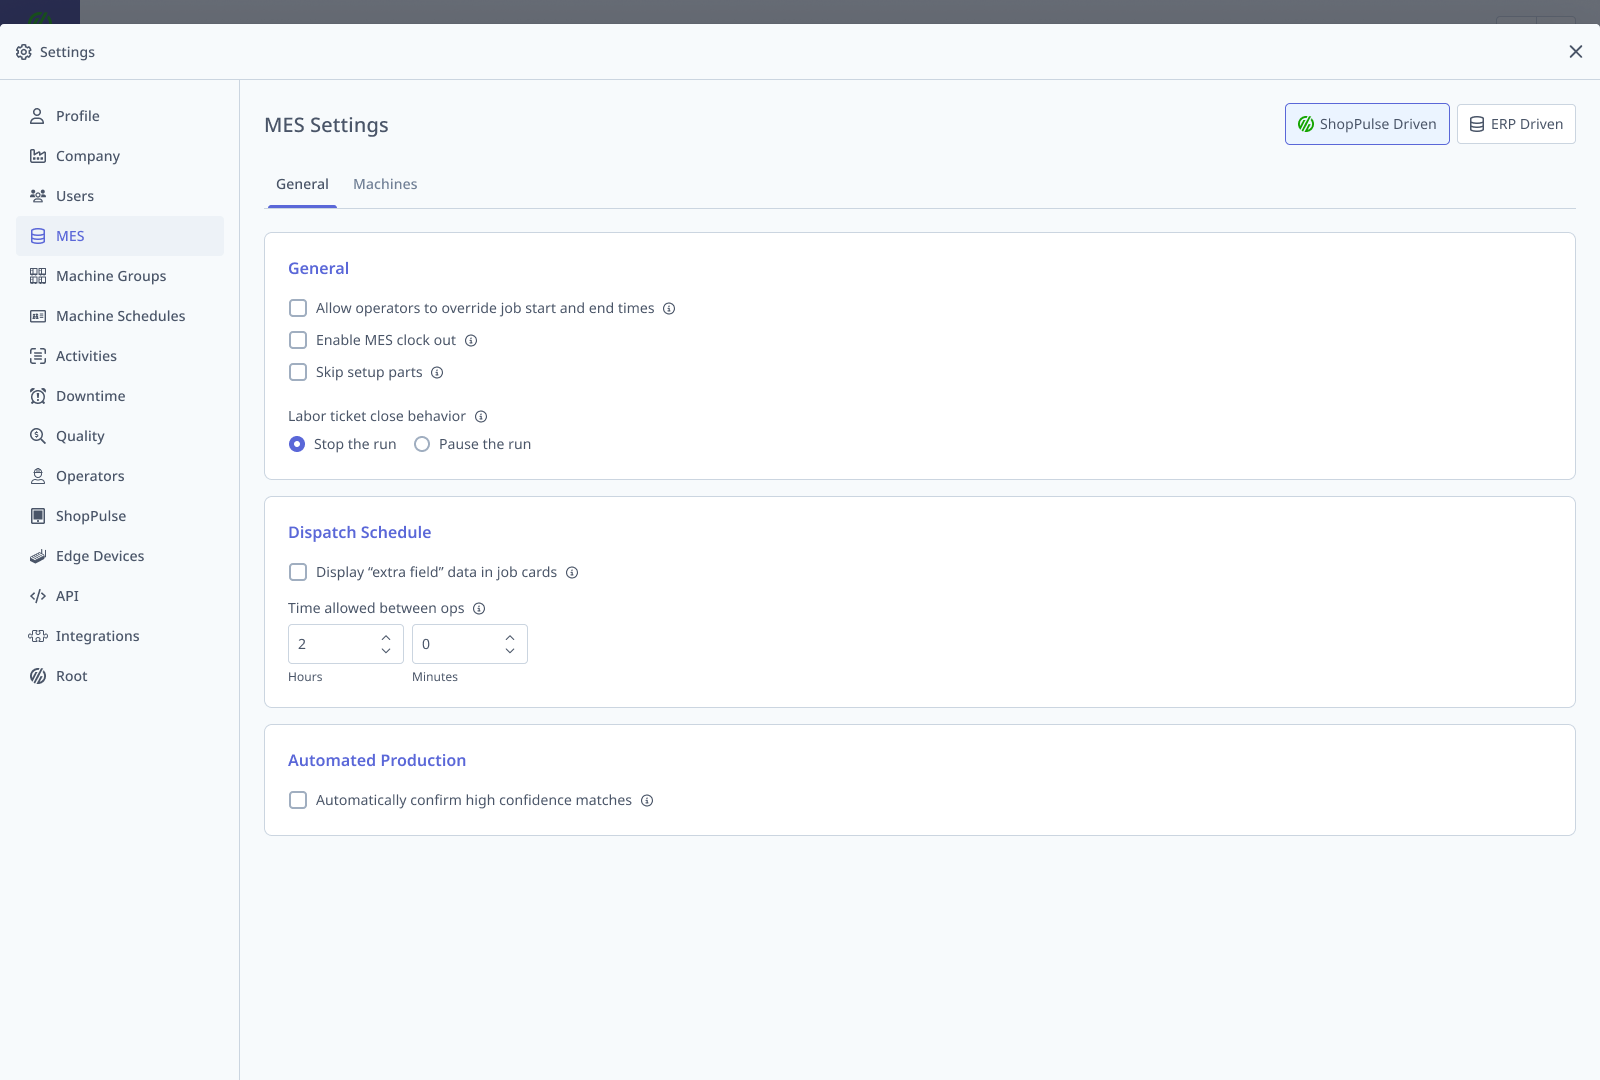
Step 2: Configure Account-Level Settings
Account-level settings apply to all MES-enabled machines in your account. Configure these now — they only take effect on machines that have MES enabled, so setting them ahead of time has no impact on machines without MES enabled.
Automatically Confirm High Confidence Matches
What it does: When enabled, APM matches that have very high confidence automatically commit to your ERP without operator confirmation.
- Default: Off
- Access required: Manager or Executive
Recommendation: Leave this off initially. Monitor APM accuracy for a few weeks, then enable if match quality is consistently high.
Important: Even with this enabled, "Suggested" and "No Match Found" states always require manual operator confirmation.
Clock Out Flow
What it does: Enables a structured Clock In / Clock Out user interface in ShopPulse, making it clear when operators start and stop work.
- Default: Off
- Access required: IT Admin or higher
Use this if: Your shop requires formal clock-in/clock-out for labor compliance or shift tracking.
Note: Clock Out Flow is a hard prerequisite for Shift Handover. If you plan to enable Shift Handover on any machine, Clock Out Flow must be enabled first. The Shift Handover toggle in MES Settings will be disabled until Clock Out Flow is on.
Skip Setup Parts
What it does: During Setup activity mode, parts are not tracked (you're setting up, not producing). This avoids cluttering setup labor with incidental part usage.
- Default: Off
- Access required: IT Admin or higher
Use this if: Your operators track parts during setup and you want to exclude those from the labor ticket.
Allow Operators to Override Job Start & End Times
What it does: Operators can adjust the timestamp when a job started or ended (e.g., "I actually started at 2:05, not 2:00").
- Default: Off
- Access required: Manager or Executive
Use this if: Your operators need flexibility to correct timing after the fact (useful for paper-based backups or shift handoffs).
Step 3: Configure Each Machine
Now that resources are mapped and account settings are configured, you'll set up each machine's intended behavior. These settings can all be configured before enabling MES — they take effect when you enable MES in Step 6.
For each machine, you'll configure:
- Manage jobs in — Where operators select and manage jobs
- Jobs selected by — How jobs are assigned
- Default Activity — Setup or Production for new tickets
Manage jobs in
This setting controls where jobs are managed—in ShopPulse (by operators) or in your ERP.
- ShopPulse: Operators manage jobs in MachineMetrics. They see available jobs and can switch between them.
- ERP Driven: Jobs are managed entirely in your ERP. MachineMetrics becomes read-only for job assignment.
Default: ShopPulse (most shops choose this)
Note: On Uniform Connector accounts, machines without MES enabled use a MES/ERP ID field to map to an ERP resource, rather than the standard resource mapping system used by MES-enabled machines.
Jobs selected by (ShopPulse Only)
This setting controls how jobs are assigned. It only appears if "Manage jobs in" is set to ShopPulse.
- Operator: Operator manually selects a job from the Dispatch Schedule. Best for flexible job sequencing.
- Program: Auto Production Monitoring (APM) automatically suggests a job based on the program name/parameters. Operator confirms or overrides. Program may be unavailable if the machine is incompatible with program-based job selection (e.g., it does not produce program data) — this is a machine-level limitation reflected in the UX.
Default: Operator (safest for initial setup)
Default Activity
The activity mode (Setup or Production) assigned to new jobs created on this machine.
- Setup: For jobs that are being set up (no production yet).
- Production: For jobs actively producing parts.
Default: Production (most common)
Step 4: Understanding the Configuration Paths
Your choices in Steps 1–3 create different configurations. Here's a quick reference for what each path does:
| MES Enabled? | Manage jobs in | Jobs selected by | Behavior |
|---|---|---|---|
| Off | ShopPulse | Operator | MES not enabled. No labor tickets, no ERP submission. |
| Off | ShopPulse | Program | Program-driven tracking with APM. No labor tickets. Useful for visibility before committing to MES. |
| On | ShopPulse | Operator | Full MES with manual job selection. Operator picks jobs from Dispatch Schedule. Labor tickets submitted to ERP. |
| On | ShopPulse | Program | Full MES with automatic job matching. APM suggests jobs, operator confirms, labor tickets submitted to ERP. Most common. |
| On | ERP Driven | ERP | ERP-managed MES. Jobs and labor handled entirely in ERP, MachineMetrics is read-only. |
Choose the row that matches your plan, then configure accordingly.
Step 5: Understand Your Connector Type
Your ERP integration is either Uniform or Flexible. This affects how your configuration works. Ask your SDM which type you have—it determines what options are available to you. Both connector types support the same configure-then-enable approach — the difference is where certain settings live.
Uniform Connectors
Most current ERP integrations are Uniform. They support both ShopPulse and ERP-Driven modes at the account level.
How it works:
- There's an account-level Global Job Management Method setting in MES Settings (ShopPulse or ERP Driven) that sets the strategic direction for the account
- Each machine's MES toggle determines whether MES features (ERP-sourced jobs, labor tickets) are enabled on that machine
- Together, these two settings constrain the available "Manage Jobs In" and "Jobs Selected By" options for each machine
Configuration pattern: Set the Global Job Management Method to your intended direction (e.g., ERP Driven), then enable MES on individual machines as they're ready. Machines without MES enabled are unaffected by the global setting.
Flexible Connectors
Epicor Kinetic is a Flexible Connector. There's no account-level toggle.
How it works:
- Each machine's configuration is completely independent
- A single account can have some machines ERP-driven and others ShopPulse-managed simultaneously
- No global switch—full flexibility per machine
Configuration pattern: Configure and enable each machine independently. You have full control over each machine's job tracking method with no account-level constraints.
Step 6: Enable MES on Each Machine
You've configured your setup — resources are mapped, account settings are configured, and each machine's behavior is set. Now it's time to enable MES on your machines. This is the step where the switch actually happens.
Before You Enable
- Confirm your staging is complete — both resource mappings are set (Record labor as + Schedule jobs as) and the machine's job tracking preferences are configured. MES cannot be enabled without the resource mappings.
- Coordinate with operators. Enabling MES will stop any active jobs and sign out active operators on that machine. Plan around shift changes or maintenance windows.
How to Enable MES
Option A: From MES Settings Page
- On the MES Settings page, find the machine
- Click the MES toggle to turn it On
- A confirmation dialog appears with a warning:
- "Enabling MES will sign out any active operators on this machine and stop any running jobs"
- This is expected behavior
- Click Confirm
- MES is now enabled on the machine
Option B: From Machine Edit Page
- Navigate to Machines in the main menu
- Select the machine
- Click the settings icon → Production & Operations tab
- Scroll to the MES toggle and turn it On
- Confirm the warning
What Happens After You Enable MES
- The machine now sources jobs from your ERP Dispatch Schedule
- Operators see the multi-job queue in ShopPulse (if "Jobs selected by" is Program, APM suggestions will start appearing)
- Labor tracking is now required—all work must be assigned to a labor ticket before submission
- The machine is ready for operators to use
Disabling MES
The MES toggle is reversible — you can disable MES on a machine if needed:
- Submit all in-flight labor tickets first. Any draft or uncommitted tickets will be orphaned if you disable MES without completing them.
- Toggle MES to Off
- A confirmation dialog appears with the same warning (active sessions will stop)
- Confirm
The machine returns to the non-MES workflow. Other MES-enabled machines are unaffected.
Part 6: Configuring Auto Production Monitoring (APM)
APM is the engine that automatically suggests which job is running based on program data. If you've set "Jobs selected by" to Program on any machine, configure APM settings.
Machine-Level APM Settings
These settings apply to a single machine. Access them here:
- Machines in main menu
- Select the machine
- Settings icon → Production & Operations tab
- Scroll to the APM Configuration section (visible only if "Jobs selected by" is set to Program or if MES is disabled but Program matching is enabled)
Data Items
APM uses program data items (names, parameters) to match programs to jobs. By default, the system intelligently selects the best data items for your machine.
When to override:
- You notice APM matching on programs it shouldn't (e.g., matching a warmup program to a production job)
- You want to limit matching to specific data items for safety or precision
- Some data items are expired or no longer valid (usually after a machine remap)
How to adjust:
- Scroll to Data Items
- You'll see a list of available items with checkboxes
- Uncheck items you don't want to use, or select specific ones
- Save
Pro tip: Leave this at defaults initially. If accuracy is good, don't change it.
Default Activity
The activity mode assigned to new labor tickets on this machine.
- Setup: New jobs are set up first (no parts tracked until switched to Production)
- Production: New jobs go straight to production
Most common: Production
Ignored Programs
Programs you want to exclude from APM matching. No production run is created for ignored programs—they're treated as background activity.
Examples:
- Warmup programs (e.g., "9900", "PROBE", "TEST")
- Maintenance programs
- Demo or test programs
How to add:
- Scroll to Ignored Programs
- Enter a program name or regex pattern
- Click Add
- Repeat for each program to ignore
Ignore 9XXX Programs
A quick toggle to auto-exclude all 9000-series programs (commonly used for warmup, probing, or utilities).
Recommendation: Enable if your shop uses 9000-series as utilities or non-production activity.
Create run when operation changes
This setting only appears when MES is off. It controls whether a new production run is created each time the running operation changes.
When MES is on, labor tickets manage the run lifecycle—this setting is not used.
Account-Level APM Setting
Automatically confirm high confidence matches (covered in Step 2) applies to all MES-enabled machines.
Part 7: The Machine Edit Page
Everything you configure on the MES Settings page can also be configured individually on each machine's edit page. Use this for fine-tuning after bulk configuration.
How to Access Machine Settings
- Navigate to Machines in main menu
- Click on the machine name
- Click the settings icon (gear)
- Select Production & Operations tab
What You'll Find
The same settings as the MES Settings page:
- MES toggle
- Manage jobs in (ShopPulse or ERP Driven)
- Jobs selected by (Operator, Program, or N/A)
- Default Activity (Setup or Production)
- Record labor as (ERP resource)
- Schedule jobs as (ERP resources)
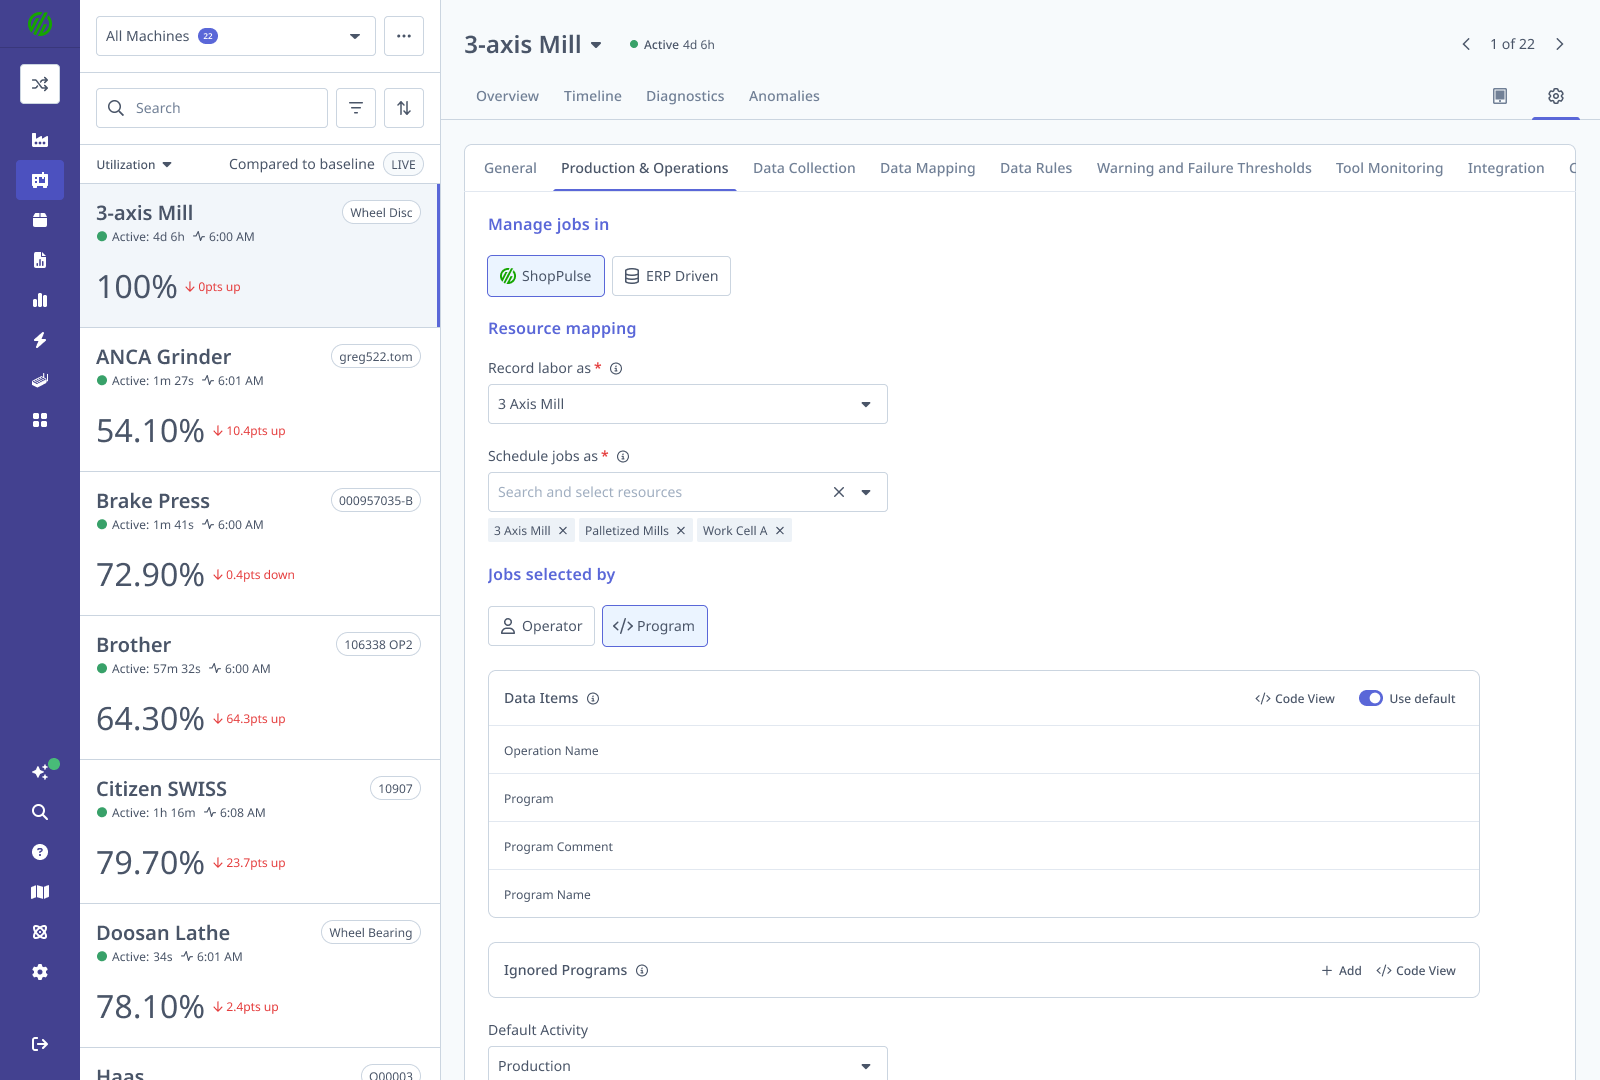
Plus APM-specific settings:
- Data Items
- Ignored Programs
- Ignore 9XXX Programs
- Create run when operation changes (MES off only)
And, when MES is enabled and "Manage jobs in" is set to ShopPulse, an Optional Features section:
- Enable first article inspection — Adds a quality inspection step at the setup-to-production transition. When enabled, operators are prompted to submit their first piece for QA inspection before entering production. See First Article Inspection for the full feature description.
- Enable shift handover — Adds a structured end-of-shift handoff workflow with analytics summary, note-taking, and AI-generated handover notes for the incoming operator. See Shift Handover for the full feature description.
These toggles are also available as columns on the MES Settings Machines tab for bulk management across all machines.
When to Use This Page
- Fine-tune one machine without affecting others
- Adjust APM settings for a specific machine after monitoring accuracy
- Enable or disable MES on a single machine
- Check a machine's exact configuration
Part 8: Understanding the Operator Experience (Admin Context)
As an admin, you don't need to know every step of the operator workflow, but understanding what operators see helps you configure correctly and troubleshoot issues.
Match States (APM)
When "Jobs selected by" is set to Program, operators see the APM match state in ShopPulse:
| State | Meaning | Operator Action |
|---|---|---|
| Waiting for Program | APM is listening for a program to start running. | Wait for program to load and start. |
| Matched | APM found a match with high confidence. | Confirm the suggested job or select a different one. |
| Suggested | APM found a possible match but with lower confidence. | Manually confirm or select a different job. Always requires confirmation. |
| No Match Found | APM ran but couldn't find a matching job in the Dispatch Schedule. | Manually select a job from the list, or contact a manager if the job isn't listed. Always requires confirmation. |
| Confirmed | Operator confirmed the match or manually selected a job. Committed ticket created. | Start tracking work. |
Draft vs. Committed Tickets
Operators work with two types of labor tickets:
- Draft Ticket: Created by APM match. Exists in MachineMetrics only. Job can be reassigned. Cannot be submitted.
- Committed Ticket: Created when operator confirms a match or manually selects a job. Exists in both MachineMetrics and ERP. Job is locked. Can be submitted.
This distinction matters: committed tickets can't be "corrected" from ShopPulse—they must be completed or submitted as-is.
Ticket Lifecycle
- Ticket created (draft or committed depending on how job was assigned)
- Operator tracks work (burden hours accumulate, parts are recorded)
- Operator marks Complete or Incomplete (submits labor ticket)
- Ticket closes in ERP (labor data is now in your system)
Activity Mode Behavior
When a ticket is created in Setup mode:
- Parts and hours are tracked during setup
- Operator switches to Production or marks Complete
- If switched to Production: new Production ticket is auto-created
- If marked Complete: work is submitted; operator starts a new ticket if needed
This prevents setup hours from being counted as production and keeps your costing accurate.
Operators cannot switch modes mid-ticket without completing it. This is by design—each mode represents a distinct type of work.
Part 9: Tips & Best Practices
Learn from accounts that have successfully deployed MES.
Configure First, Then Enable Gradually
The most successful rollouts follow a configure-then-enable approach:
- Configure all machines first — Map all resources, configure job tracking preferences, and set account-level settings across your entire fleet. None of this changes what operators see.
- Enable a small pilot group — Pick 2–3 representative machines (different types/operators if possible) and enable MES on them.
- Monitor for 1–2 weeks — Watch for APM accuracy, operator confusion, or data issues on your pilot machines.
- Adjust and expand — Tune APM settings (Ignored Programs, Data Items) based on what you see, then enable additional machines.
Why: Configuring everything first means you're only making one change per machine (flipping the MES toggle), which makes troubleshooting straightforward. And because each machine goes live on MES independently, issues on one machine don't affect the rest of your fleet.
Be Conservative with "Automatically Confirm"
Leave "Automatically confirm high confidence matches" off for the first few weeks. Monitor APM accuracy in ShopPulse before enabling auto-confirmation. A high-confidence match that's wrong will silently submit to your ERP—you want to catch those first.
Time Enablement Around Shift Changes
Enabling or disabling MES stops active jobs and signs out operators. Enable MES during:
- End of shift (before operators leave)
- Early morning before first job
- Lunch break
- Planned maintenance window
Avoid enabling mid-production.
Leave Data Items at Defaults
The system intelligently selects data items for APM matching. Only override if:
- You notice incorrect matches after monitoring for a week
- Data items are expired (machine was remapped)
- You want to restrict matching to specific safe items for safety reasons
Use Ignored Programs to Filter Noise
If you see warmup, probe, or test programs triggering APM matches, add them to Ignored Programs:
- Exact match (e.g., "PROBE", "WARMUP")
- Regex pattern (e.g., "^WARMUP.*" to match anything starting with WARMUP)
This keeps your labor data clean.
Leverage "Ignore 9XXX Programs"
If your shop uses 9000-series programs for utilities (warmup, probe, test), enable this toggle. One click, cleaner data.
How Pre-Selected Jobs Work
When "Jobs selected by" is Program, operators can still manually add jobs to the queue using the "Add Job" button. When they do, a committed ticket is created immediately in the ERP. This is by design — the operator is affirming "I'm working on this job." Since committed tickets can't be reassigned from ShopPulse, encourage operators to be intentional about which jobs they add.
Part 10: FAQs & Troubleshooting
Why don't I see the MES Settings page?
The MES Package hasn't been activated on your account. An IT Admin (or higher) can activate it from Settings > Company: "Enable MES." If you don't see that setting, your account may not have the MES Package entitlement — contact your SDM.
Why can't I enable MES on a machine?
Both resource mappings must be set first. Check:
- Record labor as: Is an ERP resource selected?
- Schedule jobs as: Is at least one ERP resource selected?
If both are set and you still can't enable MES, refresh the page or contact support.
Why is "Jobs selected by" grayed out or not visible?
"Jobs selected by" only appears when "Manage jobs in" is set to ShopPulse. If you've set "Manage jobs in" to ERP Driven, this option is locked and hidden (ERP Driven has no operator job selection). Additionally, if the machine is incompatible with program-based job selection (e.g., it does not produce program data), the Program option may be unavailable — this is a machine-level limitation reflected in the UX, not an account-level setting.
What happens when I enable MES on a machine?
Enabling MES on a machine:
- Signs out any operators actively using that machine
- Stops any running jobs
- Begins sourcing jobs from your ERP Dispatch Schedule
- Makes labor tracking required for all work
This is a per-machine action — other machines are unaffected. This is why you should enable MES during shift breaks or end of shift.
What happens when I disable MES?
Disabling MES reverts the machine to the non-MES workflow: active jobs stop, operators are signed out. Before disabling, make sure all in-flight labor tickets are submitted. Disabling MES without completing tickets orphans them—they won't be submitted to your ERP. Other MES-enabled machines are unaffected.
Why are some Data Items grayed out or marked as expired?
Data items become invalid when:
- A machine is remapped to a different model
- The machine's program library has changed significantly
- The data item's source program is no longer in use
Remove expired items and select valid ones, or leave "Data Items" at default and let the system relearn.
What does "Automatically confirm high confidence matches" do?
When enabled, APM matches with very high confidence automatically commit to your ERP without operator confirmation. The operator sees the committed job and starts tracking.
Important: "Suggested" and "No Match Found" matches still require manual confirmation, even with this enabled.
Are some settings locked? Why?
If you have a Uniform Connector, the account-level Global Job Management Method and each machine's MES toggle together determine what configuration options are available. Some settings may be constrained based on these selections. Contact your SDM for details.
What if a machine is showing all jobs, not filtered by resource?
Check the Schedule jobs as setting for that machine. If it's empty or set to resources that don't match your ERP, no jobs will filter correctly. Set it to the correct ERP resource(s).
Can I have multiple machines record labor under the same ERP resource?
Yes. Many accounts do this. All labor from multiple MachineMetrics machines can roll up to a single "resource group" in your ERP (e.g., "Milling Stations").
What if APM keeps matching the wrong jobs?
Monitor the match states for a week or two. Then:
- Check if certain programs are consistently mis-matched
- Add those programs to Ignored Programs if they're not actually production (warmup, test, etc.)
- Review Data Items—if certain items are driving bad matches, uncheck them
- If a machine was recently remapped, remove expired data items and let the system relearn
If problems persist, contact your SDM—they can help tune APM for your specific shop conditions.
Can I use MES without an ERP integration?
Yes. On accounts without a live ERP integration, work orders are imported via CSV/file rather than sourced directly from an ERP. Labor tickets open and close in MachineMetrics only — there is no write-back to an external system. There is also no automatic end-of-shift sign-out while MES is active; operators close their labor ticket to sign out (open the job card → tap Submit → choose Complete or Incomplete). Contact your SDM to confirm this path is configured for your account.
Related Articles
- MES Settings
- Configuring a Machine's Production Settings
- Auto Production Monitoring (APM)
- How to Use ShopPulse on MES-Enabled Machines
- Getting Started with MES in ShopPulse: Operator Guide
- First Article Inspection
- Shift Handover
Need Help?
If you run into issues or have questions not covered here:
- Contact your Solutions Delivery Manager — They know your account and can help with configuration questions, connector details, or troubleshooting
- Email support@machinemetrics.com — Our support team is here for technical issues or product questions
We're here to help you get the most out of MES.