Automations & Workflows Guide
Overview
What are Automations?
Automations in MachineMetrics enable you to automatically respond to shop floor events, sending the right information to the right person or system at the right time.
Key Benefits:
- Faster Response Times: Automatically notify personnel when issues occur
- Reduced Unplanned Downtime: Operators can request help without leaving machines
- Proactive Problem Solving: Alert before small issues become big problems
- System Integration: Connect MachineMetrics to CMMS, ERP, and other systems
- Data-Driven Decisions: Trigger actions based on real-time machine data
Automation Types:
- Workflows: Trigger-based automations (most powerful and flexible)
- Basic Notifications: Simple machine/job-based notifications
- Automatic Setup: Auto-track setup time (beta feature)
Who Uses Automations:
- Operations Managers: Set up downtime and alarm notifications
- Maintenance Teams: Auto-create work orders for alarms
- Material Handlers: Receive material replenishment requests
- IT Teams: Integrate MachineMetrics with external systems via webhooks
- Operators: Trigger manual workflows (call for help) from tablets
What are Workflows?
Core Concept
Workflows = Trigger + Action(s)
A Workflow automatically executes one or more actions when a specific trigger event occurs.
Example:
Trigger: Alarm Code "P/S 101" occurs on Mill #3
Action: Send notification to maintenance supervisor
Result: Maintenance aware of alarm immediately (no waiting for operator to call)
Why Use Workflows?
Problem: Traditional Response
- Operator notices alarm
- Operator leaves machine to find help
- Additional downtime while machine sits idle
- Unpredictable response times
Solution: Workflow-Enabled Response
- Alarm occurs (trigger)
- Workflow automatically notifies maintenance (action)
- Operator continues working on other machines
- Predictable, faster response times
[Recommended Image]: Replace with direct video link
Workflow Components
1. Name
- Descriptive identifier (e.g., "Way Lube Low - Notify Maintenance")
2. Machine(s)
- Single Machine: Workflow applies to one specific machine
- All Machines: Workflow applies to all machines (use for common triggers)
3. Trigger
- Event that starts the workflow
- Examples: Alarm occurs, downtime categorized, machine inactive, scheduled time
4. Action(s)
- What happens when trigger fires
- Multiple actions can be added to one workflow
- Examples: Send notification, create incident, call webhook, display message
5. Status
- Enabled: Workflow is active
- Disabled: Workflow is paused (not deleted)
Creating Workflows
Accessing Workflows
Navigation:
- Log in to MachineMetrics
- Click Automations in sidebar
- Select Workflows tab
- Click New Workflow button (top right)
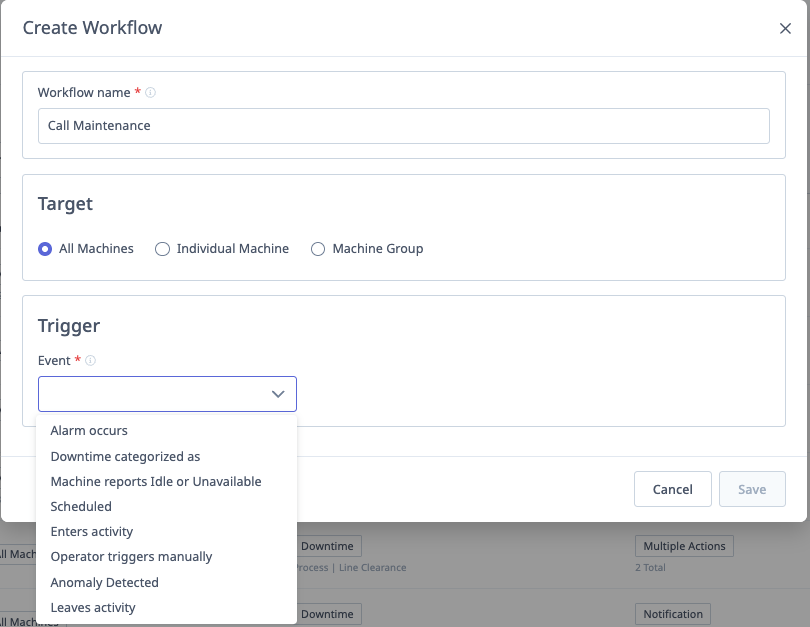
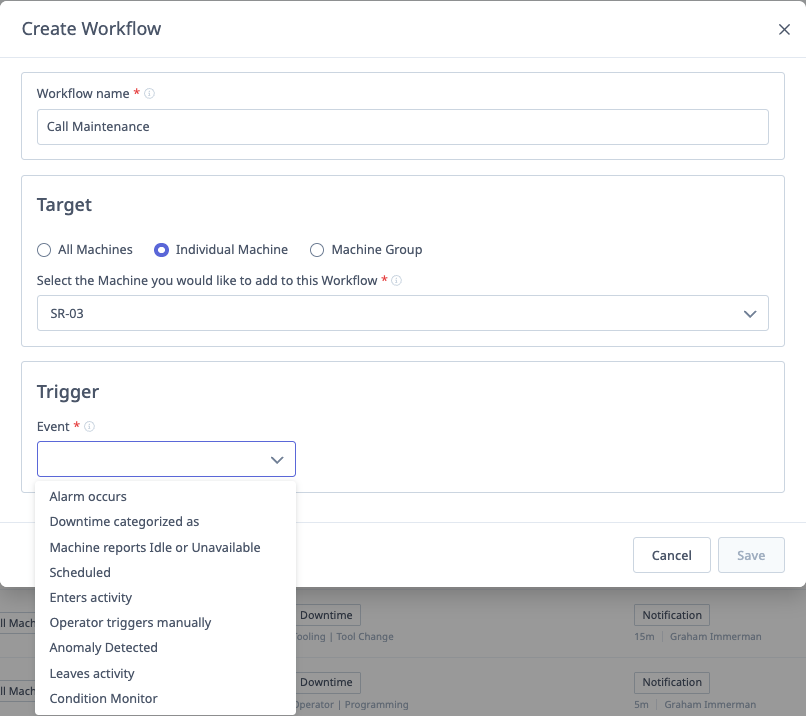
Step-by-Step Workflow Creation
1. Click "New Workflow"
- Workflow creation form opens
2. Enter Workflow Name
- Use descriptive names that indicate purpose
- Examples:
- "Way Lube Low - Notify Maintenance"
- "Out of Material - Alert Material Handler"
- "Mill Group Inactive 30min - Notify Supervisor"
3. Select Machine(s)
- Single Machine: Choose from dropdown
- Use for machine-specific triggers (e.g., specific alarm codes)
- Required for Condition Monitor triggers
- All Machines: Check "Apply to All Machines" checkbox
- Use for universal triggers (e.g., any downtime category)
4. Select Trigger
- Choose from available trigger types
- Configure trigger-specific settings
- See Workflow Triggers for details
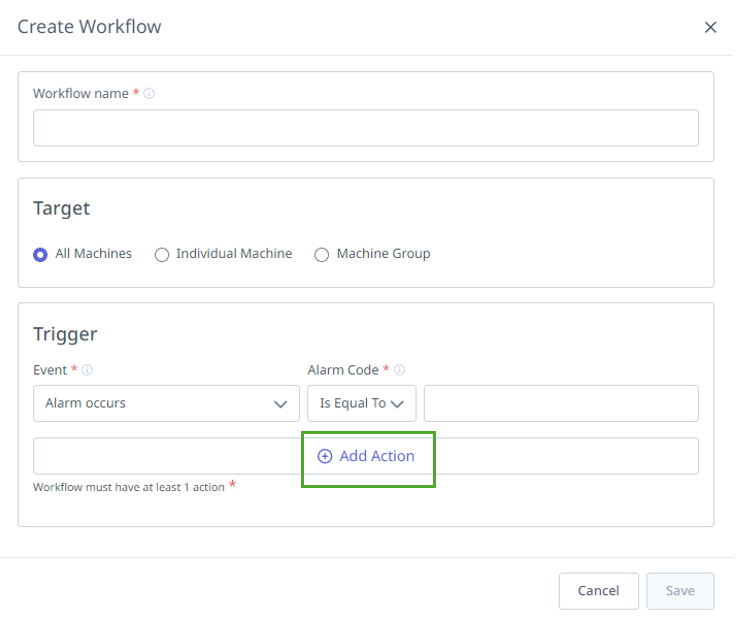
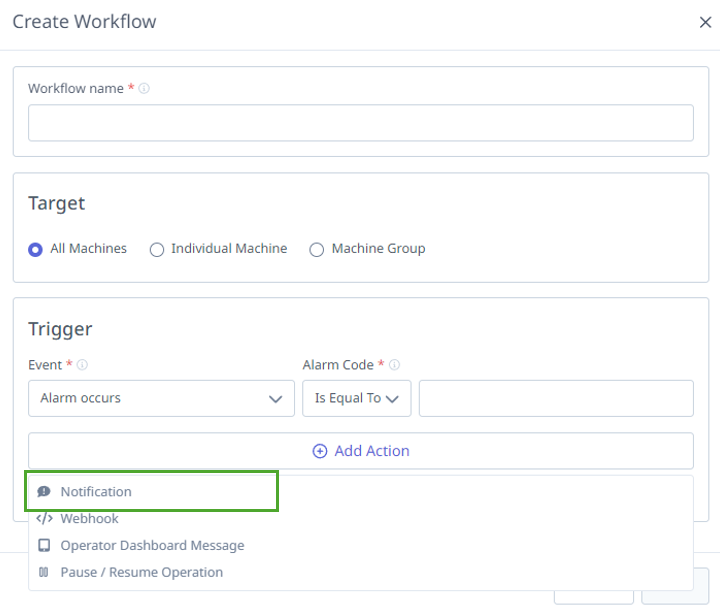
5. Add Action(s)
- Click Add Action button
- Select action type
- Configure action settings
- Add multiple actions if needed (e.g., notify supervisor AND create incident)
- See Workflow Actions for details
6. Set Status
- Toggle Enabled/Disabled
- Start enabled if ready to use
- Start disabled if testing or not ready
7. Click "Save"
- Workflow is created
- Appears in workflows list
- Begins monitoring for trigger events (if enabled)
Quick Workflow Creation Example
Scenario: Notify maintenance when way lube is low
Name: Way Lube Low - Notify Maintenance
Machine(s): Mill #3
Trigger: Alarm Occurs
  - Alarm Code: "P/S 000" (way lube low code)
Action: Notification
  - Delay: 0 minutes
  - Users: John Doe (Maintenance Supervisor)
  - Override notification times: No
Status: Enabled
Result: When Mill #3 reports alarm "P/S 000", John Doe receives notification immediately.
Workflow Triggers
Overview of Triggers
Triggers are events that start workflows.
Available Triggers:
- Alarm Occurs
- Downtime Categorized As
- Machine Reports Inactive
- Scheduled
- Enter Activity
- Leaves Activity
- Operator Triggers Manually
- Condition Monitor
- Setup Stage Entered (if Setup Stages enabled)
- Setup Exceeded (if Setup Stages enabled)
1. Alarm Occurs
When to Use: Respond to specific machine alarms automatically.

Configuration:
- Alarm Code: Enter alarm code to monitor
- Matching Options:
- Is Equal To: Exact match (e.g., "P/S 101" matches only "P/S 101")
- Starts With: Matches codes starting with characters (e.g., "tm" matches "tm1", "tm2", "tm3")
- Contains: Matches codes containing characters (e.g., "lube" matches "way-lube", "lube-fault")
Example Use Cases:
- Way lube low alarm → Notify maintenance
- Tool break alarm → Notify maintenance + create incident
- Critical alarms → Notify manager + display operator message
Example:
Trigger: Alarm Occurs
  - Alarm Code: "P/S 101"
  - Matching: Is Equal To
Action: Notification to Maintenance Supervisor
2. Downtime Categorized As
When to Use: Respond when operators categorize downtime with specific reasons.
Configuration:
- Downtime Category: Select from configured downtime categories
Example Use Cases:
- "Out of Material" → Notify material handler
- "Need Tooling" → Notify tool crib
- "Waiting for Inspector" → Notify quality department
- "Need Maintenance" → Notify maintenance + create incident
Benefits:
- Operators can request help without leaving machine
- Faster response times
- Better tracking of downtime causes
Example:
Trigger: Downtime Categorized As "Out of Material"
Action: Notification to Material Handler
Result: Material handler receives immediate notification, brings material
3. Machine Reports Inactive
When to Use: Alert when machine has been idle for extended period.
Configuration:
- Delay / Minutes of Downtime: Minutes machine must be inactive before triggering
- 0 minutes: Trigger immediately when inactive
- 30 minutes: Trigger after 30 minutes of continuous inactivity
- Operations are scheduled:
- Checked: Only trigger if downtime occurs during scheduled job/operation time
- Unchecked: Trigger during any inactive period
- Shifts to Monitor: Select which shifts to monitor (at least one required)
Example Use Cases:
- Alert supervisor if machine idle > 30 minutes during production shift
- Monitor unattended shifts (alert if idle > 2 hours)
- Track extended setup time (idle in setup mode > 1 hour)
Example:
Trigger: Machine Reports Inactive
  - Delay: 30 minutes
  - Operations are scheduled: Checked
  - Shifts to Monitor: First Shift, Second Shift
Action: Notification to Production Supervisor
Result: Supervisor notified if machine idle > 30 min during scheduled production
4. Scheduled
When to Use: Trigger workflows at specific times and days.
Configuration:
- Schedule: Select time and day(s)
- Daily at specific time
- Weekly on specific day(s) at specific time
- Monthly on specific date at specific time
Example Use Cases:
- Daily end-of-shift report
- Weekly performance summary
- Monthly maintenance reminder
- Scheduled data sync to external system
Example:
Trigger: Scheduled
  - Time: 7:00 AM
  - Days: Monday - Friday
Action: Notification with daily production summary
Result: Supervisor receives daily production email every morning
5. Enter Activity
When to Use: Trigger when machine enters specific activity.
Configuration:
- Activity Type:
- Job Setup
- Job Production
- Any Activity
Example Use Cases:
- Entering Setup → Notify supervisor (track setup start times)
- Entering Production → Log to external system
- Any activity start → Update ERP system
Example:
Trigger: Enter Activity - Job Setup
Action: Webhook to ERP (log setup start)
Result: ERP updated when operator starts setup
6. Leaves Activity
When to Use: Trigger when machine leaves specific activity.
Configuration:
- Activity Type:
- Job Setup
- Job Production
- Any Activity
Example Use Cases:
- Leaving Setup → Alert if setup exceeded expected time
- Leaving Production → Log to external system (production run complete)
- Any activity end → Update dashboard
Example:
Trigger: Leaves Activity - Job Production
Action: Notification to shipping (production complete)
Result: Shipping notified when job finishes
7. Operator Triggers Manually
When to Use: Allow operators to trigger workflows from the Operator Dashboard (tablet).
Configuration:
- No additional configuration needed
- Workflow appears as button on tablet
Example Use Cases:
- "Call Maintenance" button (operator requests help)
- "Need Material" button (operator requests material)
- "Quality Issue" button (operator alerts quality department)
- "First Article Ready" button (operator notifies inspector)
Benefits:
- Operators can request help without leaving machine
- Reduces unplanned downtime
- Standardizes communication
- Tracks frequency of requests
Example:
Trigger: Operator Triggers Manually
Action: Notification to Maintenance Supervisor
Result: Operator presses "Call Maintenance" button on tablet, supervisor notified immediately
[Recommended Image]: Screenshot of Operator Dashboard showing manual workflow trigger buttons
8. Condition Monitor
When to Use: Trigger based on specific data item thresholds.
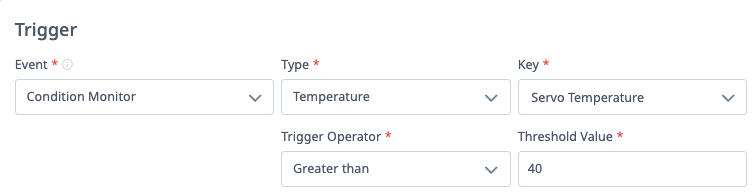
Configuration:
- Data Item: Select from available data items (specific to machine)
- Condition: Set threshold
- Greater than
- Less than
- Equal to
- Value: Threshold value
Important: Only available when targeting a single machine (not "All Machines").
Example Use Cases:
- Feedrate override drops below 80% → Notify supervisor
- Spindle load exceeds 95% → Alert maintenance
- Temperature exceeds threshold → Create incident
- Cycle time exceeds expected by 20% → Notify engineer
Example:
Machine: Mill #3
Trigger: Condition Monitor
  - Data Item: Feedrate Override
  - Condition: Less than
  - Value: 80
Action: Notification to Process Engineer
Result: Engineer notified if feedrate override drops below 80% (indicates process issue)
9. Setup Stage Entered
When to Use: Trigger when specific setup stage begins.
Prerequisites: Setup Stages feature must be enabled.
Configuration:
- Setup Stage: Select from configured setup stages
Example:
Trigger: Setup Stage Entered - "First Article Inspection"
Action: Notification to Quality Inspector
Result: Inspector notified when first article is ready
10. Setup Exceeded
When to Use: Alert when setup time exceeds expected duration.
Prerequisites: Setup Stages feature must be enabled.
Configuration:
- Setup Stage: Select stage to monitor
- Threshold: Minutes over expected time
Example:
Trigger: Setup Exceeded - "Tool Setup" stage exceeds expected by 15 minutes
Action: Notification to Supervisor
Result: Supervisor alerted to investigate why setup is taking longer than planned
Workflow Actions
Overview of Actions
Actions are what happens when a workflow trigger fires.
Available Actions:
- Notification
- Incident
- Webhook
- Operator Dashboard Message
- Pause/Resume Operation
Multiple Actions: You can add multiple actions to one workflow. Example:
Trigger: Alarm Code "P/S 101"
Actions:
  - Notification to Maintenance
  - Incident creation
  - Operator Dashboard Message ("Maintenance has been notified")
1. Notification
Purpose: Send email/text notifications to selected users.
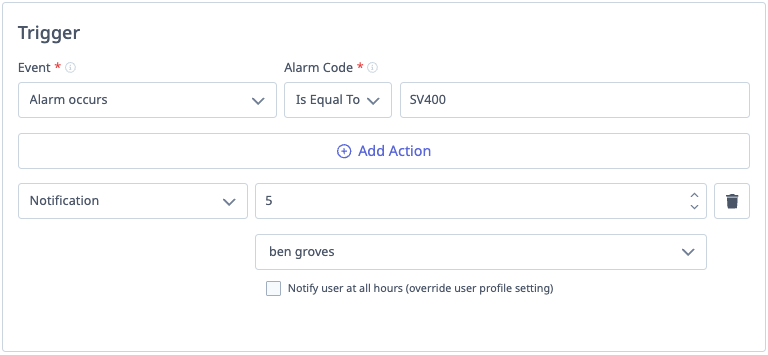
Configuration:
- Delay in Minutes (optional): Wait X minutes before sending notification
- 0 = immediate
- 15 = wait 15 minutes (useful for transient issues)
- Select User(s): Choose users to notify
- Only users with MachineMetrics profiles appear in list
- Users must have email/mobile configured in profile
- Override Profile Notification Times:
- Unchecked: Respect user's notification time preferences (e.g., "only during work hours")
- Checked: Send notification at any time (ignore user preferences)
Important:
- Delivery Method (email vs. text) is controlled by individual user profile settings
- Users must opt in to receive notifications in their profile
- Users must have mobile numbers configured for text notifications
Example:
Action: Notification
  - Delay: 5 minutes
  - Users: John Doe (Maintenance Supervisor)
  - Override notification times: No
Result: If alarm persists for 5 minutes, John receives notification (respecting his notification hours)
Use Cases:
- Alert maintenance to alarms
- Notify material handlers of material needs
- Alert supervisors to extended downtime
- Send performance summaries
2. Incident
Purpose: Create an incident when workflow triggers.
Configuration:
- No additional configuration needed
What is an Incident:
- Tracked issue requiring resolution
- Assigned to specific person
- Has status (Open, In Progress, Resolved)
- Includes all context (machine, trigger event, timestamp)
- Tracked in Incidents dashboard
Use Cases:
- Create work order for maintenance alarms
- Track quality issues requiring investigation
- Log extended downtime events for follow-up
- Systematically manage recurring problems
Example:
Trigger: Alarm Code "Tool Break"
Action: Incident
Result: Incident created, assigned to maintenance, tracked until resolved
[Recommended Image]: Screenshot of Incidents dashboard showing created incidents
3. Webhook
Purpose: Send data to external system (CMMS, ERP, etc.).
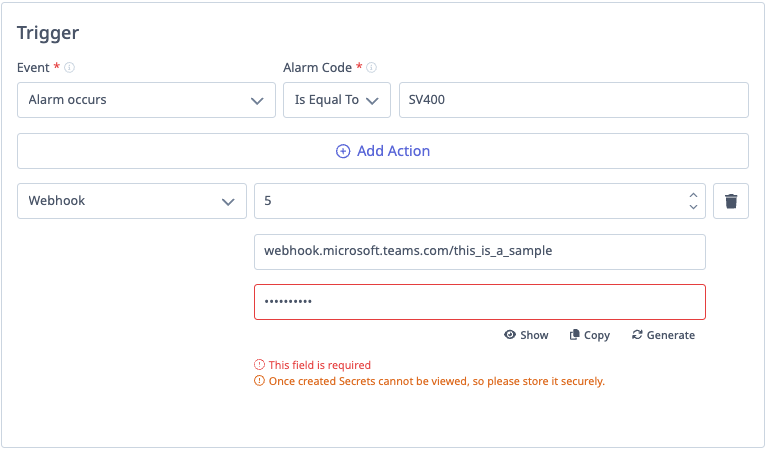
Configuration:
- Enter URL: Destination endpoint (e.g., https://your-cmms.com/api/work-orders)
- Enter Secret: Unique authentication code
- Auto-generated or custom
- Used for HMAC signature validation
- Important: Cannot be viewed again after creation - save it securely!
Data Sent:
- JSON payload with trigger event details:
- Machine information
- Trigger type and details
- Timestamp
- Additional context
- Headers:
X-MM-Signature: HMAC SHA-256 signature for authenticationX-MM-Timestamp: Request timestampX-MM-Request-URI: Request URI
[Recommended Image]: Replace with direct video link
Use Cases:
- Create work orders in CMMS
- Update ERP system with production status
- Sync data to external dashboards
- Trigger actions in other systems
Example:
Trigger: Downtime Categorized As "Maintenance Required"
Action: Webhook
  - URL: https://cmms.company.com/api/create-work-order
  - Secret: abc123def456 (securely stored)
Result: Work order automatically created in CMMS
Security:
- See Webhooks Integration for endpoint setup and security details
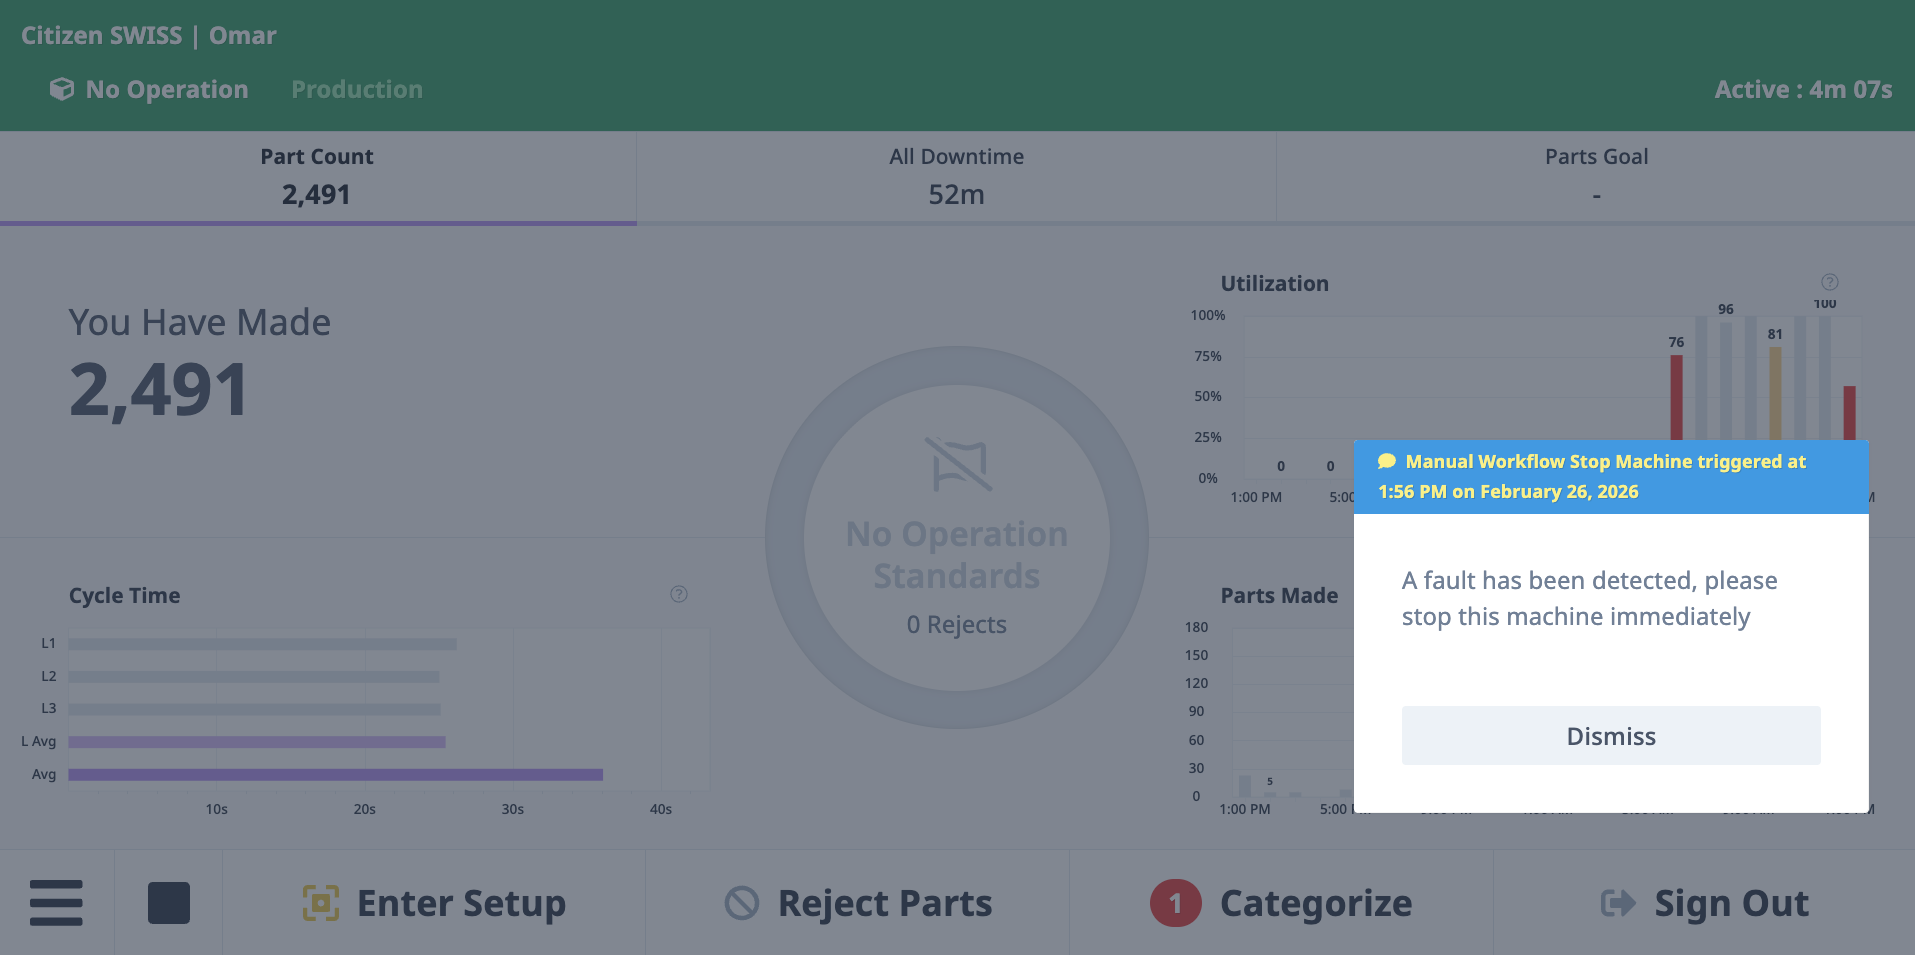
4. Operator Dashboard Message
Purpose: Display message on Operator Dashboard (tablet) at the machine.
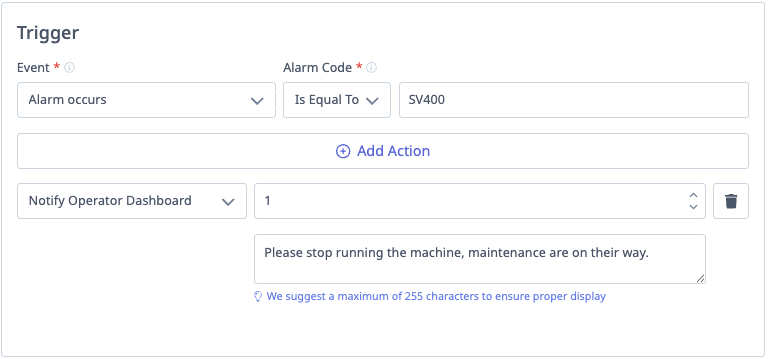
Configuration:
- Message Text: Enter message to display
Message Display:
- Appears as popup/banner on tablet
- Operator must acknowledge (dismiss) message
- Provides immediate context to operator
Use Cases:
- "Way Lube is Low! Please fill way lube to designated level!"
- "Maintenance has been notified and is on the way"
- "First article inspection required before continuing"
- "Setup time exceeding target - check tooling"
Example:
Trigger: Alarm Code "Way Lube Low"
Actions:
  - Notification to Maintenance
  - Operator Dashboard Message: "Way Lube is Low! Maintenance has been notified. Please fill way lube to designated level."
Result: Operator sees message immediately, maintenance is notified
Important: If using Scheduled trigger with "All Machines" target, message appears on all tablets.
5. Pause/Resume Operation
Purpose: Automatically pause or resume an operation based on trigger.
Configuration:
- Action: Pause or Resume
Use Cases:
- Pause operation if alarm occurs (prevent running with issue)
- Resume operation when condition clears
- Auto-pause during breaks (scheduled trigger)
Example:
Trigger: Alarm Occurs - "Coolant Low"
Action: Pause Operation
Result: Operation automatically paused, preventing machine from running without coolant
Note: Use with caution - ensure operators understand when/why operations auto-pause.
Common Workflow Examples
Example 1: Faster Downtime Resolution
Problem: Operators leave machines to find material, causing extended downtime.
Solution:
Workflow Name: Out of Material - Alert Material Handler
Machine(s): All Machines
Trigger: Downtime Categorized As "Out of Material"
Actions:
  1. Notification to Material Handler
  2. Operator Dashboard Message: "Material handler has been notified"
Status: Enabled
Results:
- Operator categorizes downtime as "Out of Material"
- Material handler receives immediate notification with machine location
- Operator continues working on other machines
- Material handler brings material
- Downtime reduced from 30+ minutes to 10 minutes
Example 2: Alarm Response Automation
Problem: Maintenance unaware of specific alarms until operator calls.
Solution:
Workflow Name: Way Lube Low - Notify Maintenance
Machine(s): Mill #3
Trigger: Alarm Occurs
  - Alarm Code: "P/S 000"
  - Matching: Is Equal To
Actions:
  1. Notification to Maintenance Supervisor
  2. Incident creation
  3. Operator Dashboard Message: "Maintenance has been notified. Please fill way lube."
Status: Enabled
Results:
- Alarm occurs
- Maintenance supervisor immediately notified
- Incident created for tracking
- Operator sees message and takes action
- Response time reduced from 20+ minutes to <5 minutes
Example 3: Material Replenishment Request
Problem: Operators must leave machines to request material, causing delays.
Solution:
Workflow Name: Operator Material Request
Machine(s): All Machines
Trigger: Operator Triggers Manually
Actions:
  1. Notification to Material Handler (with machine location)
  2. Operator Dashboard Message: "Material request sent to material handler"
Status: Enabled
Operator Experience:
- Operator presses "Request Material" button on tablet
- Message confirms request sent
- Material handler arrives with material
- Operator never left machine
Results:
- Reduced unplanned downtime
- Operators can handle more machines
- Improved material handler efficiency (knows exactly where to go)
Example 4: Extended Inactivity Alert
Problem: Machines sit idle during production shifts without anyone noticing.
Solution:
Workflow Name: Mill Group Idle 30min - Notify Supervisor
Machine(s): All Machines (filtered to Mill Group via filter)
Trigger: Machine Reports Inactive
  - Delay: 30 minutes
  - Operations are scheduled: Checked
  - Shifts to Monitor: First Shift, Second Shift
Actions:
  1. Notification to Production Supervisor
Status: Enabled
Results:
- Supervisor receives alert if any mill idle > 30 minutes during production shift
- Supervisor investigates (operator break? waiting for material? forgotten machine?)
- Proactive awareness prevents hours of lost production
Example 5: Daily Production Summary
Problem: Management wants daily production summary without manual reporting.
Solution:
Workflow Name: Daily Production Summary Email
Machine(s): All Machines
Trigger: Scheduled
  - Time: 7:00 AM
  - Days: Monday - Friday
Actions:
  1. Notification to Plant Manager, Operations Manager
    - Message includes link to Daily Production Dashboard
Status: Enabled
Results:
- Every morning at 7 AM, managers receive email with link to yesterday's production data
- Consistent, automated reporting
- No manual effort required
Example 6: Feedrate Monitoring
Problem: Operators sometimes reduce feedrate override but forget to increase it, causing slow cycles.
Solution:
Workflow Name: Mill #3 Feedrate Below 80% - Alert Operator
Machine(s): Mill #3
Trigger: Condition Monitor
  - Data Item: Feedrate Override
  - Condition: Less than
  - Value: 80
Actions:
  1. Operator Dashboard Message: "Feedrate Override is below 80%. Check if this is intentional."
  2. Notification to Process Engineer (delayed 10 minutes)
Status: Enabled
Results:
- Operator receives immediate message if feedrate drops below 80%
- Operator adjusts if unintentional
- If feedrate remains low for 10 minutes, engineer is notified to investigate
Example 7: CMMS Work Order Creation
Problem: Maintenance alarms require manual work order creation in CMMS.
Solution:
Workflow Name: Critical Alarms - Create CMMS Work Order
Machine(s): All Machines
Trigger: Alarm Occurs
  - Alarm Code: "crit"
  - Matching: Starts With
Actions:
  1. Webhook
    - URL: https://cmms.company.com/api/create-work-order
    - Secret: [saved securely]
  2. Notification to Maintenance Supervisor
Status: Enabled
Results:
- Any alarm starting with "crit" (crit-1, crit-temp, etc.) triggers workflow
- Work order automatically created in CMMS with all context (machine, alarm code, timestamp)
- Maintenance supervisor notified
- No manual work order creation needed
Managing Workflows
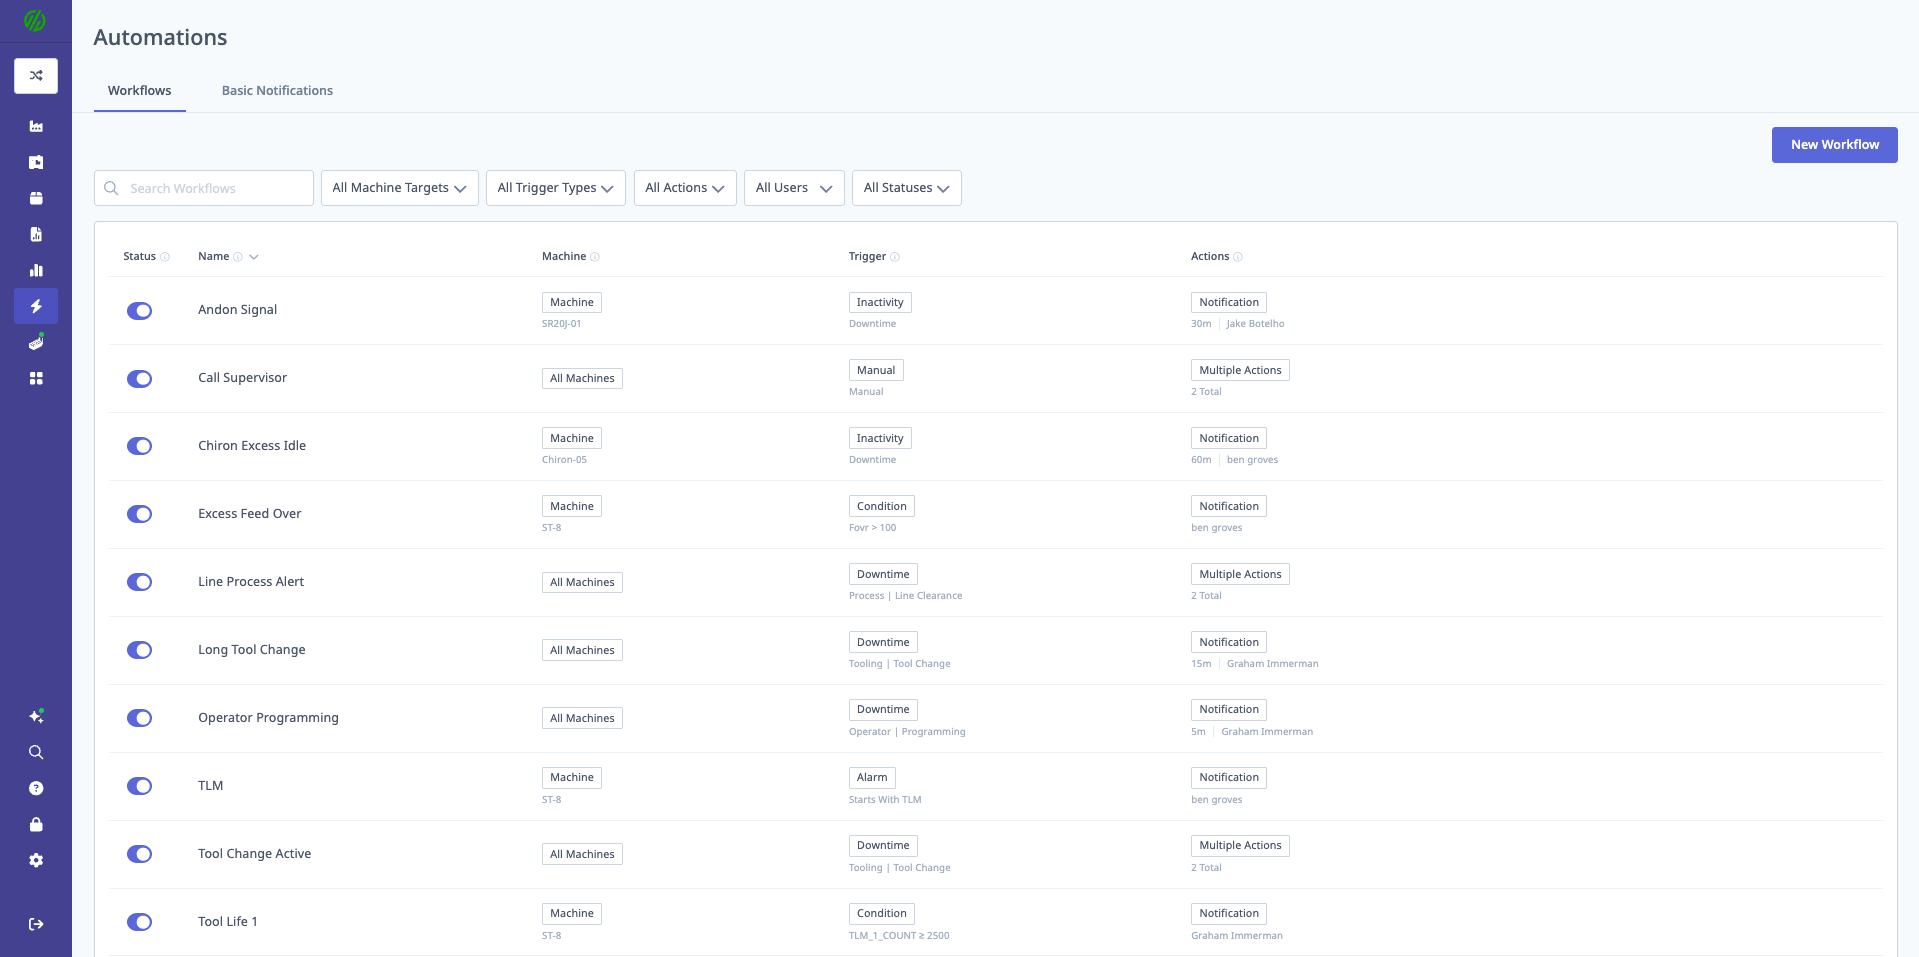
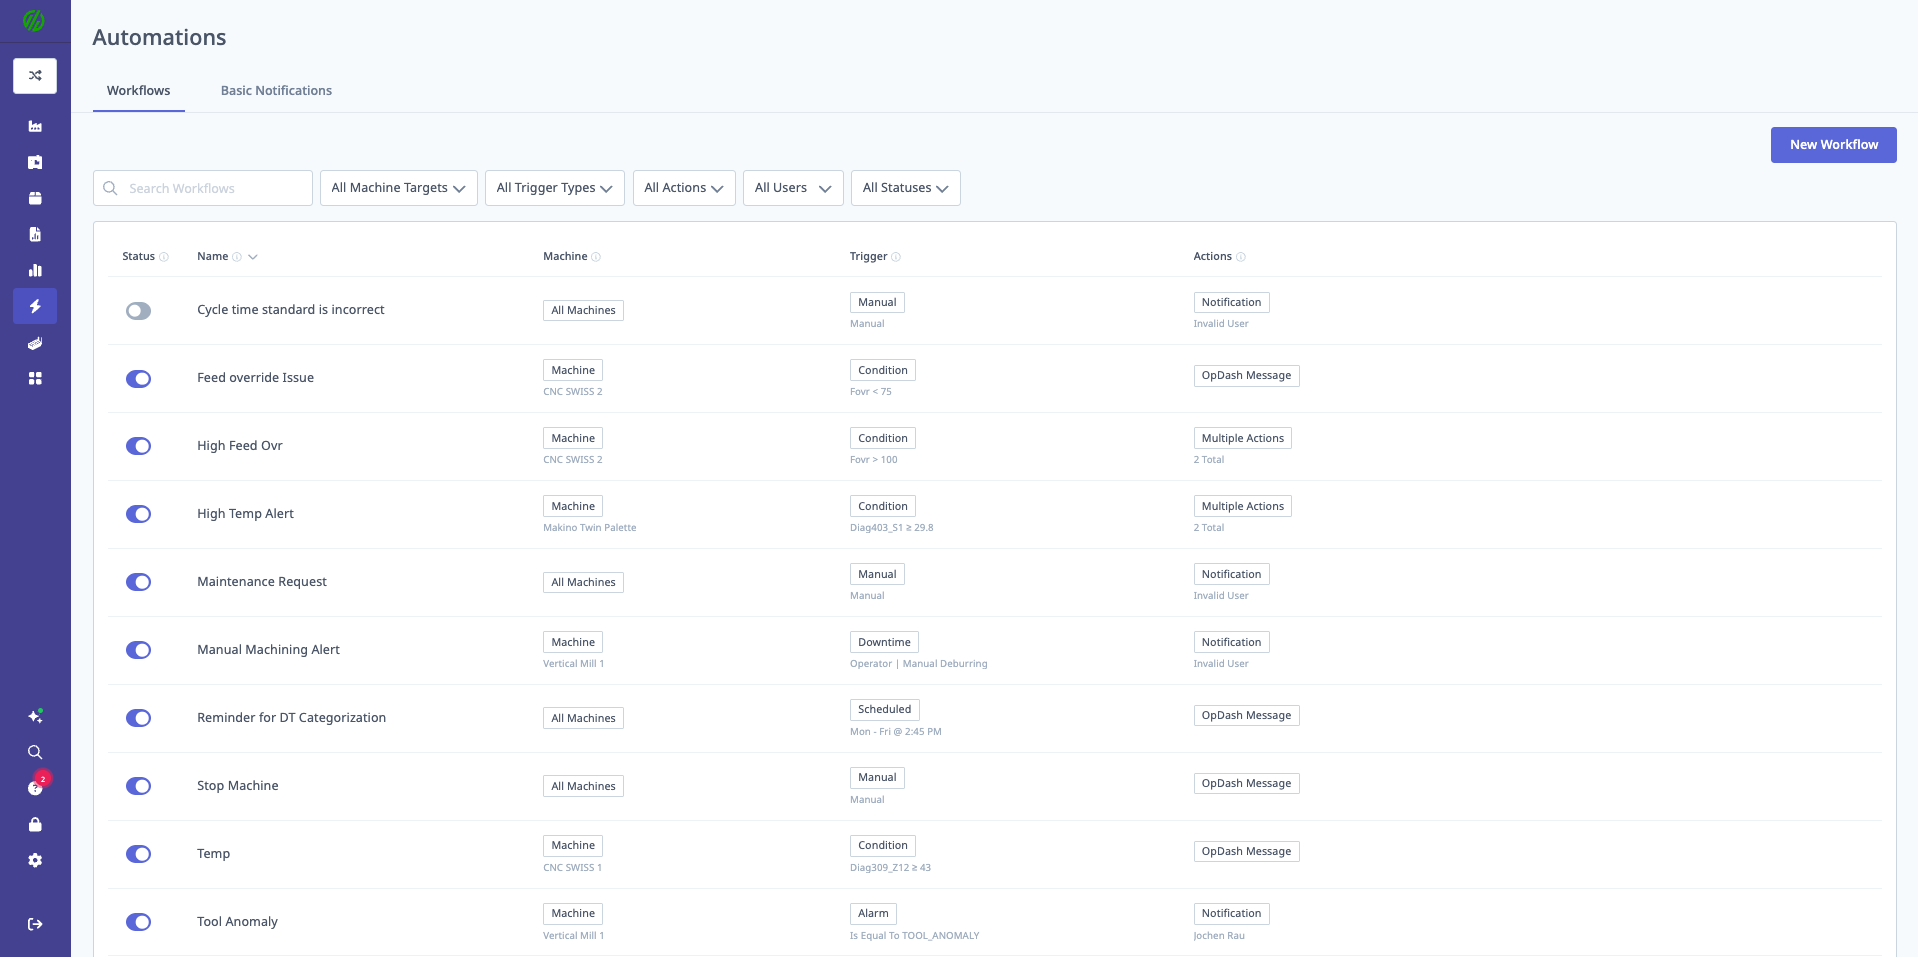
Viewing Workflows List
Workflows Page Shows:
- Status: Enabled (green) or Disabled (gray)
- Name: Workflow name
- Machine(s): Target machine(s)
- Trigger: Trigger type
- Action(s): Action type(s)
Sorting:
- Click column headers to sort
- Sort by name, machine, trigger, or status
Searching:
- Search box at top
- Search by workflow name, machine, trigger type, action type
Filtering:
- Machine Target: Filter to workflows for specific machines
- Trigger Type: Show only workflows with specific trigger
- Action Type: Show only workflows with specific action
- Users: Show only workflows notifying specific users
- Status: Show only Enabled or Disabled workflows
Editing Workflows
Step-by-Step:
- Navigate to Automations → Workflows
- Click on workflow in list
- Edit form opens
- Modify any field:
- Name
- Machine(s)
- Trigger settings
- Actions (add, remove, or modify)
- Status (Enable/Disable)
- Click Save
Changes Take Effect Immediately:
- Enabled workflows begin monitoring immediately
- Disabled workflows stop monitoring immediately
Disabling Workflows
When to Disable:
- Testing other workflows (avoid duplicate notifications)
- Machine out of service
- Trigger condition no longer relevant
- Temporary pause (e.g., during maintenance)
How to Disable:
- Open workflow for editing
- Toggle Status to Disabled
- Click Save
Benefits vs. Deletion:
- Workflow configuration preserved
- Can be re-enabled easily
- Maintains history
Deleting Workflows
When to Delete:
- Workflow no longer needed
- Replacing with updated workflow
- Cleaning up test workflows
Step-by-Step:
- Click on workflow in list
- Scroll to bottom of edit form
- Click Delete Workflow button
- Confirm deletion in popup dialog
- Workflow permanently deleted
Important: Cannot be undone. If you might need workflow again, disable instead.
Testing Workflows
Before Enabling:
- Create workflow with status = Disabled
- Manually trigger condition (e.g., categorize downtime)
- Check if notification received
- Verify webhook payload (if using webhooks)
- Once confirmed working, enable workflow
Recommendation: Test with single machine before applying to "All Machines".
Basic Notifications
What are Basic Notifications?
Basic Notifications are simpler, machine- or job-based notifications, separate from full Workflows.
Access:
- Navigate to Automations → Workflows
- Click Basic Notifications tab (separate from Workflows tab)
Configuration:
- Notification based on machine settings
- Or notification based on job settings
- Simpler setup than full workflows
When to Use:
- Simple notification needs (don't need advanced trigger logic)
- Quick setup for common scenarios
- Less flexible than workflows
Example:
- Notify supervisor when any machine in "Mill Group" goes inactive
[Recommended Image]: Screenshot of Basic Notifications configuration page
Webhooks Integration
What are Webhooks?
Webhooks allow MachineMetrics to send data to external systems in real-time.
Common Integrations:
- CMMS systems (create work orders)
- ERP systems (update production status)
- Custom dashboards
- Data warehouses
- Third-party analytics platforms
Creating a Webhook Endpoint
Requirements:
- External server to receive webhook data
- HTTPS endpoint (recommended for security)
- HMAC signature validation (recommended)
Example: Express.js Webhook Endpoint
const express = require('express');
const crypto = require('crypto');
const app = express();

app.use(express.json());

// Your webhook secret (same as configured in MachineMetrics workflow)
const WEBHOOK_SECRET = 'abc123def456';

app.post('/webhook', (req, res) => {
  // Get headers
  const signature = req.headers['x-mm-signature'];
  const timestamp = req.headers['x-mm-timestamp'];
  const requestUri = req.headers['x-mm-request-uri'];

  // Validate signature
  const payload = `${timestamp}.${requestUri}.${JSON.stringify(req.body)}`;
  const expectedSignature = crypto
    .createHmac('sha256', WEBHOOK_SECRET)
    .update(payload)
    .digest('hex');

  if (signature !== expectedSignature) {
    console.error('Invalid signature');
    return res.status(401).send('Invalid signature');
  }

  // Process webhook data
  console.log('Webhook received:', req.body);

  // Extract relevant info
  const { machine, trigger, timestamp: eventTime } = req.body;

  // Do something with the data (e.g., create work order in CMMS)
  // ...

  res.status(200).send('Webhook received');
});

app.listen(3000, () => {
  console.log('Webhook endpoint listening on port 3000');
});
Webhook Payload
Example Payload (Alarm trigger):
{
  "machine": {
    "id": "12345",
    "name": "Mill #3",
    "group": "CNC Mills"
  },
  "trigger": {
    "type": "alarm_occurs",
    "alarm_code": "P/S 101",
    "alarm_message": "Way Lube Low"
  },
  "timestamp": "2026-01-27T14:30:00Z",
  "workflow": {
    "id": "67890",
    "name": "Way Lube Low - Create Work Order"
  }
}
Payload Fields:
- machine: Machine details (id, name, group)
- trigger: Trigger type and details
- timestamp: When event occurred (ISO 8601)
- workflow: Workflow details
Security Best Practices
1. Use HMAC Signature Validation
- Always validate
X-MM-Signatureheader - Prevents unauthorized webhook calls
- Ensures data integrity
2. Store Secrets Securely
- Use environment variables (not hardcoded)
- Use secrets management (AWS Secrets Manager, Azure Key Vault, etc.)
- Never commit secrets to version control
3. Use HTTPS
- Encrypt data in transit
- Prevents man-in-the-middle attacks
4. Validate Timestamp
- Check
X-MM-Timestampto prevent replay attacks - Reject requests older than 5 minutes
5. Log Webhook Activity
- Log all incoming webhooks
- Monitor for unusual patterns
- Track failures for debugging
Automatic Setup (Beta)
What is Automatic Setup?
Automatic Setup automatically tracks setup time without operator input.
How It Works:
- Requires APM (Automatic Production Monitoring) enabled
- Works best with machines that have consistent cycle times
- Detects setup period based on cycle time patterns
- Automatically logs setup time in production runs
Enabling Automatic Setup
Prerequisites:
- APM must be enabled on machine
- Machine must report cycle times
- Operations must have expected cycle times configured
Step-by-Step:
- Navigate to Settings → Machines
- Select machine
- Scroll to Automatic Setup section
- Toggle Enable Automatic Setup
- Click Save
How Automatic Setup Detects Setup
Detection Logic:
- Production run starts (via APM or operator)
- Machine begins cycling
- Automatic Setup monitors cycle times
- If cycle times significantly longer than expected → Classifies as "Setup"
- Once cycle times stabilize near expected → Switches to "Production"
- Setup time automatically logged
Example:
Operation: Mill Part ABC-123
Expected Cycle Time: 120 seconds

Cycles 1-5: 180-300 seconds (50-150% longer) → Setup Mode
Cycles 6+: 115-125 seconds (near expected) → Production Mode

Setup Time: Automatically calculated from cycles 1-5
Benefits
- No operator input required
- Accurate setup time tracking
- Consistent setup time data
- Enables setup time analysis and improvement
Limitations
- Requires consistent cycle times
- May not work well for:
- Highly variable cycle times
- One-off jobs
- Manual operations
- Beta feature (may have edge cases)
Best Practices
Workflow Design
1. Use Descriptive Names
- Include trigger and action in name
- Examples:
- ✅ "Way Lube Low - Notify Maintenance"
- ✅ "Out of Material - Alert Material Handler"
- ❌ "Workflow 1"
- ❌ "Test"
2. Start Simple, Add Complexity
- Begin with single trigger + single action
- Test thoroughly
- Add additional actions once working
- Avoid overly complex workflows (hard to troubleshoot)
3. Use Delays for Transient Issues
- Some alarms clear quickly (false positives)
- Add 2-5 minute delay to avoid unnecessary notifications
- Example: Alarm occurs → Wait 5 minutes → If still present, notify
4. Combine Related Actions
- Use multiple actions in one workflow
- Example: Alarm occurs → Notify maintenance + Create incident + Display operator message
- Reduces workflow count, easier to manage
5. Test Before Enabling
- Create workflow as Disabled
- Manually trigger condition
- Verify notification received
- Enable once confirmed working
Notification Configuration
1. Configure User Profiles First
- Ensure users have email and mobile configured
- Verify users opted in to notifications
- Set appropriate notification time preferences
2. Respect Notification Times
- Don't override notification times unless critical
- Example: Way lube alarm → Override (machine may damage)
- Example: Daily report → Don't override (not urgent)
3. Avoid Notification Fatigue
- Don't notify for every minor event
- Use delays to filter transient issues
- Group related notifications (e.g., daily summary instead of per-event)
4. Notify the Right People
- Maintenance alarms → Maintenance supervisor
- Material needs → Material handler
- Quality issues → Quality department
- Don't notify entire team for specific issues (causes alert fatigue)
Downtime Category Hierarchy
Create Parent Categories with Subcategories:
Example: Tooling
- Parent: Tooling (broad category)
- Subcategories:
- Tool Change
- Tool Inspection
- Lack of Tooling
- Tool Break
Benefits:
- More specific root cause tracking
- More targeted notifications
- Example: "Tool Break" → Notify maintenance + create incident
- Example: "Lack of Tooling" → Notify tool crib only
Webhook Best Practices
1. Test Endpoint Before Production
- Use test endpoint first
- Verify payload structure
- Confirm authentication working
- Move to production once validated
2. Handle Errors Gracefully
- Webhook endpoint should always return 200 (even if processing fails)
- Log errors internally
- Retry logic for failed processing (not for failed authentication)
3. Process Asynchronously
- Don't block webhook response on long-running tasks
- Queue data for processing
- Return 200 immediately
4. Monitor Webhook Health
- Log all incoming webhooks
- Alert if webhooks stop arriving (connection issue?)
- Track processing failures
Maintenance and Review
Weekly:
- Review workflow execution counts
- Identify workflows never triggering (may need adjustment)
- Check for excessive triggering (may need delay or threshold adjustment)
Monthly:
- Review notification recipients (are they still correct?)
- Disable workflows for decommissioned machines
- Archive workflows no longer needed
Quarterly:
- Audit all workflows for relevance
- Update based on process changes
- Share best practices across teams
Getting Help
Common Questions
"Workflow not triggering"
- Check workflow status (Enabled?)
- Verify machine selection (correct machine?)
- Confirm trigger condition met (alarm code exact match?)
- Check filters (shift monitoring correct?)
"Notification not received"
- Check user profile (email/mobile configured?)
- Verify user opted in to notifications (Profile Settings → Notifications)
- Check notification time preferences (is it outside allowed hours?)
- Look in spam folder
"Webhook returning 401 error"
- Signature validation failing
- Verify webhook secret matches
- Check HMAC signature calculation logic
- Ensure timestamp, URI, and body included in signature payload
"Too many notifications"
- Add delay to workflow (filter transient issues)
- Adjust trigger threshold (e.g., increase inactivity delay)
- Consider daily summary instead of per-event notifications
"Workflow triggering for wrong machine"
- Check machine selection ("All Machines" when should be single?)
- Verify alarm code matching logic (using "Contains" when should use "Is Equal To"?)
- Review machine group configuration
Before Contacting Support
Gather Information:
- Workflow name
- Trigger type and configuration
- Action type and configuration
- Machine(s) affected
- Expected behavior vs. actual behavior
- When issue started (recent change?)
Try These Steps:
- Disable workflow, re-enable (refresh configuration)
- Test with single machine (narrow scope)
- Verify user profile settings (for notification issues)
- Check workflow execution log (if available)
- Create test workflow with same trigger (isolate issue)
Contact Support
MachineMetrics Support:
- Email: support@machinemetrics.com
- Include:
- Workflow name and configuration details
- Screenshot of workflow settings
- Machine(s) affected
- Trigger condition and when it occurred
- Expected vs. actual behavior
For Training:
- Request workflows training session
- Ask about webhook integration guidance
- Schedule team training on workflow best practices
Next Steps:
- Create your first workflow: Creating Workflows
- Explore common examples: Common Workflow Examples
- Set up webhook integration: Webhooks Integration
- Review related features: Production & Analytics Guide
Questions? Contact support@machinemetrics.com