Automatic Downtime Categorization
Overview
What is Automatic Downtime Categorization?
Automatic Downtime Categorization (also known as Automatic Downtime Tracking or ADT) identifies, records, and categorizes downtime events without requiring operator input. MachineMetrics continuously monitors machine state signals to detect when a machine stops producing parts, then automatically applies downtime categories using rule-based logic.
Key Benefits:
- ✅ Eliminate manual downtime entry by operators
- ✅ Ensure consistent and accurate downtime categorization
- ✅ Understand why machines go idle and uncover process bottlenecks
- ✅ Reduce operator burden and improve data quality
- ✅ Drive more accurate OEE and performance analytics
- ✅ Identify recurring downtime causes automatically
Feature Availability
| Requirement | Details |
|---|---|
| Module | Core Platform |
| Optional Add-Ons | None (ADT is included as part of downtime tracking) |
| Real-Time Requirements | Machine connectivity with status signals (in-cycle, idle, powered, alarms, I/O) |
| Access Level | Viewable by Operators & Supervisors Editable by Executive, Manager, and IT Admin |
How It Works
Detection
MachineMetrics continuously monitors machine state changes:
- Downtime Detected: When a machine leaves a productive state (in-cycle), ADT detects the transition into downtime
- Downtime Ends: When the machine resumes production, the downtime event automatically closes
- Timestamps Recorded: ADT stores start and end timestamps for real-time status and long-term analysis
Automatic Categorization
Once downtime is detected, ADT uses If-This-Then-That (IFTTT) logic to automatically assign downtime categories based on:
- Machine states (execution, mode, program data)
- Alarms (alarm codes or alarm text/messages)
- I/O signals (door open, tool release button, sensors)
- Time windows (scheduled breaks, lunch, shift meetings)
- Setup mode (when machine enters setup mode)
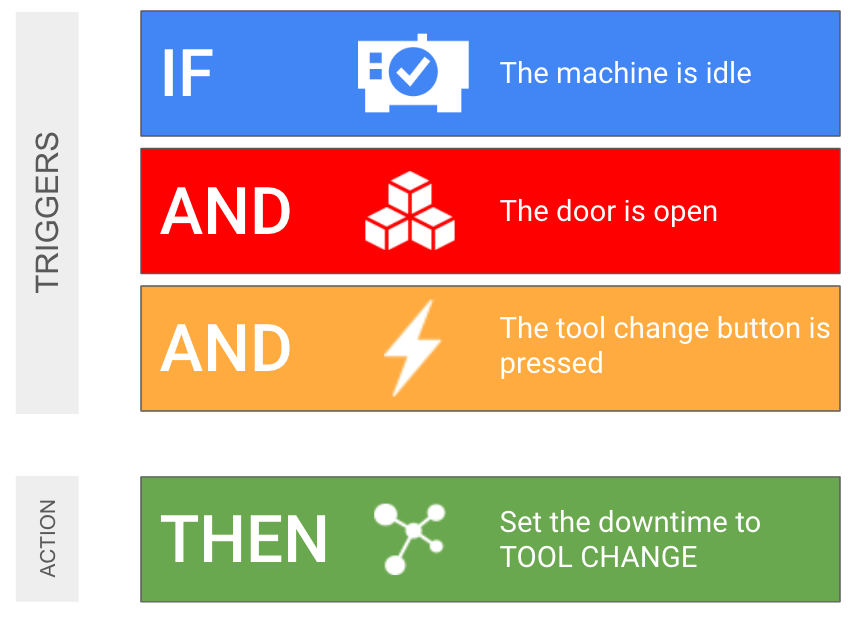
Example Logic:
IF alarm code = "PS1"
THEN categorize downtime as "Machine Fault | Programming Error"

IF data item "block" contains "M0"
THEN categorize downtime as "Operator | Optional Stop"

IF door sensor = "open"
THEN categorize downtime as "Operator | Door Open"
Prerequisites
Before Creating Downtime Rules
Recommended Setup Steps:
-
Configure Downtime Categories
- Navigate to System Settings → Downtime Categories
- Create a hierarchy of categories that match your shop floor needs
- Example structure:
Machine Fault
  ├─ Programming Error
  ├─ Overload
  └─ Mechanical Failure
Operator
  ├─ Optional Stop
  ├─ Door Open
  └─ Tool Change
Scheduled
  ├─ Break
  ├─ Lunch
 └─ Shift Meeting
-
Configure Machine Groups (if applicable)
- If you want rules to apply to specific groups of machines
- Navigate to System Settings → Machine Groups
- Create logical groups (e.g., CNC Mills, Lathes, Turning Centers)
-
Identify Data Items and Signals
- Review available data items in Machine Settings → Data Collection
- Identify alarm codes and messages from machine controls
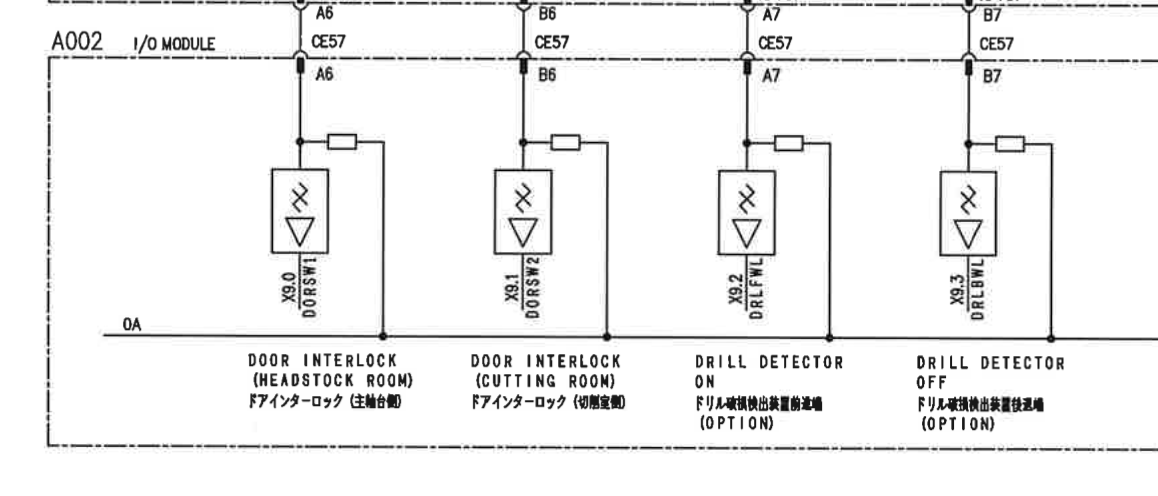
- Document I/O signals (PLC addresses) from ladder diagrams or wiring documentation
- Examples:
single-block= Single block mode activedoor-open= Door interlock signalblock= Current program block (M-code)- Alarm codes:
PS1,PS0094, etc. - I/O addresses:
X9.1(door sensor),X10.5(tool release button)
Accessing Downtime Rules
Navigation
- In the left-hand navigation menu, click My Apps
- When the menu expands, select Downtime Rules
- The Downtime Rules configuration page will open
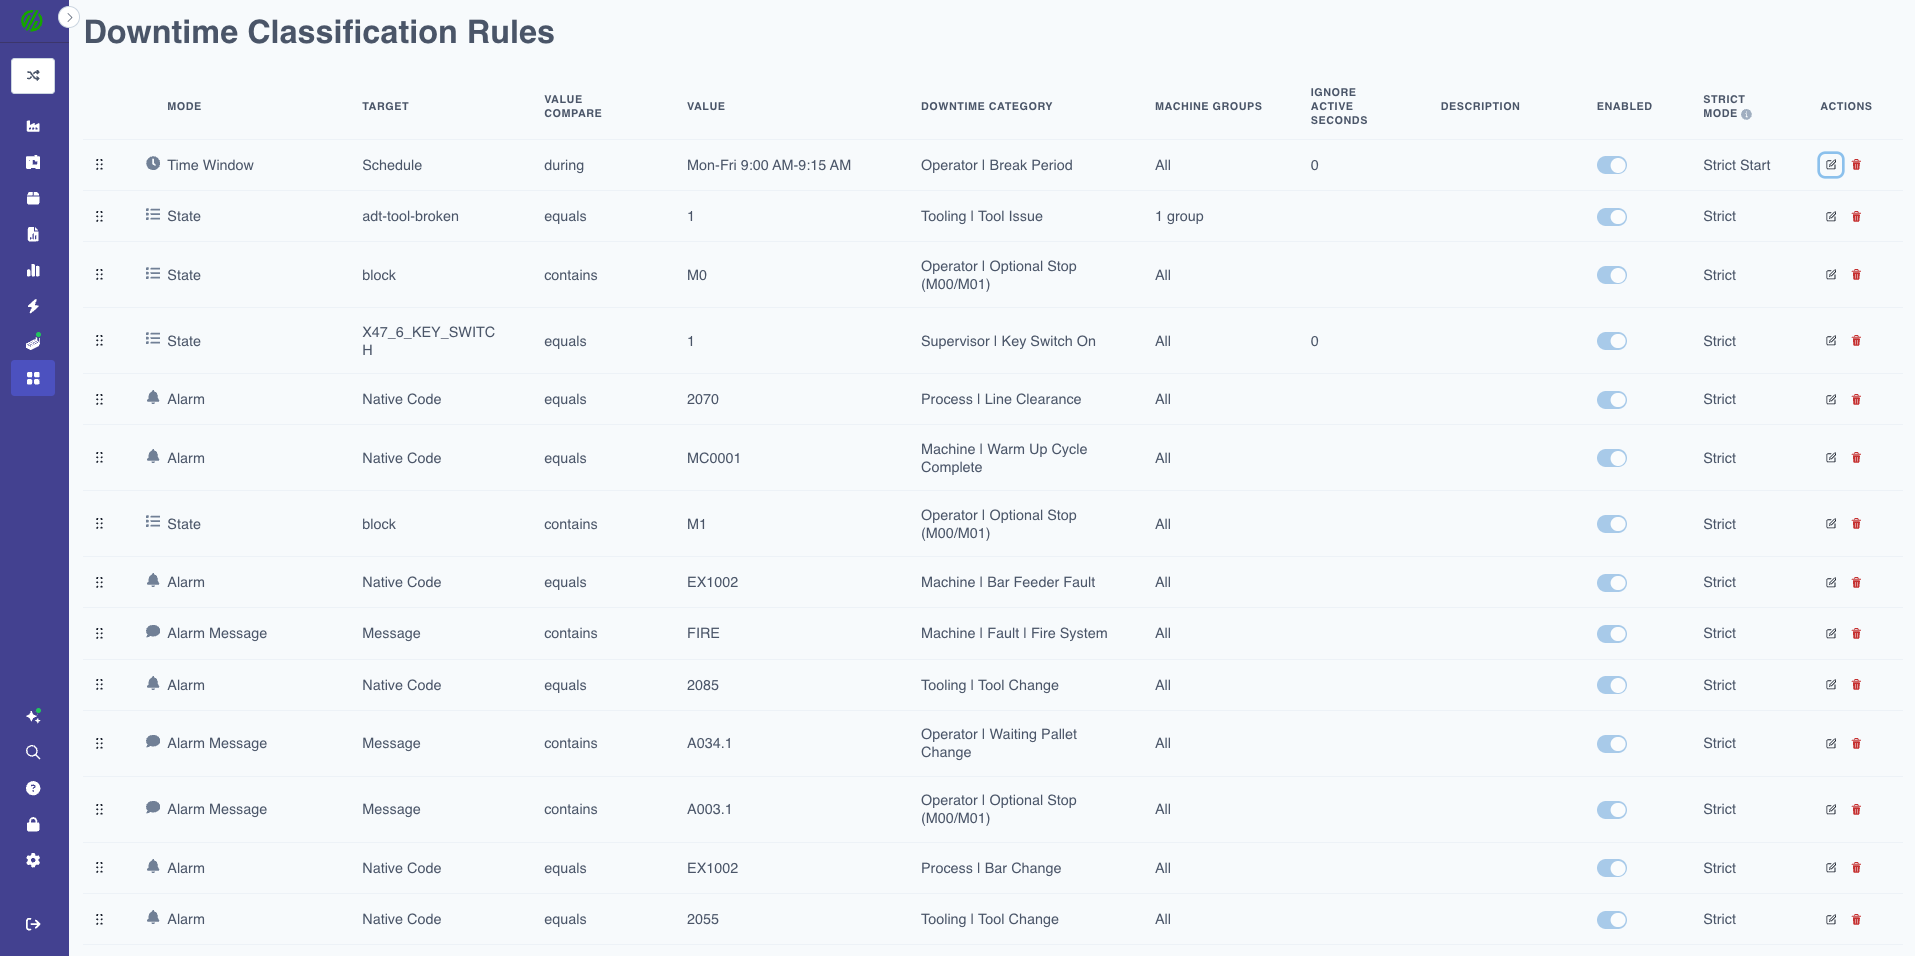
What You'll See
- List of existing rules (if any have been created)
- Add New Rule button at the top
- Rule table showing:
- Enabled/Disabled status
- Mode (Alarm, Alarm Message, State, Setup, Time Window)
- Target (data item, alarm code, or time range)
- Value comparison logic
- Assigned downtime category
- Machine group or "All Machines"
- Edit and delete actions
Creating Automatic Downtime Rules
Step-by-Step Process
Step 1: Click "Add New Rule"
A new row will appear in the rule table with empty configuration fields.
Step 2: Select Mode
Choose the trigger type for your rule. Available modes:
| Mode | Description | Use Case |
|---|---|---|
| Alarm | Uses alarm code or number | Categorize based on specific machine fault codes |
| Alarm Message | Uses alarm message text | Categorize based on text in alarm descriptions (supports "contains") |
| State | Uses any data item value | Categorize based on machine state, program data, or I/O signals |
| Setup | Triggers when machine enters setup mode | Automatically categorize all setup-related downtime |
| Time Window | Based on specific time periods | Categorize scheduled breaks, lunch, shift meetings |
Step 3: Specify Target
Depending on the mode selected:
- Alarm: Enter the alarm code (e.g.,
PS1,PS0094) - Alarm Message: (No target needed - will check message text in next step)
- State: Select the data item from dropdown (e.g.,
block,single-block,door-open) - Setup: Select setup activity type or "Any"
- Time Window: Define start time, end time, and days of week
Step 4: Configure Value Comparison
Choose how to compare the target value:
| Comparison | Description | Example |
|---|---|---|
| equals | Exact match | block equals M0 |
| contains | Partial text match | alarm message contains Overload |
| greater than | Numeric comparison | temperature > 180 |
| less than | Numeric comparison | pressure < 50 |
Step 5: Enter Value
Specify the value to match:
- For equals: Enter exact value (e.g.,
M0,1,PS1) - For contains: Enter text to search for (e.g.,
Overload,Door) - For numeric comparisons: Enter threshold number
Example:
Mode: State
Target: block
Value Compare: contains
Value: M0
Result: When "block" data item contains "M0", trigger this rule
Step 6: Select Downtime Category
Choose the downtime category to apply when the rule matches:
- Select from the dropdown of configured categories
- Example:
Operator | Optional Stop
Step 7: Choose Machine Application
Decide which machines this rule applies to:
- All Machines: Rule applies shop floor-wide
- Specific Machine Group: Select from configured groups (e.g., "CNC Mills")
- Individual Machines: Select specific machines
Step 8: Configure Rule Options (Optional)
-
Active Seconds to Ignore: Set minimum duration before rule fires (filters noise)
- Example:
5seconds = ignore if state is active for less than 5 seconds - Use this to avoid false triggers from brief state changes
- Example:
-
Strict Mode: Choose how to align categorization with trigger timing (see Understanding Strict Mode)
-
Enabled: Toggle to activate or deactivate the rule without deleting it
Step 9: Save Rule
Click Save or press Enter to create the rule. The rule will immediately start evaluating future downtime events.
Rule Modes Explained
Alarm Mode
Purpose: Categorize downtime based on specific alarm codes or numbers reported by the machine control.
When to Use:
- Machine has well-defined fault codes
- You want to categorize based on specific errors (e.g., PS1 = Programming Error)
Configuration:
Mode: Alarm
Target: PS1
Value Compare: equals (implied)
Downtime Category: Machine Fault | Programming Error
Result: Any time alarm PS1 is active during downtime, it's categorized as "Machine Fault | Programming Error"
Alarm Message Mode
Purpose: Categorize downtime based on text in alarm messages (not just codes).
When to Use:
- Alarm codes are generic but messages are descriptive
- You want to match partial text (e.g., any alarm containing "Overload")
Configuration:
Mode: Alarm Message
Value Compare: contains
Value: Overload
Downtime Category: Machine Fault | Overload
Result: Any alarm message containing the word "Overload" categorizes downtime as "Machine Fault | Overload"
Benefits:
- Match multiple related alarms with one rule
- Don't need to know exact alarm codes
- Works with descriptive alarm text
State Mode
Purpose: Categorize downtime based on any data item value (machine state, program data, I/O signals).
When to Use:
- You have data items that indicate why machine stopped
- You want to use I/O signals (door open, tool release, etc.)
- You want to categorize based on program blocks or M-codes
Configuration Example 1 - M-Code Detection:
Mode: State
Target: block
Value Compare: contains
Value: M0
Downtime Category: Operator | Optional Stop
Configuration Example 2 - Door Sensor:
Mode: State
Target: door-open
Value Compare: equals
Value: 1
Downtime Category: Operator | Door Open
Configuration Example 3 - Single Block Mode:
Mode: State
Target: single-block
Value Compare: equals
Value: 1
Downtime Category: Operator | Single Block
Result: State mode is the most versatile - use it for any data item available from the machine.
Setup Mode
Purpose: Automatically categorize downtime when the machine is in setup mode.
When to Use:
- You want all setup-related downtime automatically categorized
- You use MachineMetrics' setup tracking features
- You want to differentiate between production and setup downtime
Configuration Example 1 - Any Setup:
Mode: Setup
Value Compare: equals
Value: Any
Downtime Category: Setup | In Progress
Configuration Example 2 - Specific Setup Activity:
Mode: Setup
Target: (Setup Activity Type)
Value Compare: equals
Value: First Piece Inspection
Downtime Category: Quality | First Piece Inspection
Result: Setup mode automatically categorizes all or specific types of setup work.
Time Window Mode
Purpose: Categorize downtime during specific time periods (scheduled breaks, lunch, meetings).
When to Use:
- You have regularly scheduled downtime (breaks, lunch, shift meetings)
- You want to exclude scheduled downtime from unplanned downtime analysis
- You want consistent categorization regardless of machine state
Configuration Example:
Mode: Time Window
Start Time: 10:30 AM
End Time: 10:45 AM
Days: Monday - Friday
Downtime Category: Scheduled | Break
Result: Any downtime occurring between 10:30-10:45 AM on weekdays is automatically categorized as "Scheduled | Break"
Best Practice: Use Strict mode with Time Window rules to ensure categorization matches the exact schedule.
Rule Configuration Options
Active Seconds to Ignore
Purpose: Filter out noise from brief state changes that don't represent real downtime causes.
How It Works:
- Sets a minimum duration the trigger must be active before the rule fires
- Prevents false categorization from momentary state changes
Example Scenario:
Machine briefly cycles, then stops again within 3 seconds.
Without filtering, rule would fire and categorize the short burst.

With "Active Seconds to Ignore: 5":
Rule only fires if the trigger is active for 5+ seconds.
When to Use:
- Machine frequently has brief state changes
- You want to categorize only sustained conditions
- You need to filter sensor noise or momentary signals
Recommended Values:
3-5 seconds: Light filtering (most common)10-15 seconds: Moderate filtering30+ seconds: Heavy filtering (only for very noisy signals)
Machine Group Application
Purpose: Apply rules to specific groups of machines rather than all machines.
How It Works:
- Select "All Machines" for shop floor-wide application
- Select specific machine group for targeted rules
- Create multiple versions of the same rule for different groups if needed
Example Use Cases:
Use Case 1: Group-Specific Rules
Rule 1:
- Applied to: CNC Mills group
- Mode: Alarm
- Target: PS0094
- Category: Machine Fault | Spindle Overload

Rule 2:
- Applied to: Lathes group
- Mode: Alarm
- Target: PS0094
- Category: Machine Fault | Chuck Overload

Same alarm code, different meaning on different machine types.
Use Case 2: Universal Rule
Rule:
- Applied to: All Machines
- Mode: Time Window
- Time: 12:00 PM - 12:30 PM
- Category: Scheduled | Lunch

Lunch break applies to entire shop floor.
Enable/Disable Toggle
Purpose: Temporarily activate or deactivate rules without deleting them.
When to Use:
- Testing new rules (disable while validating logic)
- Seasonal rules (disable during periods when not applicable)
- Troubleshooting (disable to isolate rule behavior)
- A/B testing different categorization approaches
Best Practice: Disable rules instead of deleting them so you can re-enable later if needed.
Understanding Strict Mode
Overview
Strict Mode controls how the downtime categorization aligns with the trigger's active timing. It determines when the category starts and ends relative to the trigger.
Strict Mode Options
| Mode | Start Timing | End Timing | Use Case |
|---|---|---|---|
| Off (Default) | Applies to full downtime duration | Applies to full downtime duration | General categorization when timing doesn't need to be precise |
| Strict Start | Category starts immediately when trigger activates | Category continues past when trigger ends | For events that start at a specific time but may overflow |
| Strict End | Category applies from downtime start | Category ends exactly when trigger ends | For events that end at a specific time |
| Strict | Category starts when trigger activates | Category ends when trigger deactivates | For precisely bounded events (scheduled breaks, meetings) |
Visual Examples
Scenario: Machine M-Code M0 Detection
Timeline:
|-------------|=== M0 Active ===|-------------|
^             ^                 ^             ^
Downtime      Trigger          Trigger       Downtime
Starts        Activates        Ends          Ends

Strict Mode: Off
|=========== Operator | Optional Stop ===========|
(Entire downtime is categorized, regardless of M0 timing)

Strict Mode: Strict Start
              |=========== Operator | Optional Stop ===========|
              (Category starts when M0 activates, continues past M0 end)

Strict Mode: Strict End
|=========== Operator | Optional Stop ===|
(Category applies from downtime start, ends when M0 ends)

Strict Mode: Strict
              |===== Operator | Optional Stop =====|
              (Category precisely mirrors M0 active period)
When to Use Each Mode
Strict Mode: Off (Default)
Use when:
- You want the entire downtime categorized once trigger is detected
- Exact timing alignment doesn't matter
- Example: Any alarm during downtime categorizes the whole event
Strict Mode: Strict Start
Use when:
- Event has a defined start but variable end
- You want categorization to begin at trigger activation
- Example: Setup begins at specific time but duration varies
Strict Mode: Strict End
Use when:
- Event has a variable start but defined end
- You want categorization to end precisely with trigger
- Example: Break ends at exact time but may start early
Strict Mode: Strict
Use when:
- Event has precise start AND end boundaries
- You want categorization to exactly mirror trigger duration
- Example: Scheduled 15-minute break from 10:30-10:45 AM
Best Practice for Time Window Rules: Always use Strict mode with Time Window rules to ensure downtime is categorized only during the scheduled period, not before or after.
Example Rules
Example 1: M-Code Optional Stop
Goal: Categorize downtime when program contains M0 (optional stop) as operator-initiated.
Configuration:
Mode: State
Target: block
Value Compare: contains
Value: M0
Downtime Category: Operator | Optional Stop
Applied To: All Machines
Active Seconds to Ignore: 0
Strict Mode: Off
Enabled: Yes
Result: Any time the block data item contains "M0" during downtime, the downtime is categorized as "Operator | Optional Stop"
Example 2: Door Open Detection
Goal: Categorize downtime when door sensor is triggered.
Configuration:
Mode: State
Target: door-open
Value Compare: equals
Value: 1
Downtime Category: Operator | Door Open
Applied To: All Machines
Active Seconds to Ignore: 3
Strict Mode: Off
Enabled: Yes
Result: When door is open (signal = 1) for more than 3 seconds, downtime is categorized as "Operator | Door Open"
Example 3: Alarm-Based Categorization
Goal: Categorize downtime when specific alarm PS1 occurs as programming error.
Configuration:
Mode: Alarm
Target: PS1
Value Compare: equals (implied)
Downtime Category: Machine Fault | Programming Error
Applied To: CNC Mills
Active Seconds to Ignore: 0
Strict Mode: Off
Enabled: Yes
Result: Alarm PS1 during downtime on CNC Mills is categorized as "Machine Fault | Programming Error"
Example 4: Alarm Message Text Search
Goal: Categorize any alarm containing "Overload" as overload fault.
Configuration:
Mode: Alarm Message
Value Compare: contains
Value: Overload
Downtime Category: Machine Fault | Overload
Applied To: All Machines
Active Seconds to Ignore: 0
Strict Mode: Off
Enabled: Yes
Result: Any alarm message containing the word "Overload" categorizes downtime as "Machine Fault | Overload"
Example 5: Scheduled Break
Goal: Automatically categorize morning break from 10:30-10:45 AM as scheduled downtime.
Configuration:
Mode: Time Window
Start Time: 10:30 AM
End Time: 10:45 AM
Days: Monday - Friday
Downtime Category: Scheduled | Break
Applied To: All Machines
Strict Mode: Strict
Enabled: Yes
Result: Any downtime occurring between 10:30-10:45 AM on weekdays is categorized as "Scheduled | Break" - precisely bounded to those times only.
Example 6: Setup Mode Detection
Goal: Automatically categorize all setup work.
Configuration:
Mode: Setup
Value Compare: equals
Value: Any
Downtime Category: Setup | In Progress
Applied To: All Machines
Strict Mode: Off
Enabled: Yes
Result: Whenever machine enters setup mode, associated downtime is categorized as "Setup | In Progress"
Example 7: First Piece Inspection
Goal: Categorize first piece inspection as quality activity.
Configuration:
Mode: Setup
Target: (Setup Activity Type)
Value Compare: equals
Value: First Piece Inspection
Downtime Category: Quality | First Piece Inspection
Applied To: All Machines
Strict Mode: Off
Enabled: Yes
Result: First piece inspection setup activities are categorized as "Quality | First Piece Inspection"
Best Practices
Rule Design
Start Simple:
- Begin with high-frequency, high-impact downtime causes
- Add 3-5 rules initially, validate behavior, then expand
- Use the minimum set of triggers required
Use Clear Naming:
- Create descriptive downtime categories
- Use hierarchy: Parent | Child format (e.g., "Machine Fault | Overload")
- Maintain consistent naming conventions
Layer Rules:
- Start with broad rules (alarm message contains "Overload")
- Add specific rules for edge cases (alarm PS0094 on specific machine group)
- Rules evaluate in order - specific rules can override general ones
Signal Discovery
Identify Available Data:
- Review Machine Settings → Data Collection tab
- Document available data items, alarms, and signals
- Work with maintenance to locate PLC addresses
PLC Signal Documentation:
- X-addresses = Inputs (sensors, buttons, switches)
- Y-addresses = Outputs (lights, actuators, relays)
- Reference ladder diagrams or wiring documentation
- Example:
X9.1= door interlock sensor
Test Before Deploying:
- Disable rule initially, observe machine behavior
- Validate data item values match expected triggers
- Enable rule and monitor categorization accuracy
Maintenance
Regular Review:
- Review downtime reports weekly to validate rule behavior
- Look for "Uncategorized" downtime (gaps in coverage)
- Adjust rules based on operational feedback
Document Rules:
- Maintain documentation of what each rule does
- Include signal sources (PLC addresses, data items)
- Note any machine-specific behavior or edge cases
Monitor Performance:
- Use Active Seconds to Ignore to filter noise
- Adjust Strict Mode based on categorization accuracy
- Disable underperforming rules rather than deleting
Operator Communication
Inform Operators:
- Explain that downtime is now categorized automatically
- Operators can still override if needed (with proper permissions)
- Reduce operator burden by eliminating manual entry
Validate Accuracy:
- Cross-reference automatic categorization with operator knowledge
- Operators can flag incorrect categorizations for rule adjustment
- Use feedback loop to improve rule accuracy over time
Troubleshooting
Issue: Rule Not Triggering
Possible Causes:
- Rule is disabled (check Enable toggle)
- Data item not available or reporting UNAVAILABLE
- Value comparison logic is incorrect
- Active Seconds to Ignore set too high
Solution:
- Verify rule is enabled
- Check Machine Settings → Diagnostics tab
- Confirm data item is reporting expected values
- Test with simpler comparison (e.g., "equals" instead of "contains")
- Reduce or remove Active Seconds to Ignore temporarily
Issue: Rule Triggers Too Frequently
Possible Causes:
- Trigger is too sensitive (brief state changes)
- Active Seconds to Ignore set too low or disabled
- Data item has noisy signal
Solution:
- Increase Active Seconds to Ignore (try 5-10 seconds)
- Verify signal source (may need electrical filtering if PLC signal)
- Use more specific value comparison
- Consider if multiple rules are overlapping
Issue: Wrong Downtime Category Applied
Possible Causes:
- Multiple rules matching the same condition
- Rule priority or order of evaluation
- Incorrect target data item selected
Solution:
- Review all active rules for overlaps
- Make rules more specific (narrow scope)
- Disable conflicting rules one at a time to isolate
- Verify target data item is correct source
Issue: Strict Mode Not Working as Expected
Possible Causes:
- Misunderstanding of Strict Mode behavior
- Trigger timing doesn't align with downtime event
- Incorrect Strict Mode selected for use case
Solution:
- Review Understanding Strict Mode section
- Use Strict mode for precisely bounded events only
- Use Off mode for general categorization
- Test with different Strict Mode options and observe results
Issue: Time Window Rule Not Firing
Possible Causes:
- Machine timezone not configured correctly
- Time window doesn't overlap with machine idle time
- Strict Mode not set correctly
Solution:
- Verify machine timezone in System Settings
- Check machine schedule/shifts align with time window
- Use Strict mode with Time Window rules
- Confirm days of week are correct (Monday-Friday vs weekends)
Issue: Can't Find Data Item for Rule
Possible Causes:
- Data item not mapped from machine
- Data item name different than expected
- Machine connection not capturing desired signal
Solution:
- Check Machine Settings → Data Collection
- Search for similar data items (e.g., "block", "program", "alarm")
- Contact MachineMetrics support to add data item mapping
- Provide PLC address or signal source documentation
Getting Help
Before Contacting Support
Gather Information:
- Machine name(s) affected
- Rule configuration (mode, target, value, category)
- Expected behavior vs actual behavior
- Screenshot of rule configuration
- Screenshot of Diagnostics tab showing data item values
Common Questions
"How do I find PLC signal addresses?"
- Request ladder diagrams or wiring documentation from maintenance
- Check machine HMI for diagnostic screens showing I/O status
- X-addresses = Inputs, Y-addresses = Outputs
- Contact machine tool builder for documentation
"Can operators still manually categorize downtime?"
- Yes, if permissions allow
- Operators can override automatic categorization in ShopPulse
- Overrides are tracked and can be reviewed
"Do rules apply retroactively to past downtime?"
- No, rules only apply to future downtime events after rule is created
- Historical downtime remains categorized as it was at the time
"How many rules can I create?"
- No strict limit, but recommend keeping it manageable (<50 rules)
- Too many rules can be difficult to maintain
- Focus on high-value, high-frequency downtime causes
"What if I have conflicting rules?"
- Rules evaluate in order
- More specific rules should be created to override general ones
- Disable conflicting rules to test behavior
Contact Support
MachineMetrics Support:
- Email: support@machinemetrics.com
- In-App: Use Max AI to ask "How do I configure automatic downtime rules?"
Include in Support Request:
- Machine name(s)
- Rule configuration screenshot
- Data item or signal source (PLC address)
- Expected vs actual behavior
- Screenshots of Diagnostics tab
Related Articles
- Downtime & Quality Guide - Manual downtime tracking and quality management
- Machine Settings Guide - Data collection and mapping
- Understanding Your Data Guide - Data items and metrics explained
Ready to automate your downtime categorization?
- Navigate to My Apps → Downtime Rules
- Create downtime categories in System Settings (if not already done)
- Click Add New Rule
- Select a mode (start with Alarm or State for simplest rules)
- Configure target, comparison, and category
- Enable and save
- Monitor downtime reports to validate accuracy
Questions? Contact support@machinemetrics.com or use Max AI in the app.