Getting Started with MES in ShopPulse: Operator Guide
Overview
The ShopPulse operator dashboard is your interface for managing jobs and submitting labor tickets on MES-enabled machines. This guide covers everything you need to work confidently: understanding your dashboard, signing in, selecting and starting jobs, performing setup, running production, submitting labor tickets, handling corrections, and signing out.
Your primary job is simple: select or confirm the right job, do the work, and submit the labor ticket when done. Most tracking happens automatically — you're the quality check that keeps the data accurate.
Note: If your machine is configured as ERP Driven, job management happens in the ERP, not ShopPulse. Contact your administrator if unsure which mode your machine uses.
Feature Availability
Before you begin, make sure:
- The MES Package is active on your account and MES is enabled on your individual machine (your administrator handles this when enabling MES on the machine)
- Your machine's ShopPulse device is authorized by your account Manager or Executive
- Your operator profile is configured in Settings → Operators
- If the job queue is not visible in ShopPulse, contact your administrator
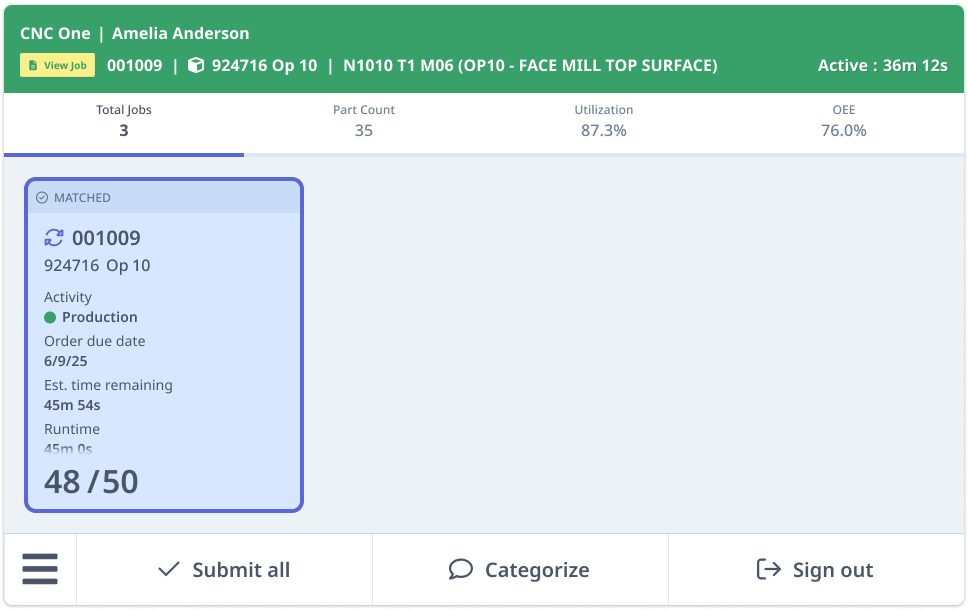
Your ShopPulse Dashboard
The ShopPulse dashboard displays key production details for setup and production activities. Based on your company settings you may also have access to other screens dedicated to downtime, alarms, and other metrics, but this screen is the fundamental place to monitor your work.
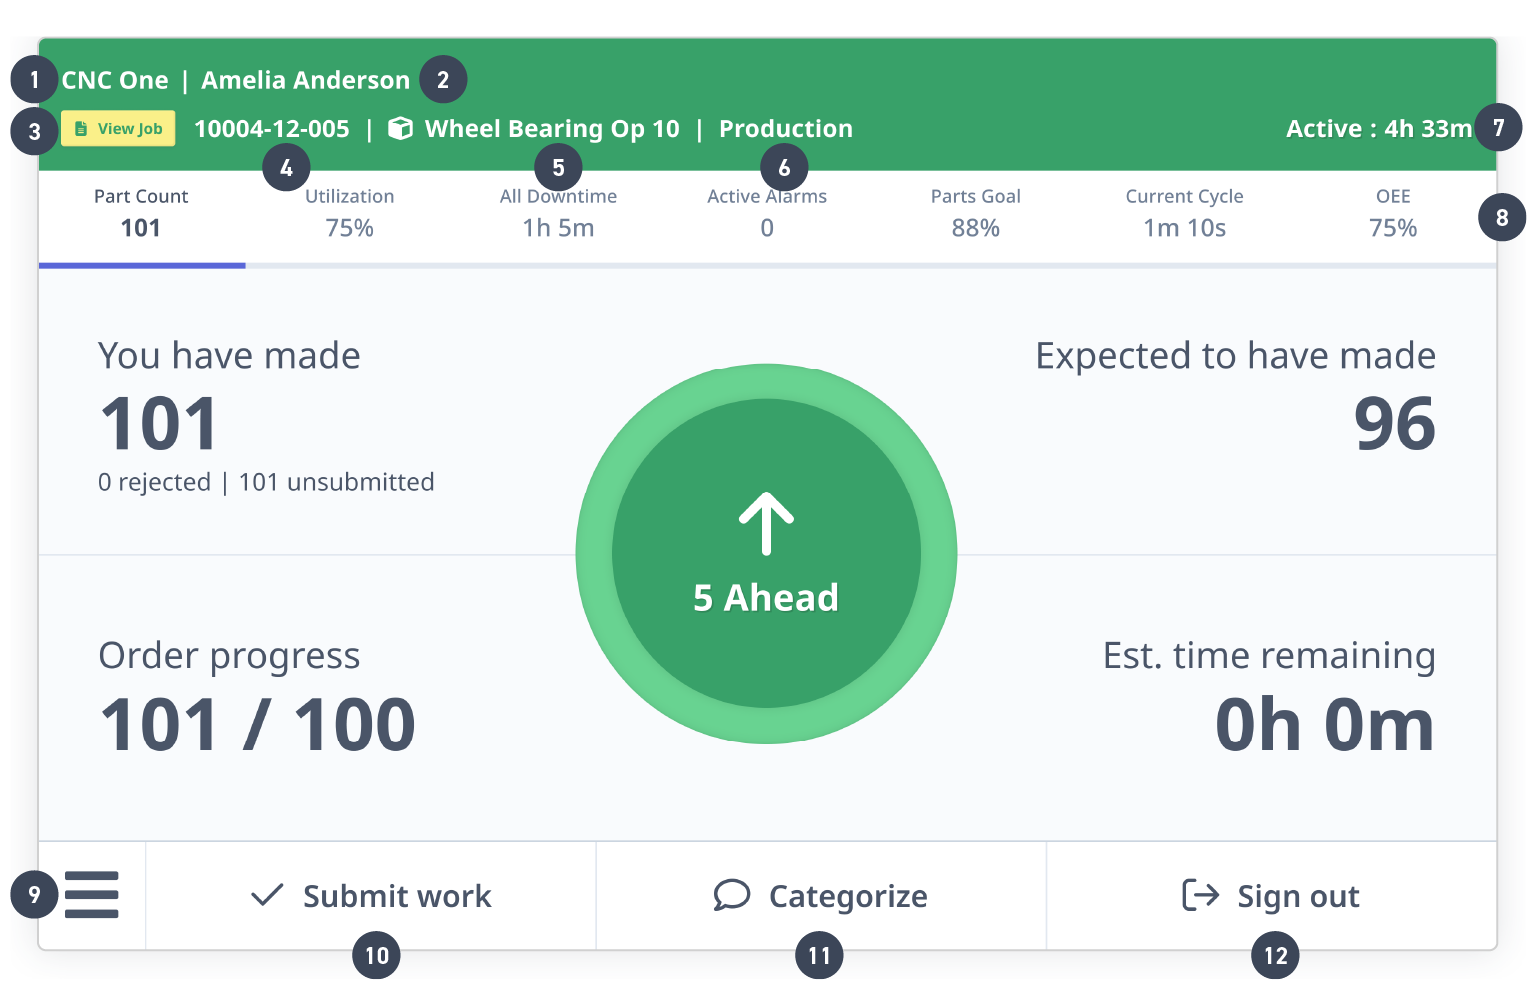
- The resource being viewed
- The operator signed in to the resource
- Displays job details
- The currently running production order
- The currently running part operation
- The currently running activity
- Current status of the resource with duration
- Additional tabs display unique views and will vary based on your company's configuration
- Open the utility menu
- Submit a labor ticket
- Categorize downtime events
- Sign out the current operator
The tabs displayed on your ShopPulse dashboard are configurable by your company administrator, so the tabs you see may differ from what other companies use. There are a number of predefined tabs available — including Cycle Time, OEE, Utilization, and Downtime — and your company can also add custom tabs. However, the Part Count tab is always visible and cannot be hidden. On MES-enabled dashboards, the Total Jobs tab (your multi-job queue) is also always present. This guide focuses on these two tabs since they are guaranteed to be available for MES operators.
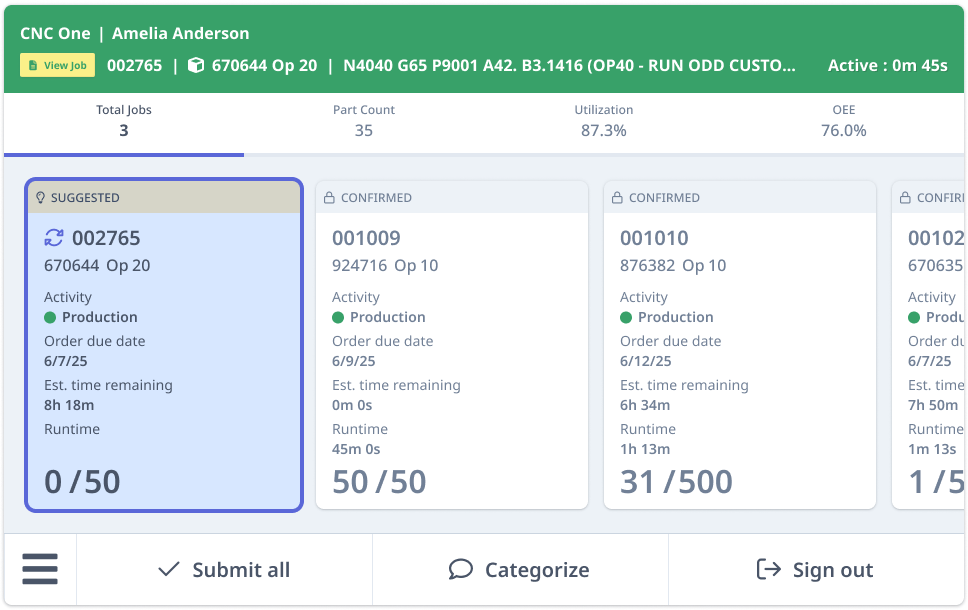
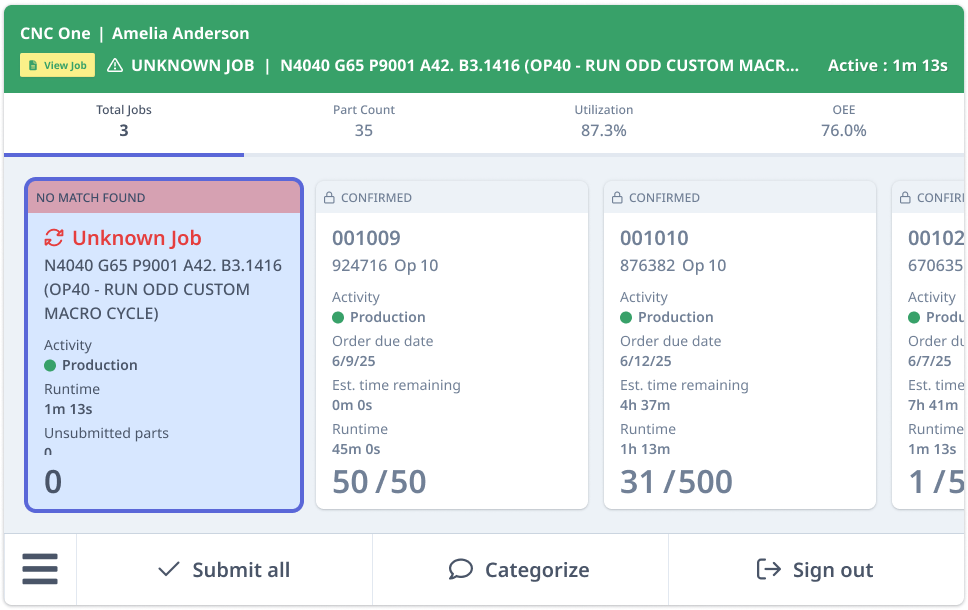
Total Jobs Tab
This is the job queue — your primary MES workflow view. Here you see:
- All jobs on the machine in the order they appear in your schedule
- Match state for each job (Waiting, Matched, Suggested, No Match Found, Confirmed)
- Actions available for each job (Confirm, Change Job, Split, Merge, Submit, etc.)
- Job details at a glance: work order, operation, part name, quantity
Use this tab to manage your queue, confirm matches, and handle job assignments.
Part Count Tab
This tab shows a focused view of your currently active job. You'll see:
- Parts made so far — how many you've completed
- Parts expected — the target quantity for the job
- Order progress — your completion status against the total quantity
- Estimated time remaining — calculated based on your current pace
- Pace indicator — shows whether you're ahead or behind schedule (for example, "5 Ahead")
Everything updates automatically. Switching between tabs doesn't affect your tickets or data.
Resource Status
The dashboard header is color-coded to show the current state of your resource at a glance. Each color represents a specific condition, and some conditions override others based on data availability and operational state.
| Status | Color | Description |
|---|---|---|
| In Setup | Yellow | The resource is in setup. Shown regardless of whether the resource is active or idle. |
| Active | Green | The resource is running production or has no job and is currently active, with no fault present. |
| Idle | Blue | The resource is running production or has no job and is currently idle, with no fault present. |
| In Fault | Red | The resource is in a fault state. This overrides all other conditions, including setup, production, or job status. |
| Not Reporting | Gray | The resource is not communicating with MachineMetrics. This overrides all other statuses due to unavailable data. |
First Article Inspection (FAI) states: If FAI is enabled on your machine, additional header colors appear during the inspection process when transitioning from setup to production. See First Article Inspection for details.
 |
| In Setup |
 |
| Active |
 |
| Idle |
 |
| In Fault |
 |
| Not Reporting |
Key Concepts for Operators
To work confidently in ShopPulse, you need to understand these terms:
Labor Ticket
A labor ticket is a record that tracks your work — the hours you spent, how many parts you made, which job you worked on, and whether you were doing setup or production. When you submit a ticket, it gets sent to the ERP so managers and planners can track progress.
Draft Ticket
A draft ticket is created automatically when the system matches a program to a job. Draft tickets exist only in MachineMetrics — they're not sent to the ERP yet. The most important thing about drafts: you can change the job assignment freely. A draft is still accumulating burden hours (the time your machine is running), but it can't be submitted until you confirm it.
Committed (Open) Ticket
A committed ticket is created the moment you confirm a match or manually add a job. Once a ticket is committed, it exists in both MachineMetrics AND the ERP. The job assignment is now locked — you can't change which job it is from ShopPulse. To change a committed ticket, you'll need to contact your ERP administrator.
Burden Hours
Burden hours are the time a job occupies your machine. The system tracks this automatically from the moment a match is made — you don't need to start or stop timers. Burden time keeps accruing even on draft tickets.
Activity Mode
Every ticket has an activity mode: either Setup or Production. You set the mode when a ticket is created (usually determined by your machine configuration). You can switch activities within the same mode — for example, from "Generic Setup" to "First Piece Inspection" — but you can't switch between modes without submitting your current ticket first.
Dispatch Schedule
Your dispatch schedule is the list of jobs scheduled for your machine, sourced directly from the ERP. This is where you find jobs when you're adding them manually. Jobs are prioritized by schedule, and you can search or browse to find what you need.
Signing In
- Open ShopPulse on your machine's device
- Tap "Sign In" in the control bar at the bottom
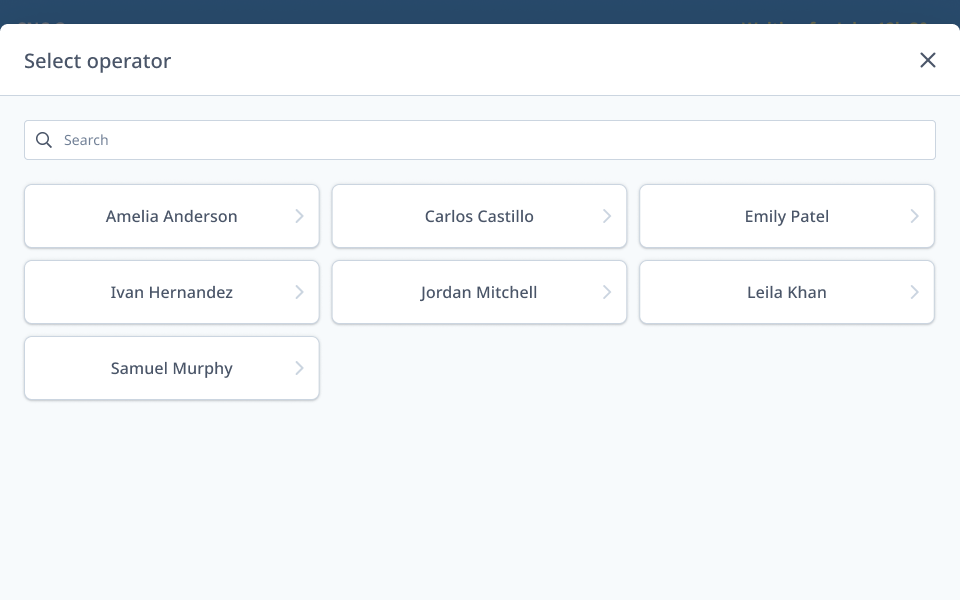
- Select your name from the operator list
- If your name isn't listed, contact your administrator — your profile needs to be configured in Settings → Operators
- Your job queue loads, showing all jobs on your machine with their current match states
Clock Out Flow: If Clock Out Flow is enabled on your account, you'll go through a structured clock-in process that ensures you're set up correctly before work begins.
Shift Handover: If Shift Handover is enabled on your machine, you'll see a two-panel welcome screen before your job queue loads. The left panel shows your assigned work for the shift; the right panel shows handover notes from the previous operator (or "No notes from previous shift" if none were submitted). Dismiss the screen to begin work. See Shift Handover for details.
Starting a Job
To start work, go to ShopPulse and select a job. Each job represents a distinct part operation within a specific production order.
- Tap "Start job" in the control bar
- The job selection screen appears, showing jobs assigned to your resource
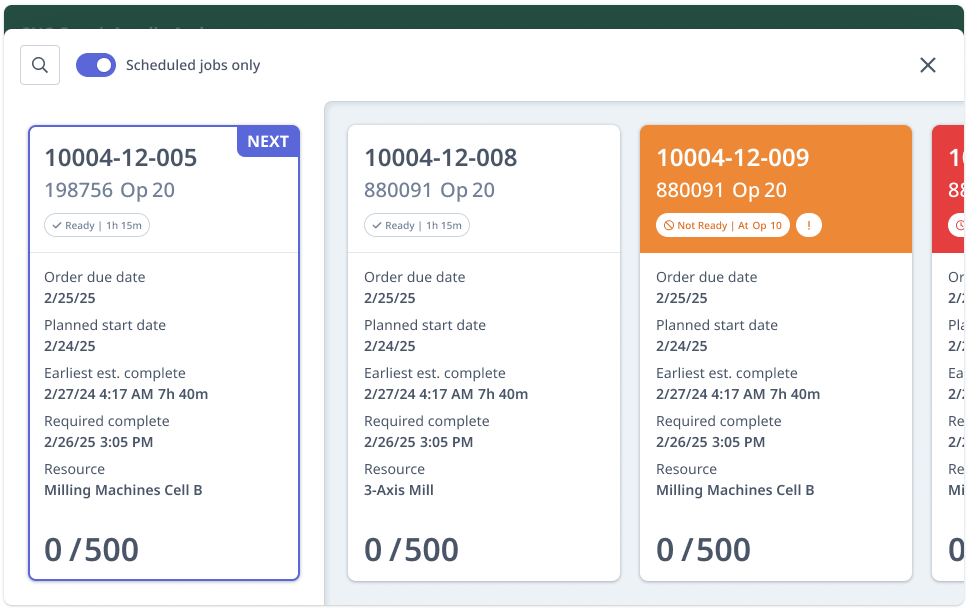
Selecting a Job
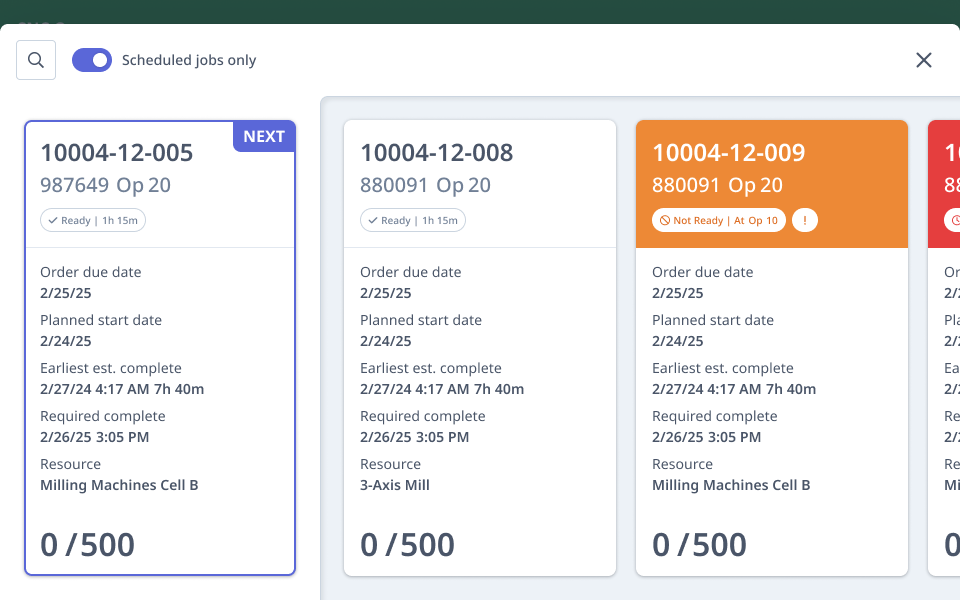
The job selection screen displays jobs assigned to your resource, sorted by start date as defined on the MachineMetrics Production Schedule.
- Jobs are filtered to display only those assigned to the current resource
- The next scheduled job on the resource is highlighted and pinned to the front of the queue, followed by other scheduled jobs sorted by start date
- If you disable "Scheduled jobs only," you'll also see jobs that haven't been scheduled yet — these appear after scheduled jobs and are sorted by job number
- When unscheduled jobs are displayed, they appear after scheduled jobs and are sorted by job number
- If you don't see the job, you can tap the search button to search across all released production orders (including those assigned to other resources)
Searching Jobs
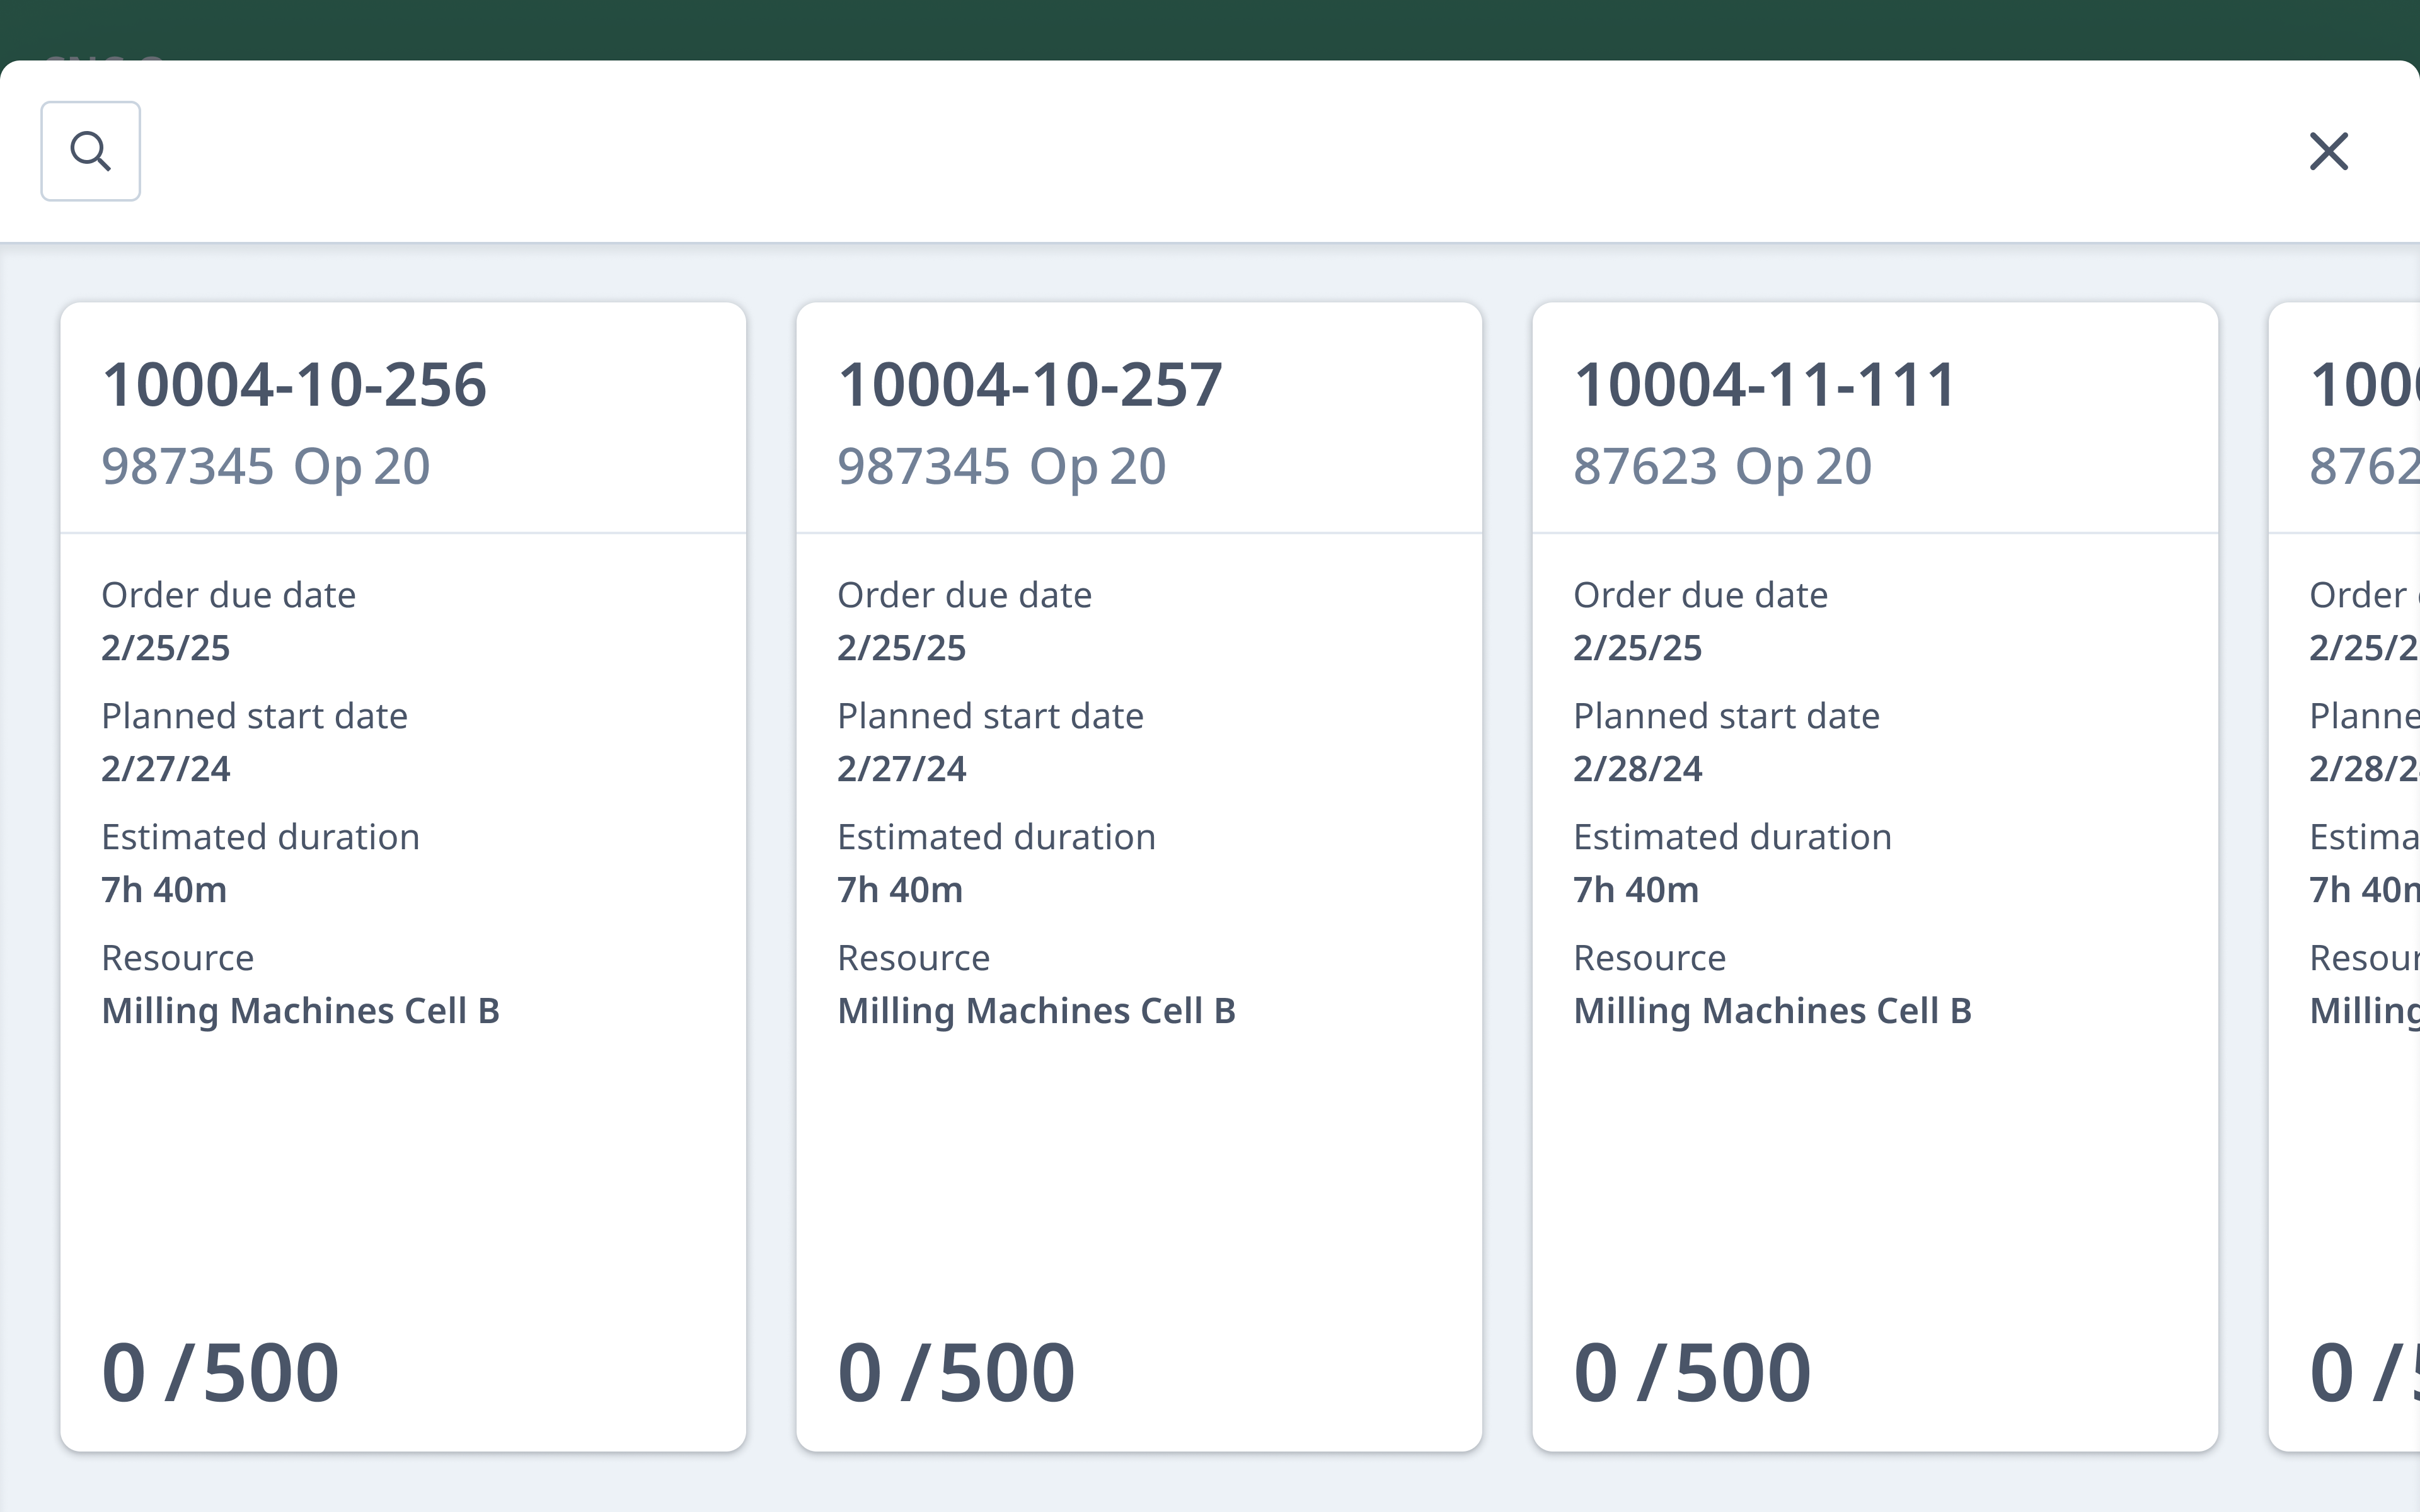
Use the job search screen to find a specific job for the current resource or across jobs assigned to other resources.
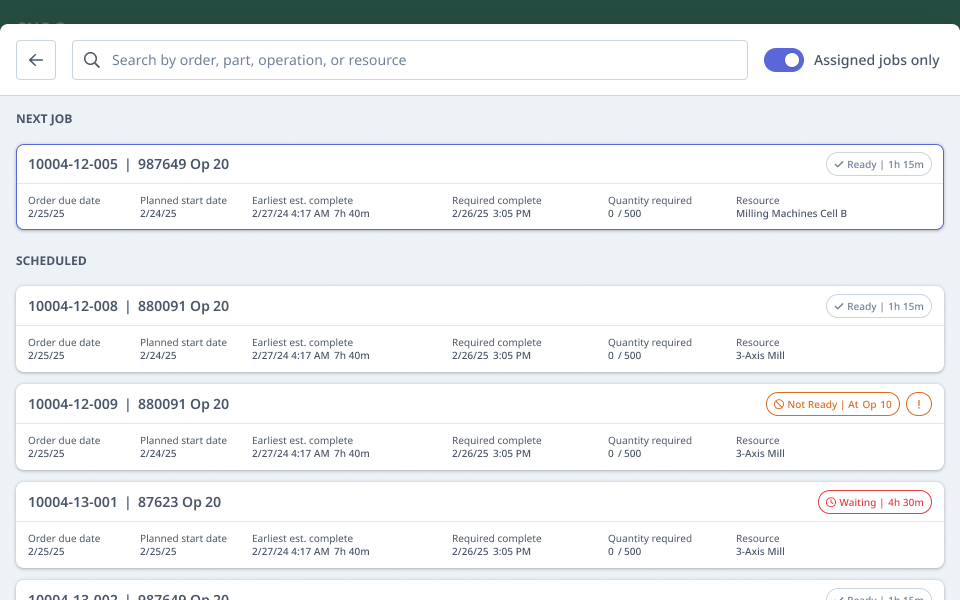
- The next scheduled job on the resource is highlighted and pinned to the top of the queue, followed by other scheduled jobs sorted by start date, while unscheduled or unassigned jobs are shown separately and sorted by job number
- For companies that do not use the MachineMetrics Production Schedule, jobs are organized as "Assigned" and "Unassigned"
- You can search for jobs using order number, part name, operation number, or the resource (either a resource or resource group) they are assigned to
- Disabling "Assigned jobs only" lets you search all jobs, including those not assigned to the selected resource, whether scheduled or unscheduled
Select Activity
After selecting a job, you can review its details and choose whether to start with setup or move straight into production.
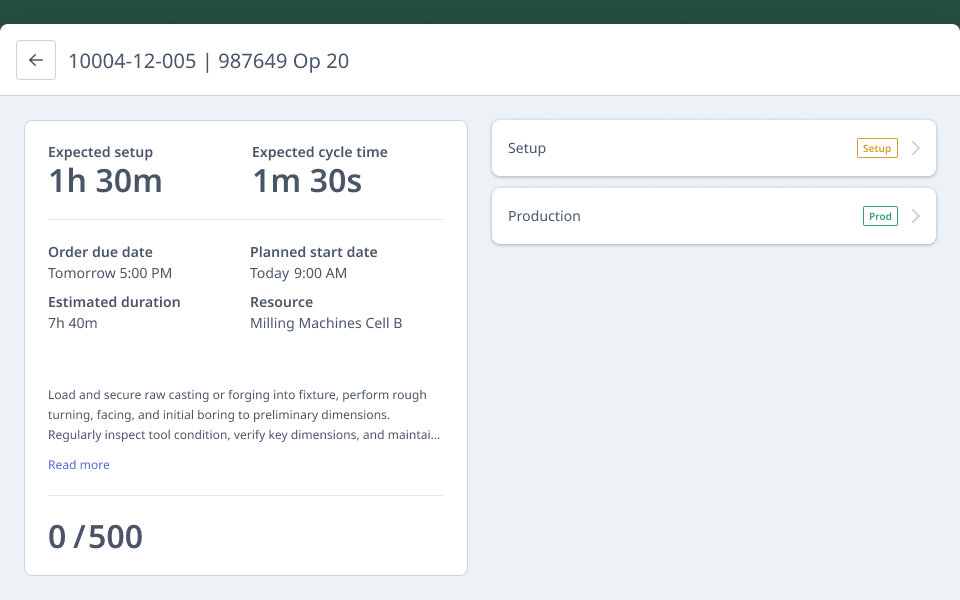
- Key job details are displayed to support effective setup, scheduling, and execution, including timing and resource information
- Tap the back button to return to the job selection screen
- Choose an activity from the list of Setup and Production activities to start the job
Understanding Match States
The system shows you different match states to help you understand what's happened and what you need to do next. This is critical — here's what each state means:
| State | What It Means | What to Do |
|---|---|---|
| Waiting for Program | You manually added this job before a program ran on the machine. Your ticket is already open in the ERP. | Nothing — wait for a program to run. The system will update automatically when it detects the program. |
| Matched | The system found a high-confidence match between the running program and a job in your queue. A draft ticket exists in MachineMetrics. | Confirm the match to open the ticket in the ERP. (Note: If your machine has "Automatically confirm high confidence matches" turned on, this happens automatically.) |
| Suggested | The system found a likely match but isn't fully confident. This often happens when multiple work orders exist for the same part. A draft ticket exists in MachineMetrics. | Review the suggested job carefully. Confirm if it's correct, or select a different job from the list. |
| No Match Found | The system couldn't identify which job is running. A draft ticket is in a holding state. | Select the correct job manually from your job list. |
| Confirmed | The match has been confirmed. Your ticket is now open in the ERP. | Complete your work and submit the ticket when you're done. |
Understanding Draft vs. Committed Tickets
Understanding the difference between draft and committed tickets is essential for working effectively in ShopPulse.
Draft Ticket
- Created by the Auto Production Monitoring (APM) system
- Exists only in MachineMetrics — not yet in the ERP
- Job assignment is changeable — you can reassign it freely
- Cannot be submitted to the ERP
- Burden time still accrues and is tracked
Committed Ticket
- Created the moment you confirm a match or manually select a job
- Exists in both MachineMetrics AND the ERP
- Job assignment is locked — you cannot change which job it is from ShopPulse
- Can be submitted when you're done with your work
- Burden time continues to accrue
Key Point: Confirmation is required before a ticket can be submitted. Once you confirm, these fields are locked and cannot be changed from ShopPulse:
- Job (Work Order Operation)
- Operator
- Activity Mode
When you submit, you'll set these final fields:
- Final part count
- Rejected parts and reject reason
- Burden hours (set automatically)
- Completion status (Complete or Incomplete)
Pre-Selecting a Job (Adding a Job Manually)
Pre-selecting a job is useful when you know what jobs you'll be running before programs start. It gives the APM system a priority pool to match against and can reduce No Match Found situations.
When to Pre-Select
- You know the sequence of jobs for your shift
- You want to give APM context about what's coming
- You're running a job for which no program has started yet
How to Pre-Select a Job
- Tap "Add Job" in the control bar
- Browse the job list or search for the work order operation you need
- Select the job
- A labor ticket is created in the ERP immediately (committed ticket)
- The job is locked and cannot be changed from ShopPulse
- The job appears as "Waiting for Program" until a program runs on your machine
- When the program runs, the system will recognize the match and update the job state to "Confirmed"
The default activity mode (Setup or Production) is determined by your machine configuration.
Important Warning
When you manually add a job, the ticket is committed immediately and the job field is locked. If APM later matches the wrong pre-selected job, you can't correct it from ShopPulse — you'll need your ERP administrator to fix it. Be careful when pre-selecting multiple similar jobs.
Confirming a Matched Job
When you see a job with a "Matched" state, the system has found a high-confidence match and is ready for you to confirm it.
- Tap the job card showing "Matched"
- Review the job details carefully to verify it's correct:
- Work order
- Operation
- Part name
- Quantity
- Tap "Confirm"
- A modal appears warning you that this action commits the ticket to the ERP and cannot be undone from ShopPulse
- Tap "Confirm" in the modal to proceed
- The state changes to "Confirmed"
- Your ticket is now open in the ERP
- The job assignment is locked
Automatic Confirmation: If your machine has "Automatically confirm high confidence matches" enabled, Matched jobs commit automatically — no action needed from you. The state will jump directly to Confirmed.
Reviewing a Suggested Match
When you see "Suggested," the system found a likely match but isn't fully confident. You need to review and decide.
- Tap the job card showing "Suggested"
- You'll see a list of candidate jobs, sorted by schedule position and due date
- If the correct job is in the list:
- Tap the job to select it
- Tap "Confirm"
- State changes to "Confirmed"
- If the correct job is NOT in the list:
- Tap "Select a different job" or "Show all possible matches" to expand the candidate list
- Use search to find the job you need
- Tap to select it
- Selecting via search commits the ticket immediately — state changes to "Confirmed"
Tip: When in doubt, use the search feature. The candidate list is filtered for relevance, but search gives you full access to all active jobs. Don't waste time scrolling; search for the work order number or part name.
Resolving No Match Found
When the system can't identify the job, you'll see "No Match Found." You need to select the correct job manually.
- Tap the job card showing "No Match Found"
- Tap "Select job"
- Your job list appears, showing active, released jobs scheduled for your machine
- Find and select the correct job
- Use search if you don't see it in the visible list
- Tap to select the job
- Selecting a job commits the ticket immediately
- State changes to "Confirmed"
Performing Setup
Setup is the phase where you prepare a job for production. The setup interface helps you stay on track, offering real-time insight into progress and flagging when things take longer than expected.
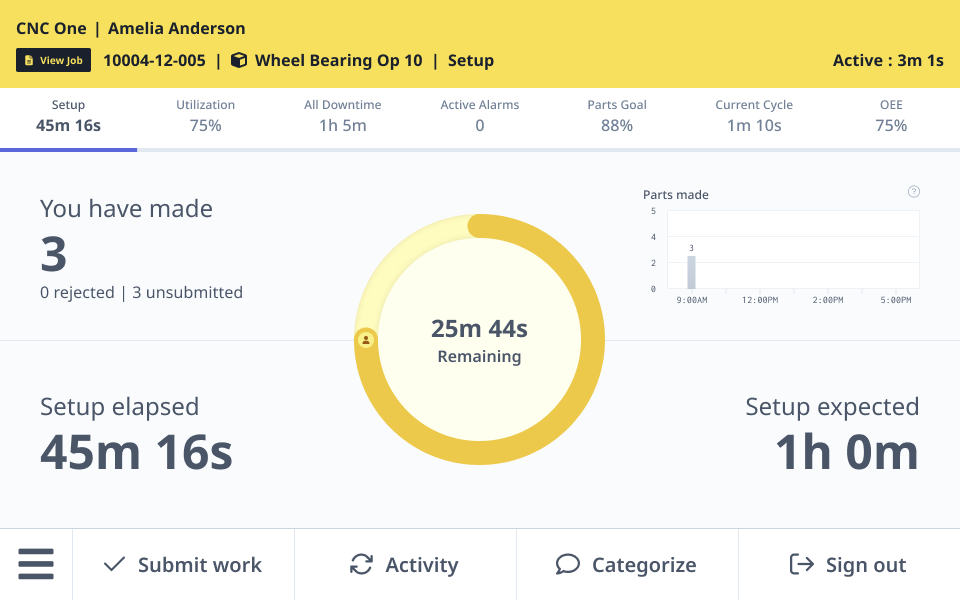
Setup Overview
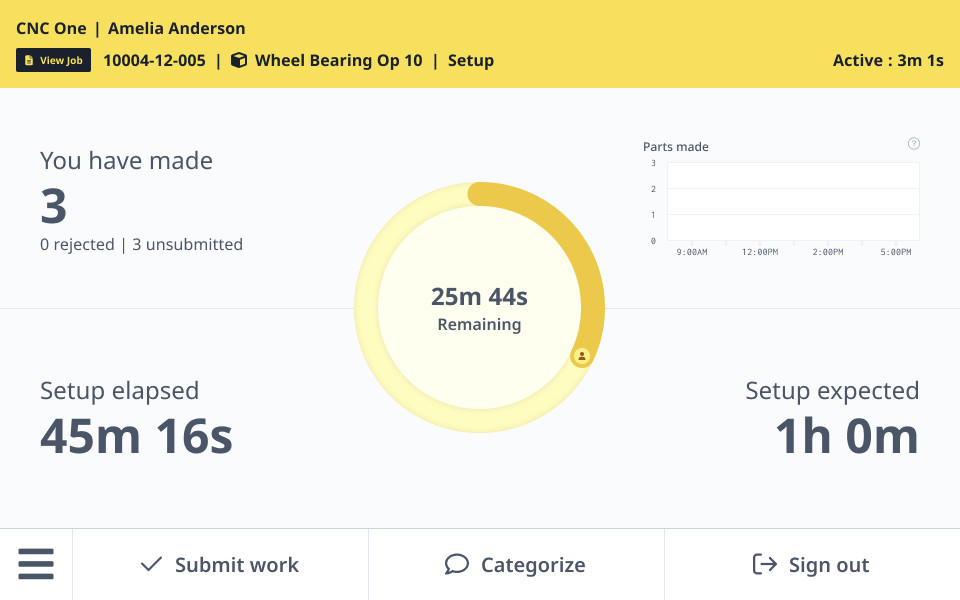
The setup dashboard displays:
- Total number of parts counted during the current setup
- Total number of parts rejected during the current setup and the total number of parts not yet submitted
- Total time spent on the current setup
- Total setup progress and remaining expected setup time
- Chart showing parts produced since the start of the current job or the most recent operator login, whichever is later
- Total setup time expected for this part operation
Expected Setup Timer
The "Expected Setup" configuration defines the total amount of time that it is expected to set up a specific part operation. When running a part operation that is configured with an expected setup time, the interface shows a visualization of how much time has progressed, how much time is remaining, and whether or not the expected setup time has been exceeded.
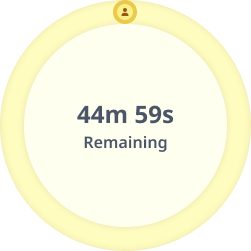 | 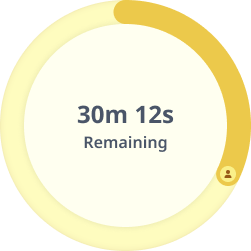 | 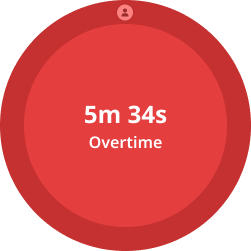 | 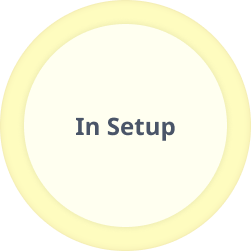 |
| Just started — full time remaining | In progress — partial time remaining | Overtime — exceeded expected time | No expected time configured |
Custom Setup Activities
If your company has added custom activity types, you will see an "Activity" button in the control bar that allows you to change the current activity, allowing for more granular understanding of setup steps in MachineMetrics.
Pausing a Setup
Pausing a setup lets you step away, such as for a break or at the end of a shift, while keeping the setup active and ensuring accurate time tracking.

- Tap "Submit" in the control bar to open the labor ticket form
- Mark the setup status as "Incomplete" and submit the labor ticket
- When prompted, select "Pause setup" (selecting "Stop job" will end the current job and allow you to start a different job)
- The setup will be "paused," allowing the next operator who signs in on the resource to resume it
- Paused time is excluded from the total setup duration to ensure accurate tracking
Completing a Setup
Setup is transitioned into production by submitting labor tickets. When submitting a labor ticket, you have the option to complete the setup and proceed to production, pause the setup, or end the setup and switch to a different job.
- Tap "Submit" in the control bar to open the labor ticket form
- Mark the setup status as "Complete" and submit the labor ticket
- Upon submission, ShopPulse automatically enters the default production activity
First Article Inspection (FAI): If FAI is enabled on your machine, a prompt will appear before you enter production asking whether to submit your first piece for quality inspection. Tap Send for Inspection to submit the piece to the QA queue, or tap Skip to proceed directly to production. Your ShopPulse header color will reflect the current FAI state while you wait (orange = awaiting inspection, teal = in progress, green = approved, red = rejected with reason). See First Article Inspection for the full operator workflow.
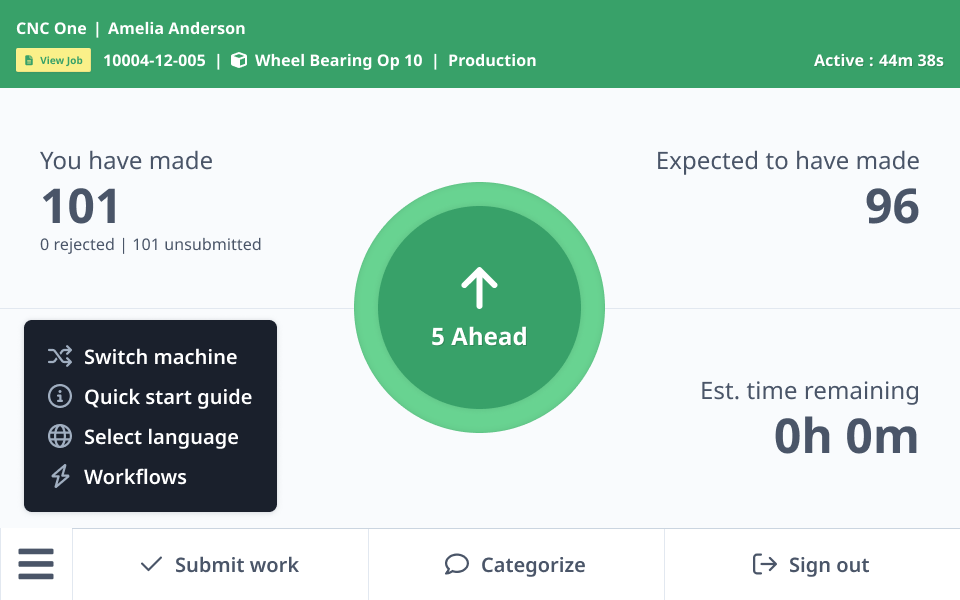
Running Production
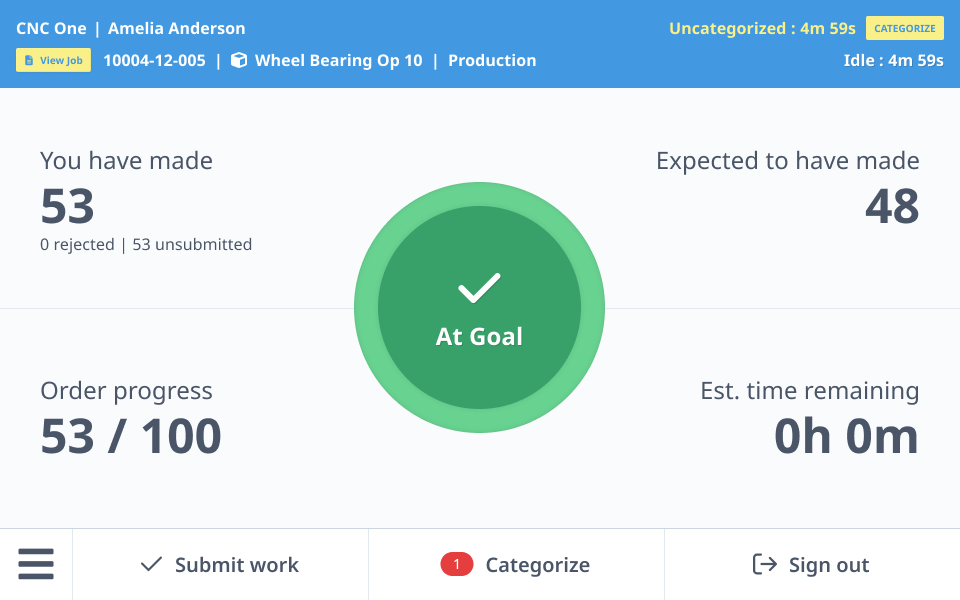
Once setup is complete (or if your job starts directly in production), the dashboard switches to the production interface. This view supports you as you work through a job, offering real-time insight into part counts, goal progress, and overall performance to help keep production on pace and issues in check.
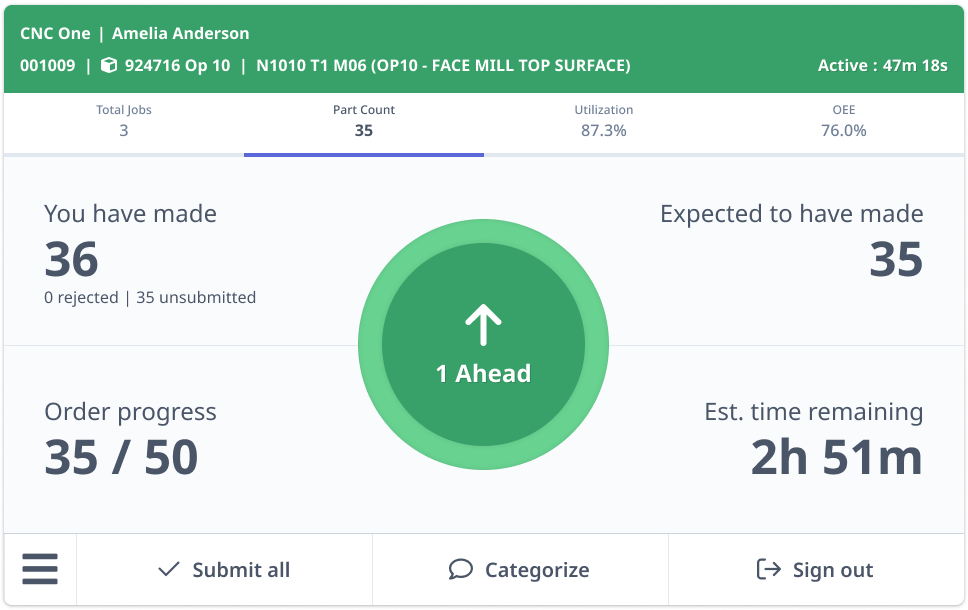
Production Overview
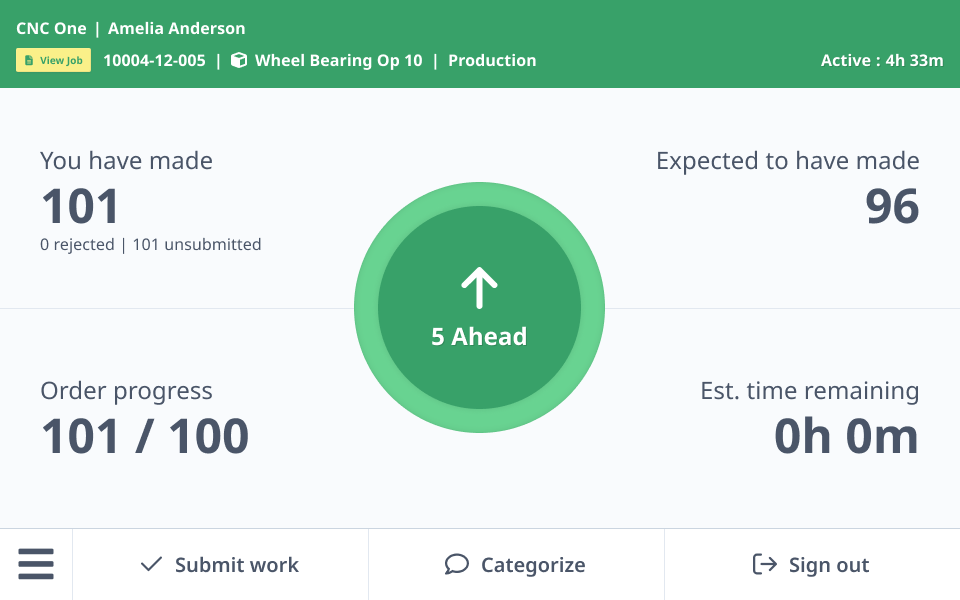
The production dashboard displays:
- Total number of parts counted — Part counts start when the operator signs in. If a job is already running, counts begin at sign-in. If the operator starts the job after signing in, counts begin when the job starts. The "Unsubmitted" count shows parts made during the current labor ticket and resets when a new one begins. If no operator is signed in, counts start at the beginning of the current shift.
- Total number of parts rejected and the total number of parts not yet submitted
- Total parts produced for the current job, including work from previous shifts
- Current parts goal for the current job
- Expected number of parts (based on expected cycle time and time elapsed)
- Estimated time remaining to complete the job, based on expected cycle time
Understanding Parts Goal
The "Parts Goal" metric measures production output against the expected cycle time. It calculates the percentage of parts produced during an operation compared to the number expected if the operation met its cycle time standard.
Your organization has set thresholds to track whether the operation is on track, ahead, or behind its goal, with "warning" and "failure" thresholds indicated by colors in the performance wheel.
| Indicator | Meaning |
|---|---|
| At Goal (green, checkmark) | The operation is meeting its parts goal and has produced exactly the amount of parts expected. |
| Ahead (green, up arrow) | The operation is exceeding its parts goal and has produced more parts than expected. |
| Behind (orange, down arrow) | The operation is behind its parts goal and has produced fewer parts than expected. |
| Very Behind (red, down arrow) | The operation is very behind its parts goal and has produced significantly fewer parts than expected. |
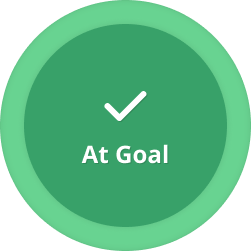 | 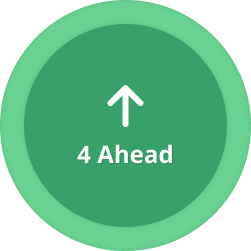 |  | 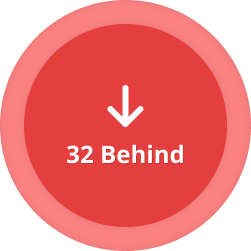 |
| At Goal | Ahead | Behind (warning) | Very Behind (failure) |
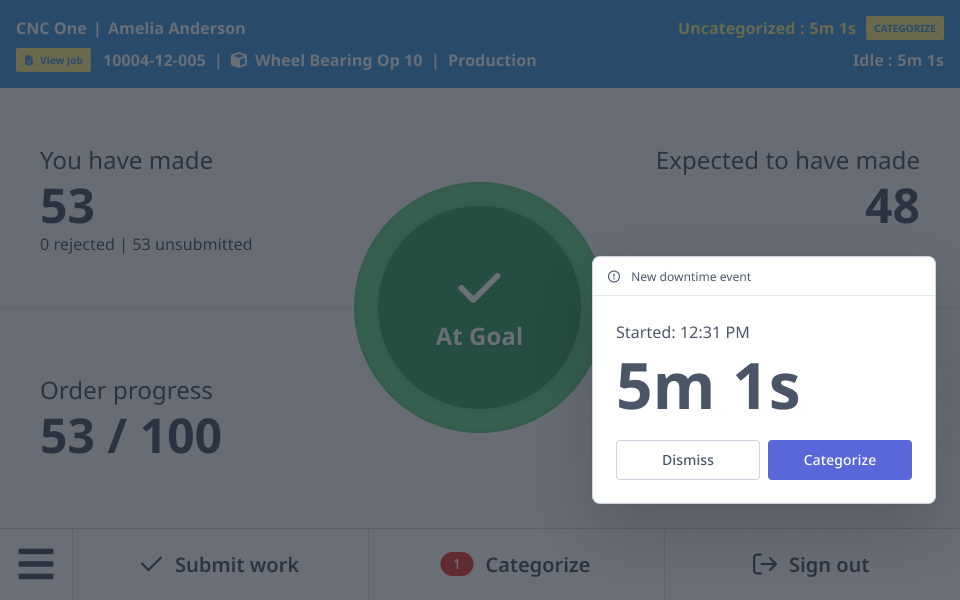
Downtime Events & Categorization
When a resource is detected as idle, the dashboard header changes to blue indicating an active downtime event. New downtime events are classified as "Uncategorized," but you have the opportunity to categorize the reason for the downtime.
The alert bubble on the Categorize button in the control bar indicates how many uncategorized downtime events are logged on this resource for the current shift.
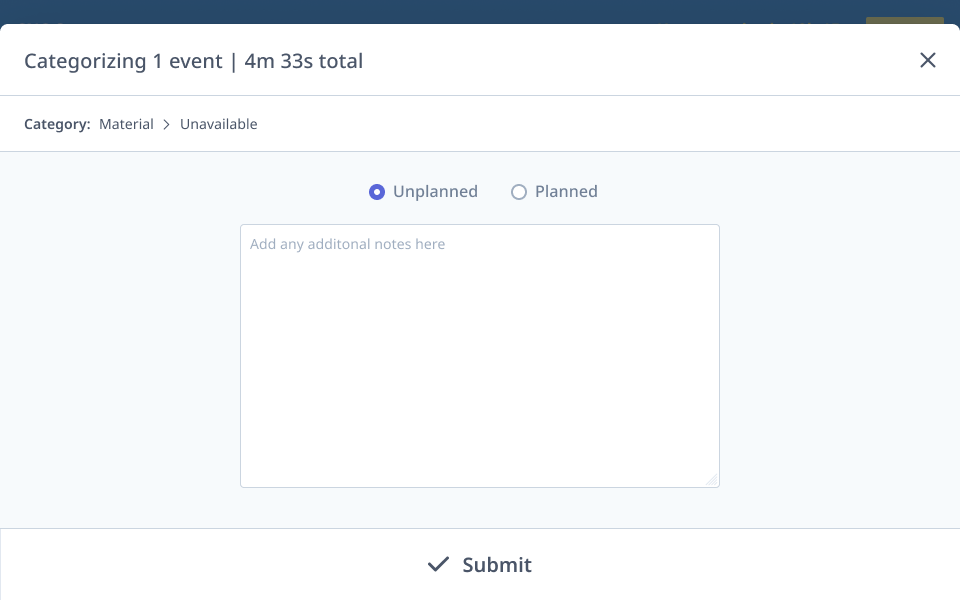
How to Categorize Downtime
- Tap "Categorize" in the header or the control bar
- You'll see the total number of events being categorized along with the total time for all events
- Select a primary category from the list (Machine, Job, Operator, General, Other, etc.)
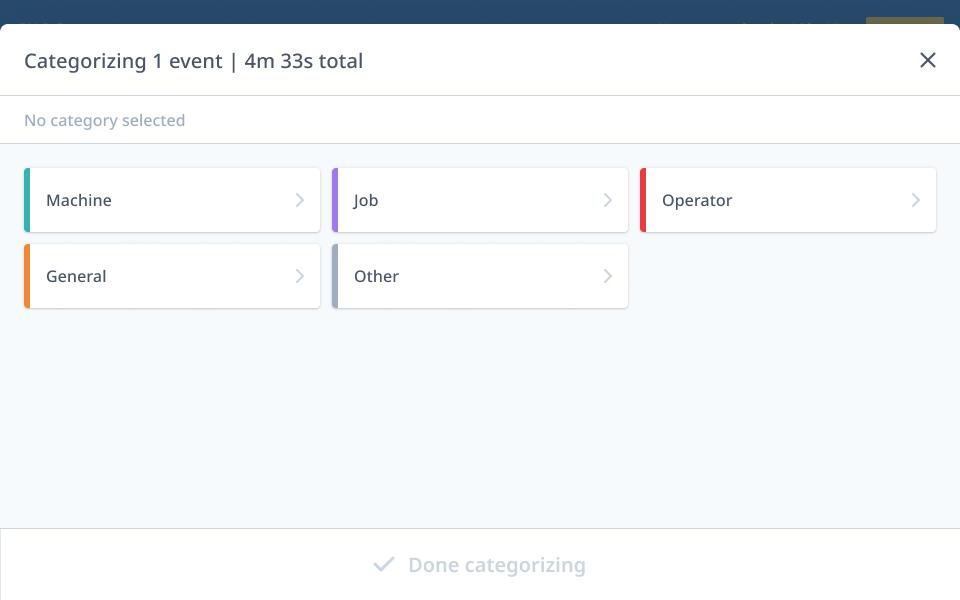
- If subcategories are available, select the appropriate subcategory
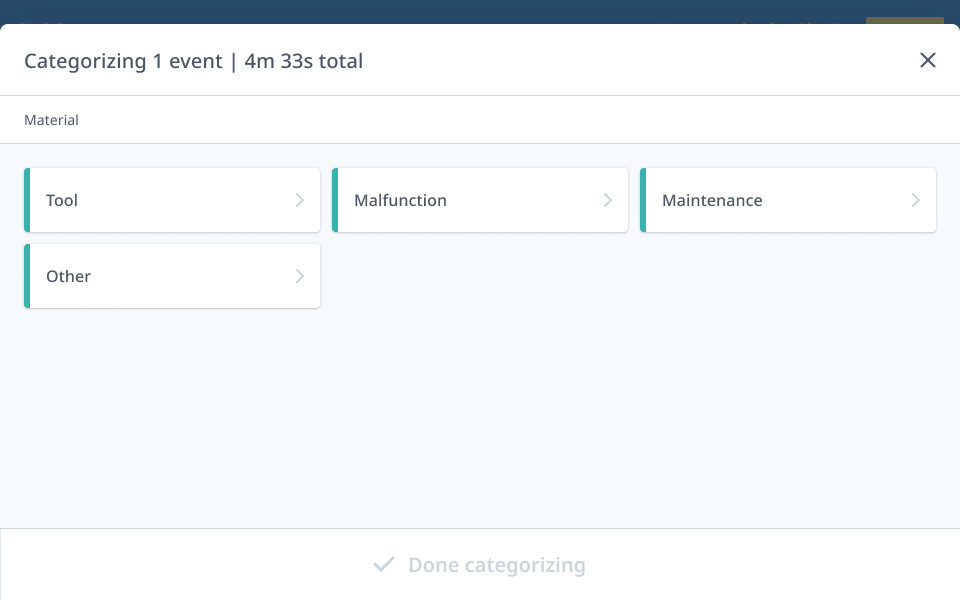
- Review your selection and tap "Done categorizing" to submit
Switching Activities
Activities let you specify exactly what kind of work you're doing — setup, first piece inspection, production, etc.
- Tap the job card for the work you're on
- Tap "Switch activity"
- Select a different activity within the same mode
- The change applies immediately — no impact on your ticket
Setup Activities
Examples include: Generic Setup, First Piece Inspection, Set Up First Piece, Change Tooling, and others (specific activities depend on your configuration).
Production Activities
Examples include: Generic Production, R&D, Lights Out, and others (specific activities depend on your configuration).
Mode Switching
- Setup → Production: Happens automatically when you submit a Setup ticket as "Complete." A new Production ticket opens automatically for the same job.
- Production → Setup: Not supported. If you need to switch from Production back to Setup, contact your supervisor.
Tracking Your Progress
You have two ways to track progress — choose whichever view works best for you:
From the Job Card
When you tap a job card, you'll see:
- Parts made so far and burden time at a glance
- Current activity mode
- Submission history (previously submitted tickets for this job)
From the Part Count Tab
This tab shows detailed progress on your currently active job:
- Parts made vs. parts expected
- Order progress against the total quantity
- Estimated time remaining based on your current pace
- Visual pace indicator — shows whether you're ahead or behind schedule
Both views update automatically. Switching between tabs doesn't affect anything — your tickets keep running in the background.
Submitting a Labor Ticket
When you're done with a job (or need to pause, stop, or hand off), you submit your labor ticket. This closes the ticket and sends the data to the ERP.
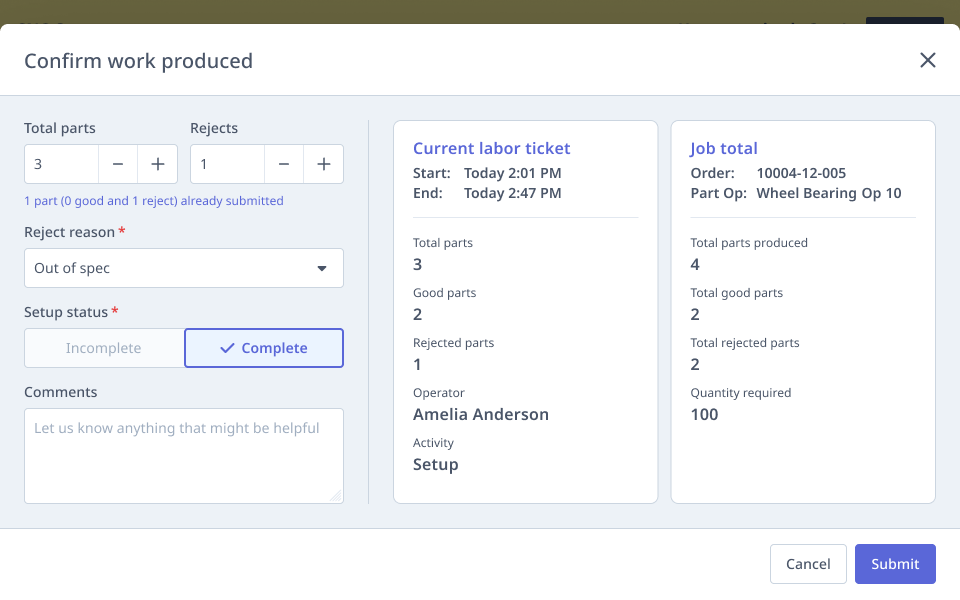
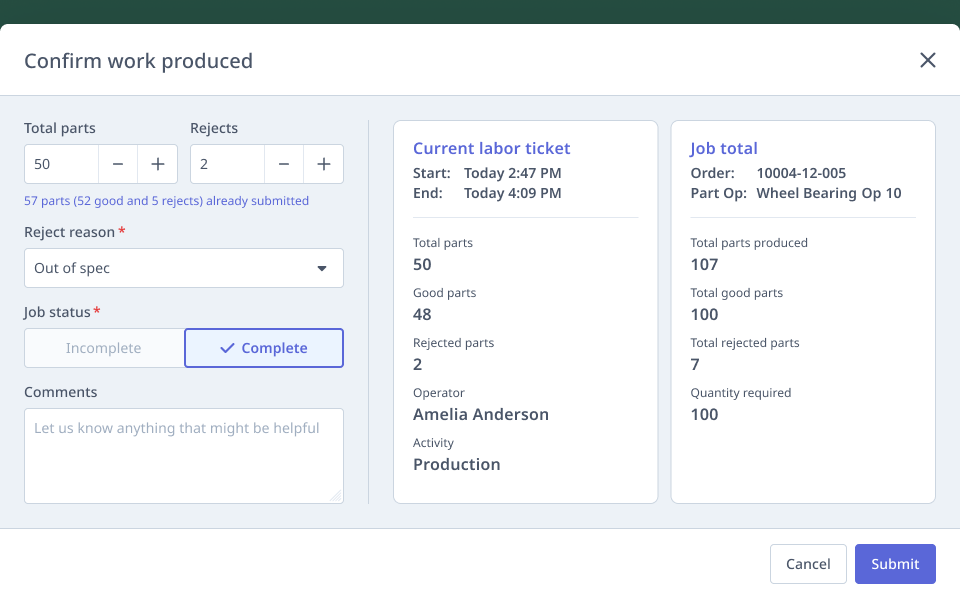
Labor Ticket Anatomy
Labor tickets are used to drive the progress of a job from setup to production to completion and can be submitted at any time. Additionally, you will be prompted to submit a labor ticket when switching activities, stopping a job, or signing out.
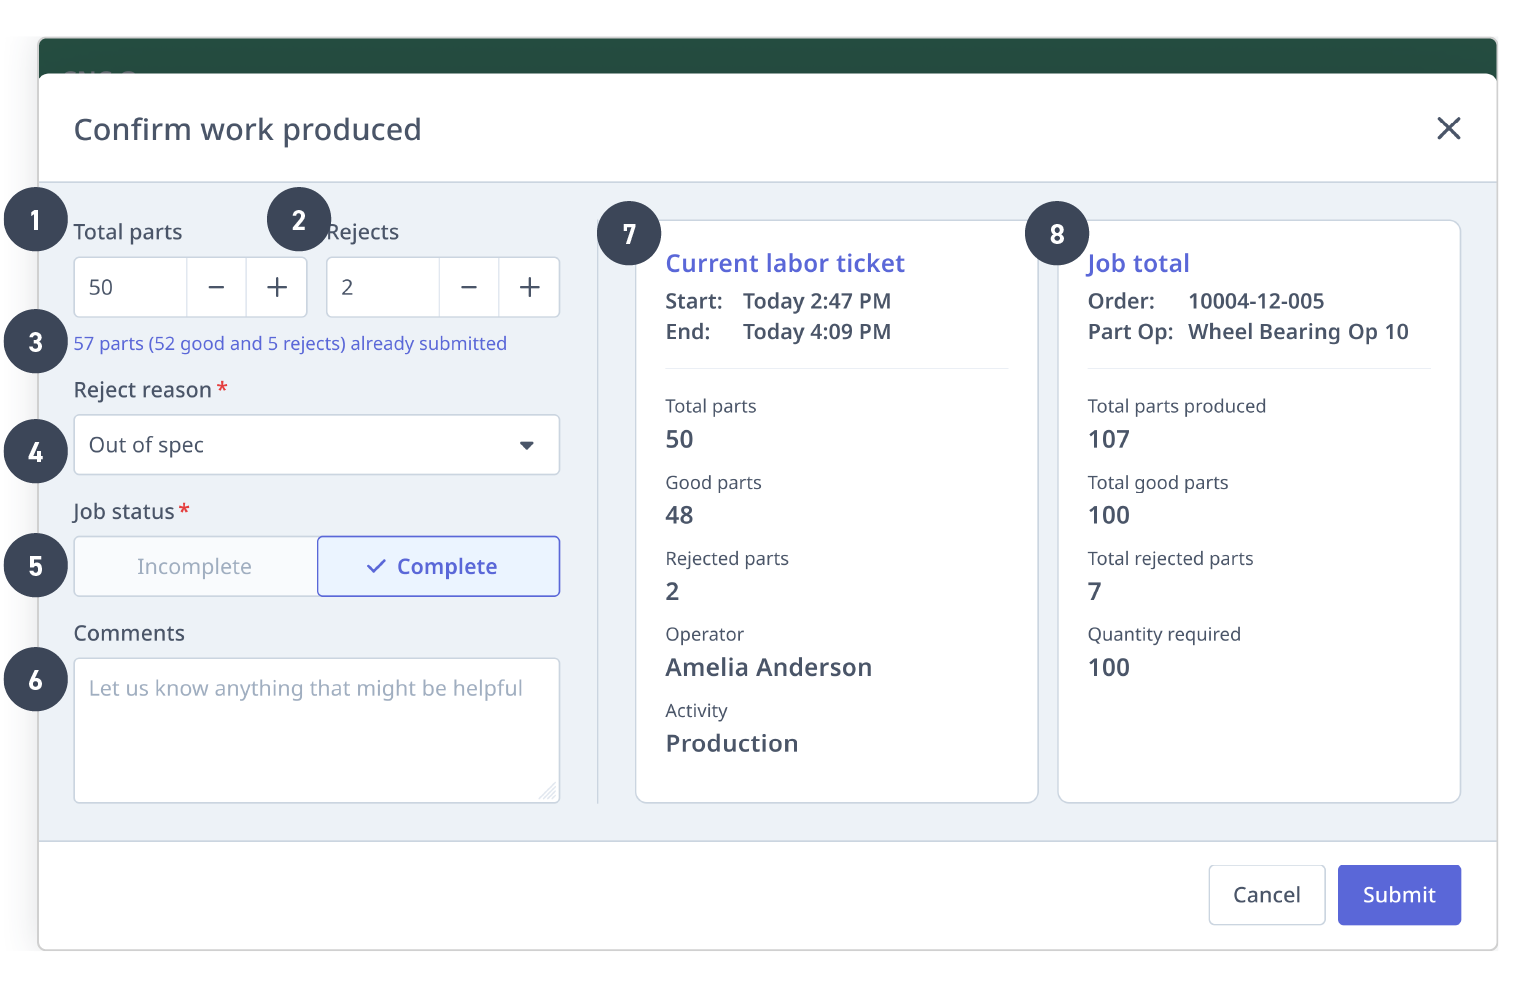
- Total parts — Total parts to submit (including rejects)
- Rejects — Total rejected parts to submit
- Prior submissions — Summary of parts submitted on previous labor tickets
- Reject reason — Reason for rejected parts (required if rejects > 0)
- Job status — Mark setup or job as Complete or Incomplete
- Comments — Optional comment
- Current labor ticket — Totals for the current labor ticket being submitted
- Job total — Cumulative job totals (includes current and all previous labor tickets)
Basic Submission Steps
- Tap "Submit" in the control bar (only available on "Confirmed" tickets)
- Enter your final part count
- If you're reporting rejected parts:
- Enter the quantity rejected
- Select a reject reason (required if you have any rejects)
- Choose your completion status:
| Status | What Happens |
|---|---|
| Complete | Ticket closes. Job is removed from your queue. If good parts are below the required quantity, a confirmation prompt appears asking if you're sure. |
| Incomplete | Ticket closes. A new ticket is automatically created with the same job and activity, so you can continue later (useful for shift handoffs). |
Setup Submission — Special Cases
When you submit a Setup ticket, the system handles the activity mode transition:
| Submission | What Happens |
|---|---|
| Setup — Complete | Setup ticket closes. A new Production ticket opens automatically for the same job. |
| Setup — Incomplete | Setup ticket closes. A new Setup ticket opens automatically so you can continue. |
Stopping a Job
If you need to stop working on a job and move to a different one:
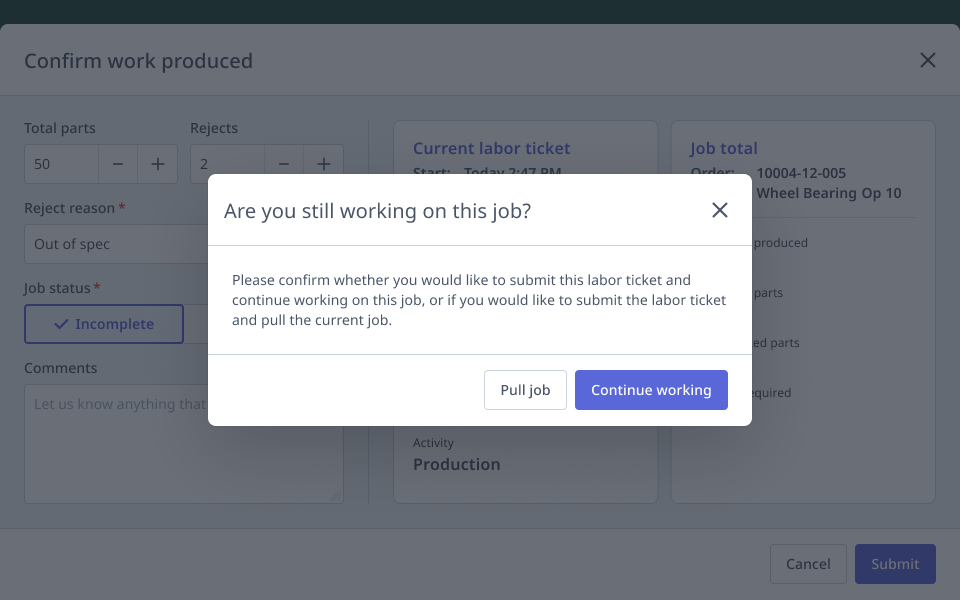
- Tap "Submit" in the control bar to open the labor ticket form
- Mark the job status as "Incomplete" and tap "Submit"
- When prompted, select "Stop job" (selecting "Continue working" will submit the current labor ticket and allow you to continue working on the job)
- Upon submission, the job will be stopped in MachineMetrics, allowing you to select another job or step away from your resource
Completing a Job
- Tap "Submit" in the control bar to open the labor ticket form
- Mark the job status as "Complete" and submit the labor ticket
- Upon submission, the job will be stopped in MachineMetrics and removed from the Production Schedule
Submitting Multiple Tickets (Submit All)
If you have multiple confirmed jobs ready to submit, you can submit them all at once.
- Tap "Submit All" in the control bar
- If any tickets are unconfirmed (Matched or Suggested):
- Confirmation modals appear for each one in sequence
- Confirm each one to proceed
- Once all are confirmed, a final modal shows the total count: "Submit X labor tickets?"
- Tap "Submit" to close all tickets in the ERP at once
Tip: Use Submit All at the end of your shift to clear confirmed jobs quickly and avoid leaving open tickets for the next operator.
Changing a Job Assignment
You can change a job assignment, but the process depends on whether the ticket is draft or committed.
Before Confirmation (Draft Ticket)
- Tap the job card
- Tap "Change Job"
- Select the correct job
- No ERP impact — the ticket is reassigned freely, and the draft remains a draft
After Confirmation (Committed Ticket)
- The job field is locked
- A "Change Job" button is visible but disabled with an explanation
- To change the job, contact your ERP administrator — they can edit it directly in the ERP
After Submission (Closed Ticket)
- No changes are possible from ShopPulse
- Contact your ERP administrator if a change is needed
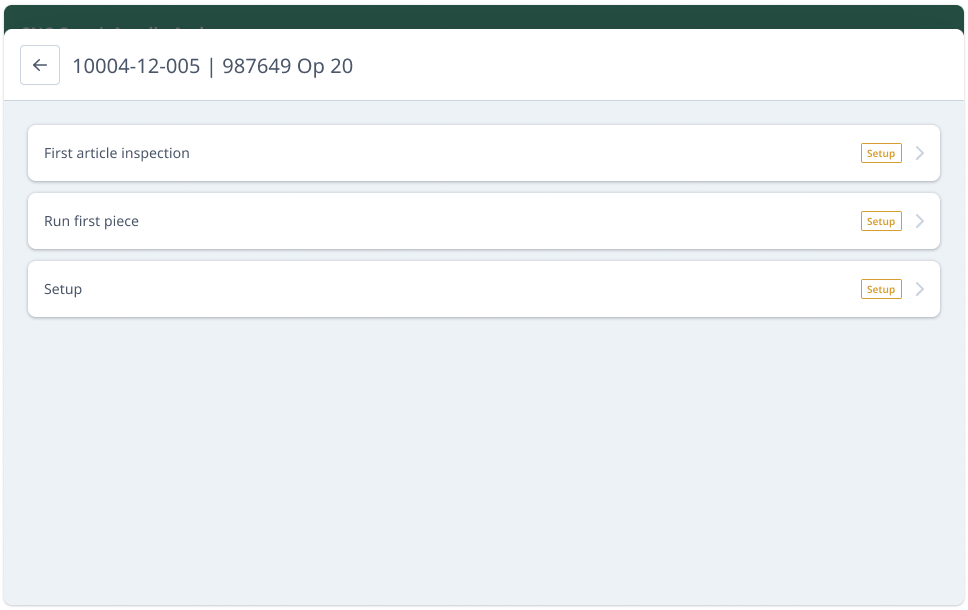
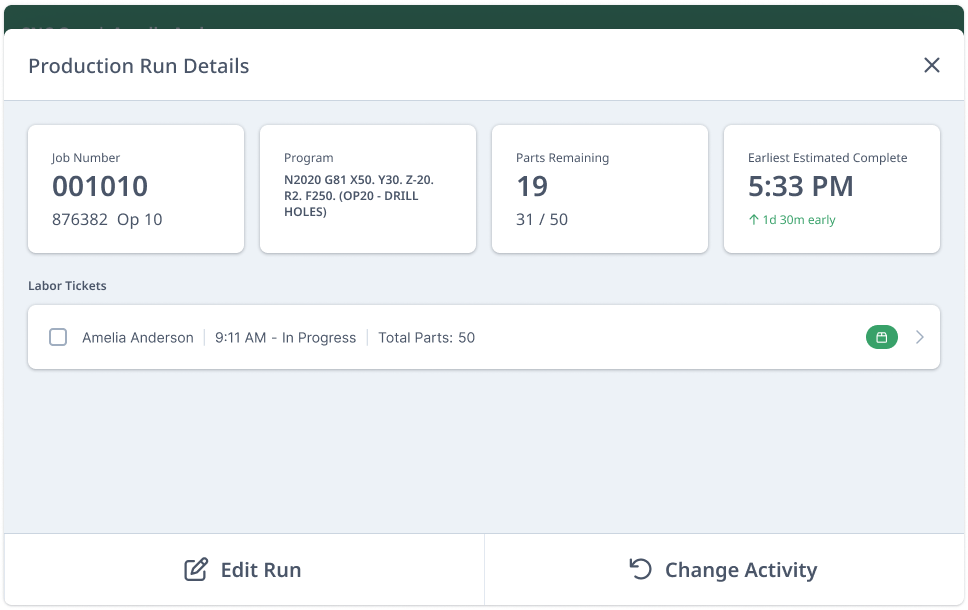
Viewing Current Job Details
You can view more information about the currently running job in the "Current production order operation" screen.
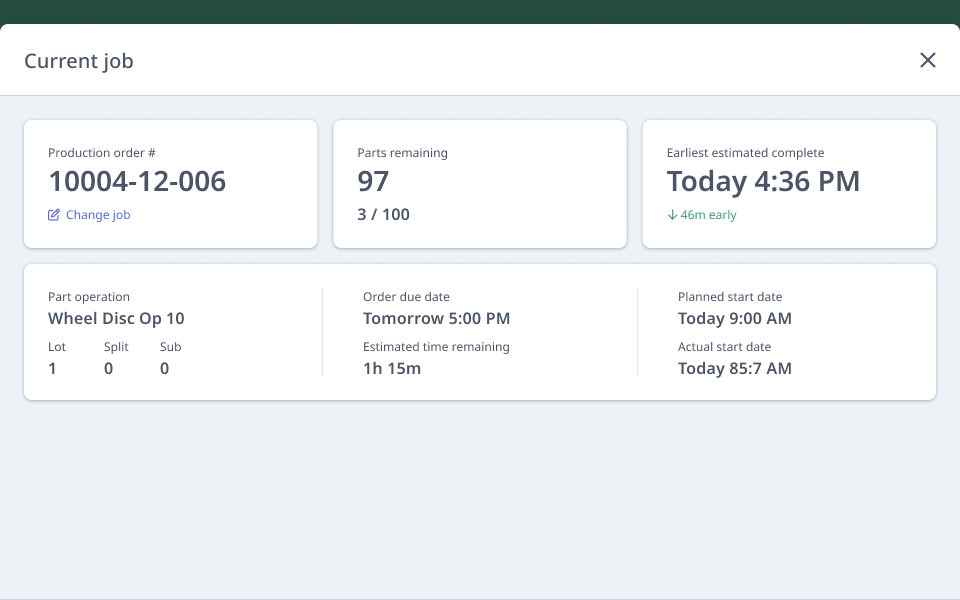
- Open the screen by tapping "View job" in the ShopPulse header
- Information is displayed for the current job including parts progress and estimated time to completion
- Selecting "Change job" beneath the production order number allows you to change the job for the current run — this is helpful in the case that you selected the wrong order initially
Splitting a Ticket
Splitting is useful when you need to separate time or parts across jobs — for example, if you run two different parts on one setup, or hand off mid-run to the next shift.
Splitting is available on any ticket that hasn't been submitted yet (draft or confirmed).
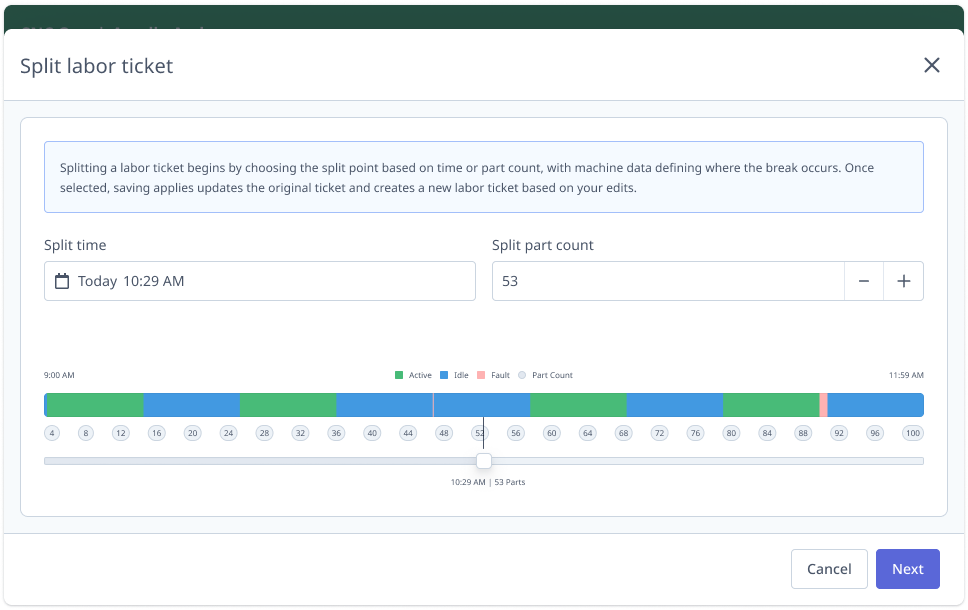
How to Split a Ticket
- Tap the job card
- Tap "Split"
- Choose your split method:
- By time: Select the exact point where the split should occur (useful when you worked on the job for a specific period)
- By part count: Enter the number of parts for the first job; split time is calculated automatically
- Select the job for the second portion
- Review the split summary to make sure everything looks right
- Tap "Confirm"
Result: The original ticket covers the first portion; a new ticket is created for the second portion. Both tickets retain their match state and can be confirmed and submitted independently.
Merging a Run
Merging is available only on draft tickets and lets you combine run data from one job into another.
When to Merge
- You accidentally started a job in the queue, but it belongs with another job
- You need to consolidate parts from multiple runs into one ticket
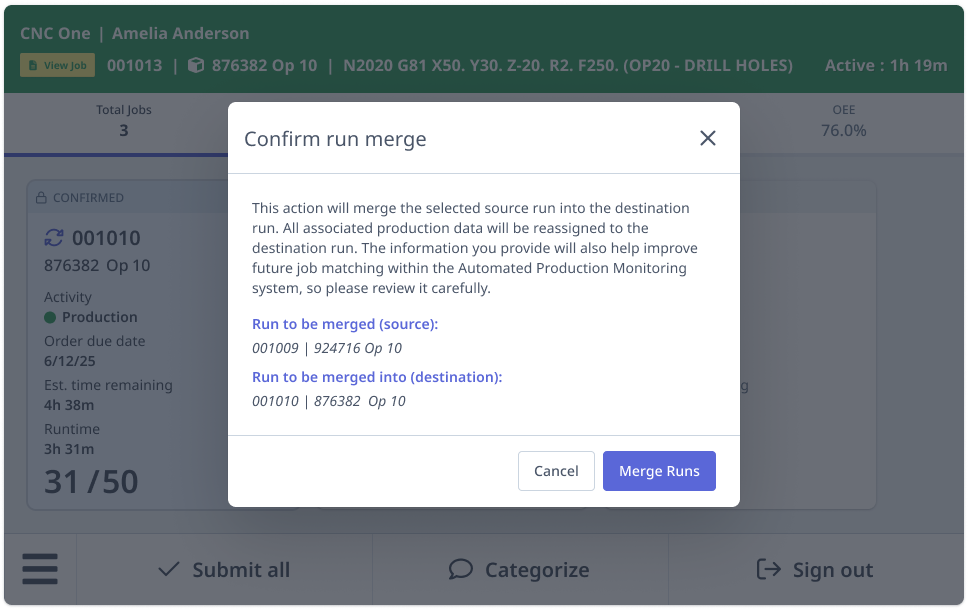
How to Merge a Run
- Tap the draft job card whose run data you want to move
- Tap "Merge"
- Select the target job
- Only jobs with an active draft or open ticket awaiting a program are shown
- Review the merge summary
- Part counts and run data move with the merge automatically
- Tap "Confirm"
If the target job isn't in the list: It's not in a mergeable state. Use "Change Job" instead to reassign the ticket to a different job.
Viewing Submission History
You can see previously submitted tickets for a job while that job is still active.
- While the job has at least one open ticket, tap the job card to view submission history
- You'll see:
- Activity mode for each submission
- Part count
- Burden hours
- Name of the operator who submitted
- Once the job is marked "Complete" and removed from your queue, the history is no longer accessible from ShopPulse
Signing Out
When you're ready to leave your machine, tap "Sign out" in the control bar.
Before you leave, the system prompts you to address any open work:
Unconfirmed drafts (Matched or Suggested):
- You'll be prompted to confirm them or reassign them to someone else
Open committed tickets:
- You'll be prompted to submit them
No Match Found items:
- Resolve them or leave them for the next operator
Once all open work has been submitted, you will be prompted to choose whether you would like to clock out for the day:
- Select "No" to sign out of the current resource only
- Select "Yes" if you would like to end your day and clock out of the system
Clock Out Flow: If Clock Out Flow is enabled, you'll go through a structured clock-out process that ensures every ticket is addressed before you leave.
Shift Handover: If Shift Handover is enabled on your machine, selecting "Yes" to clock out for the day opens the handover flow — shift analytics summary, optional note editor, and an AI-generated handover summary for the incoming operator. See Shift Handover for the full workflow.
Draft tickets that remain unconfirmed stay visible in the queue for the next operator to handle.
Job Handoffs
Smooth handoffs keep your job flowing from one shift to the next. Here's how to hand off a labor ticket so the next operator can continue where you left off:
How to Hand Off a Job
- If you're in the middle of a run and need to hand it off:
- Tap the job card
- Tap "Submit"
- Enter your part count so far
- Select "Incomplete" as the completion status
- A new ticket is created automatically with the same job and activity
- The incoming operator will see this new ticket in their queue and can continue where you left off
What the Next Operator Sees
- If you left any draft tickets unconfirmed, they appear in the queue
- The next operator can confirm them, reassign them, or add new jobs
- Any "Waiting for Program" tickets remain visible
Shift Handover
This section applies only when Shift Handover is enabled on your machine. An administrator can turn it on or off per machine — see Shift Handover for configuration details.
Shift Handover adds a structured end-of-shift handoff to your clock-out experience. When you clock out for the day, you can review your shift analytics, add notes about machine conditions or issues, and let Max AI generate a structured summary for the incoming operator. When that operator signs in, they see your summary alongside their assigned work.
Note: Shift Handover requires Clock Out Flow to be enabled on your account. Contact your administrator if you're unsure whether it's active.
Clocking Out with a Handover
When Shift Handover is enabled and you select "Yes" to "Clock out for the day?":
- Review your shift analytics summary — stat cards with key shift metrics and a color-coded machine timeline showing how your time was spent.
- Tap "Add note" to leave observations for the incoming operator. Or tap "Clock out without note" to skip the handover and clock out directly.
- Write or dictate your notes. The note editor supports free-text typing and voice dictation. Use the quick-insert badges to tag specific machines and production orders — this helps Max AI organize your notes correctly.
- Tap "Save changes." Max AI processes your notes and generates a structured, machine-grouped summary with observations and action items.
- Review the AI-generated summary. Tap "Edit Note" if anything needs revising, then tap "Submit and Clock Out."
Viewing the Handover on Clock In
Every time you sign in for the day on a Shift Handover-enabled machine, you'll see a welcome screen before your job queue loads:
- Left panel: Your assigned work for the shift
- Right panel: Handover notes from the previous operator. If the previous operator clocked out without submitting a note, this panel shows "No notes from previous shift."
Dismiss the screen to begin work.
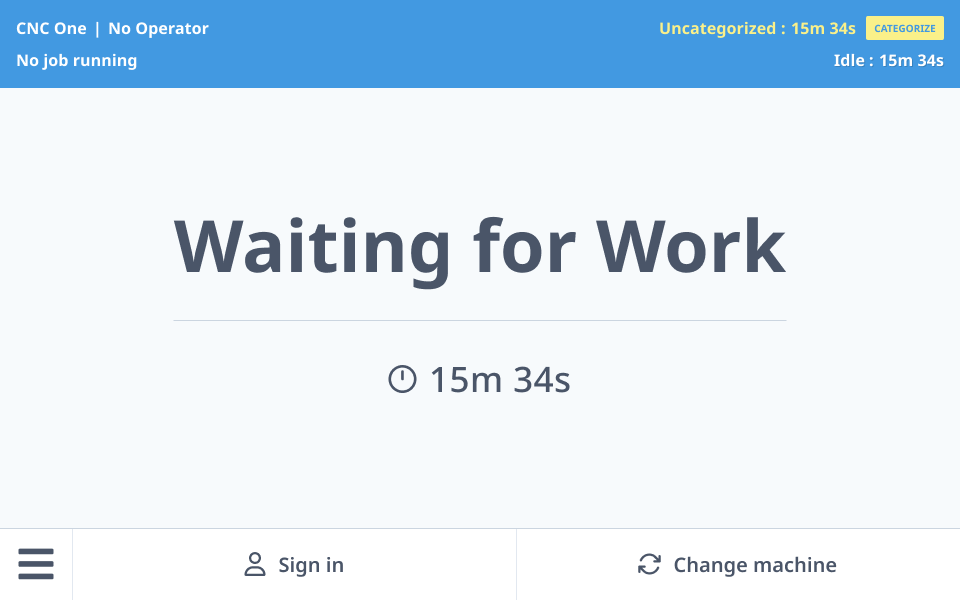
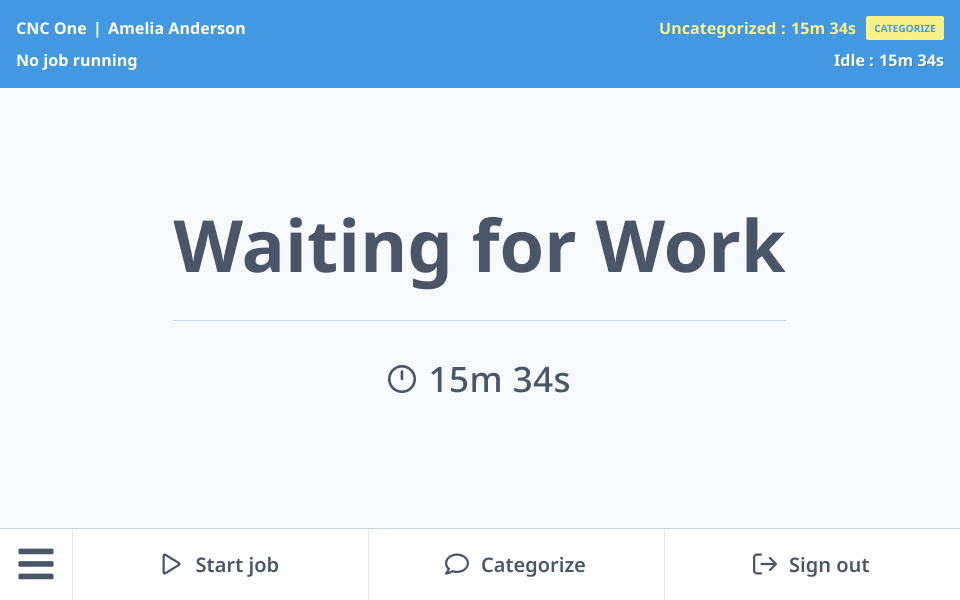
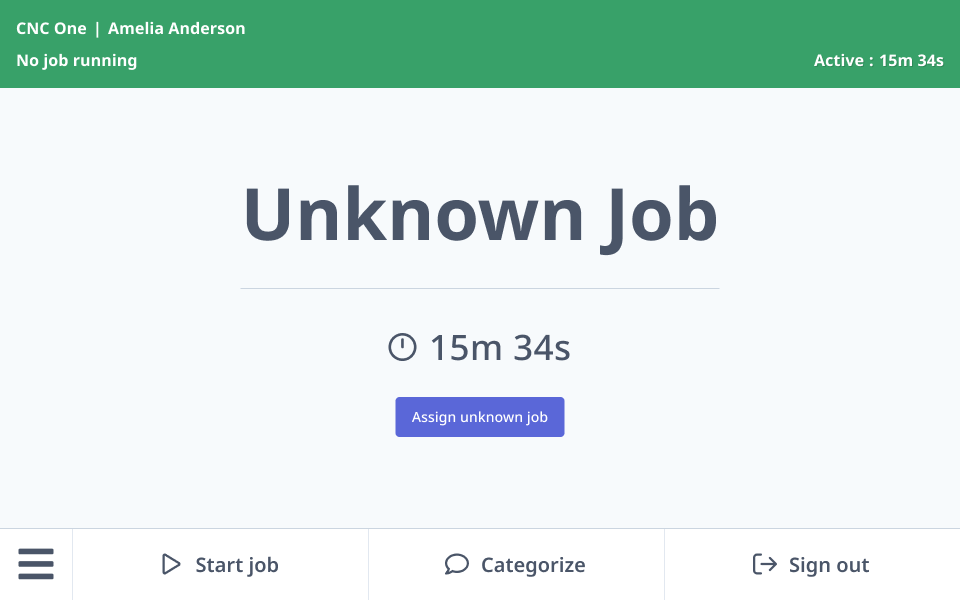
Waiting for Work & Unknown Jobs
If enabled in your company settings, the system displays "Waiting for Work" and logs time when no job is running. If machine activity is detected while no job is selected, the status changes to "Unknown Job." Operators can retroactively assign this time by selecting "Assign unknown job."

Utility Menu
Access additional settings and features by tapping the utility menu icon (hamburger menu) in the control bar.
- Switch machine — Switch to a different resource without signing out
- Quick start guide — Access the quick start guide
- Select language — Change the display language
- Workflows — Trigger automated workflows
Using the ERP Kiosk
If your facility provides an ERP kiosk, you can clock in and out directly at the kiosk rather than using ShopPulse.
The kiosk connects to your ERP system, allowing you to log your time before beginning work in MachineMetrics.
When clocking out, you can also submit any open labor tickets from all resources you're signed into. This will automatically sign you out of those resources as well.
Tips & Best Practices
- Confirm matches promptly. Draft tickets accumulate burden but can't be submitted until confirmed. Don't let them pile up.
- Pre-select jobs when you know what's coming. This gives APM a priority pool and reduces No Match Found situations.
- Use Incomplete submissions for shift handoffs. It maintains continuity and keeps the job moving.
- When in doubt on a Suggested match, use search. The candidate list is filtered; search gives you full access to all jobs.
- Don't wait until the end of your shift to review your queue. Resolve No Match Found and Suggested jobs in real time.
- Use Submit All before signing out. It clears confirmed jobs quickly and prevents the next shift from inheriting your open tickets.
- Watch the Part Count tab for pacing. The pace indicator shows whether you're ahead or behind — adjust if needed.
- Know your activity modes. Switching within the same mode is easy; switching between modes requires submission.
- Categorize downtime promptly. The sooner you log the reason, the more accurate your organization's downtime data will be.
FAQs & Troubleshooting
Q: Why is my job "Suggested" instead of "Matched"? A: Multiple work orders for the same part exist, and APM can't determine which one is running. Review the candidate list carefully and confirm the correct job.
Q: Why "No Match Found" when I know there's a matching job? A: Usually because multiple jobs with open tickets exist for the same program on the same machine. Select the correct job manually from the list.
Q: I submitted by accident — can I undo it? A: No, submission cannot be undone from ShopPulse. Contact your ERP administrator if you need to correct something.
Q: Can I split a ticket after confirming it? A: Yes, as long as you haven't submitted it yet. Split is available on both draft and confirmed tickets.
Q: A new ticket appeared that I didn't add — what happened? A: APM added it based on a program running on your machine. Review and confirm it, select a different job, or resolve it as needed.
Q: I can't see the job queue. A: MES may not be enabled on your machine yet, or you may not have signed in. Contact your administrator to check the configuration.
Q: My name isn't in the operator list. A: Your operator profile needs to be set up. Contact your administrator — they can add you in Settings → Operators.
Q: What if the ERP connection fails during submission? A: Retry the submission. If issues persist, contact your administrator.
Q: Why is my dashboard header blue? A: Your machine has been detected as idle, indicating a downtime event. Tap "Categorize" to log the reason for the downtime.
Q: What does "Unknown Job" mean? A: Your machine is active but no job has been selected. Tap "Assign unknown job" to retroactively assign this time to a job, or tap "Start job" to select a job from the schedule.
Q: Why am I seeing an inspection prompt when I complete setup? A: First Article Inspection (FAI) is enabled on your machine. An administrator can turn it on or off per machine — see First Article Inspection for the full workflow.
Q: Why do I see a two-panel welcome screen when I sign in? A: Shift Handover is enabled on your machine. The left panel shows your assigned work; the right panel shows notes from the previous operator. Dismiss the screen to begin work. See Shift Handover for details.
Q: I want to leave handover notes but I don't see the option when I clock out. A: Shift Handover may not be enabled on your machine, or Clock Out Flow (which it depends on) may not be active on your account. Contact your administrator to check.
Related Articles
- Auto Production Monitoring (APM)
- Getting Started with ShopPulse
- MES Settings
- Configuring a Machine's Production Settings
- Getting Started with MES: Administrator Guide
- First Article Inspection
- Shift Handover
Need Help?
Start with your supervisor or MachineMetrics administrator. For additional support, contact support@machinemetrics.com.