Okuma OSP-P500
Protocol: OPC-UA · Default port: 4840 · Endpoint: opc.tcp://<machine_ip>:4840 · Cable: the Ethernet port on the control panel or inside the cabinet.
Set a static IP on the control, on the same subnet as the Edge device. For where the cable goes, see Physical Connection in the OPC-UA overview.
This is a separate Okuma option from MTConnect and must be licensed and enabled on the machine. Confirm with your Okuma dealer before starting. If you want MTConnect on this control instead, see MTConnect Connectivity.
Key Points
- Requires OPC UA for Machine Tools option (separate from MTConnect license)
- Port: 4840 (standard OPC-UA)
- Access via Admin Launcher → Item #11 (OPC UA) → System → Open
- Must enable OPC Function (set from Disable → Enable)
- Click Apply to save changes, then restart the control for OPC-UA to become active
- Configure user credentials in User Settings — these go into the MachineMetrics adapter script
- Security mode and policy must match the MachineMetrics adapter configuration
- Use
SignAndEncrypt/Basic256Sha256for production environments
Navigation Path
CNC screen → Puzzle Icon → Gear → Admin Launcher → Item #11 OPC UA → System → Open
Enabling OPC-UA on the Control
Protocol: OPC-UA | Default Port: 4840 | Endpoint: opc.tcp://<machine_ip>:4840
The OPC UA for Machine Tools option must be licensed and enabled on the machine. This is a separate Okuma option from MTConnect — confirm with your Okuma dealer before starting.
Prerequisites:
- Ethernet cable connected from the machine control to the customer's network
- Network IP address or DHCP information from the customer's IT team
- OPC UA for Machine Tools option licensed on the control
Step 1: Access the CNC Screen
From the machine homepage (OSP Suite), press CNC in the lower-left Operation panel to open the conventional CNC operation screen.
Step 2: Open Admin Launcher
- On the CNC screen, locate the puzzle piece icon in the lower-right sidebar
- Tap it to open the utility menu
- Tap the gear icon (⚙) to open settings
- Select Admin Launcher
Step 3: Configure the Network / IP Address
If you have already configured the IP address for MTConnect or another protocol, skip this step.
- In the Admin Launcher, select Network Options (item 4)
- Select the Network Interface
- Configure the IP address in the Windows TCP/IP Settings page:
- DHCP: Select "Obtain an IP address automatically"
- Static IP: Enter the IP address, subnet mask, and default gateway from the customer's IT team
- Click OK and close the network settings
Step 4: Verify Firewall Settings
The OSP-P500 has a built-in firewall (OSP-FIREWALL) that must have OPC UA enabled before the connection will work.
- In the Admin Launcher, select Firewall Settings (item 6)
- The OSP-FIREWALL screen will open showing the protocol rules list
- Confirm OPC UA (TCP, port 4840) is checked/enabled
- If it is not enabled, check the box and press Apply
- Press Quit to close
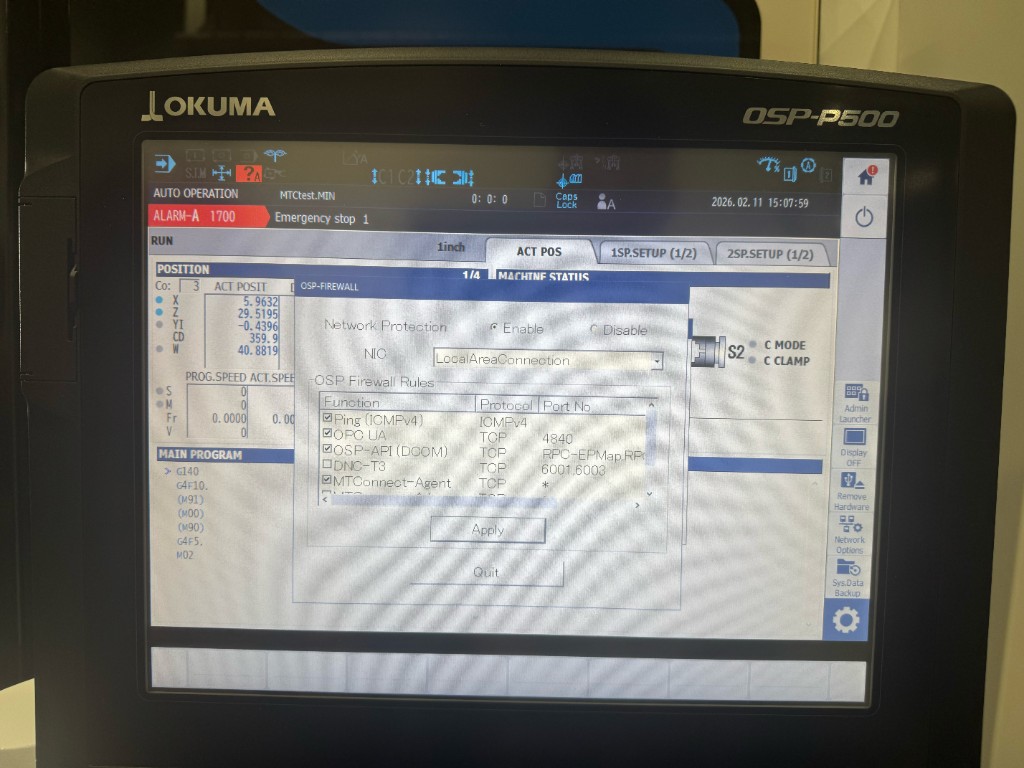
The firewall screen also shows MTConnect-Agent as a separate rule. If you are setting up MTConnect on the same machine, ensure that rule is also enabled.
Step 5: Open OPC-UA Configuration
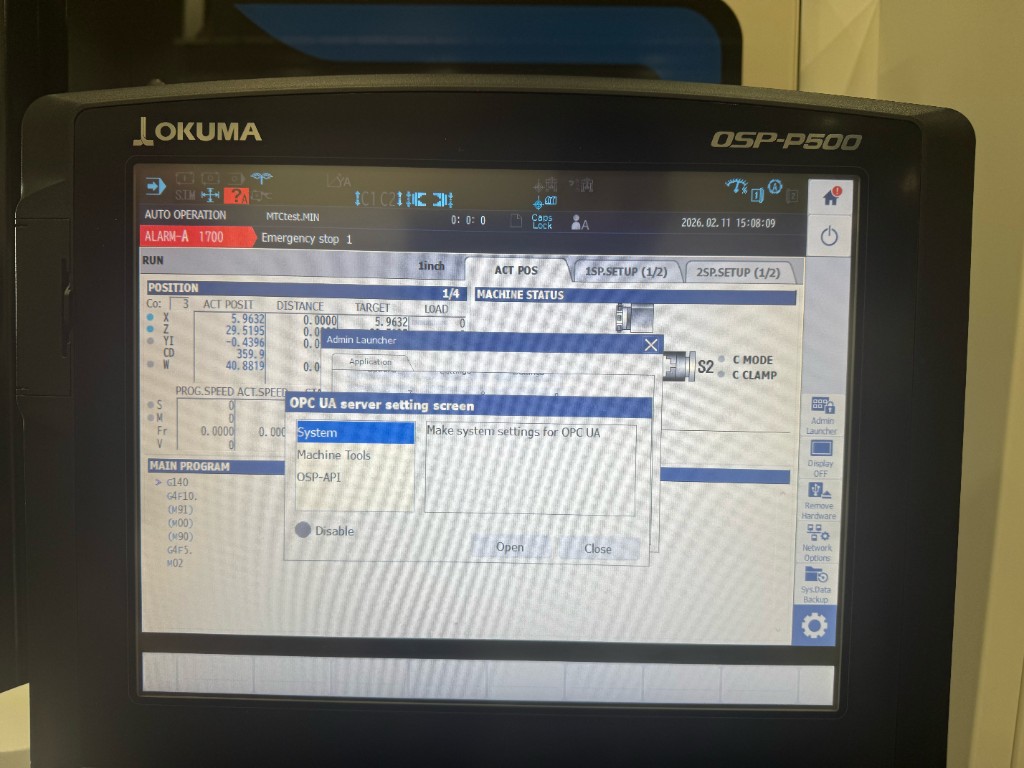
- In the Admin Launcher, scroll to item #11 — OPC UA
- Select System
- Press Open
The OPC-UA configuration interface will launch with four sections in the left sidebar: Application, User Settings, Certif. Settings, and Security Settings.
Step 6: Enable the OPC-UA Function
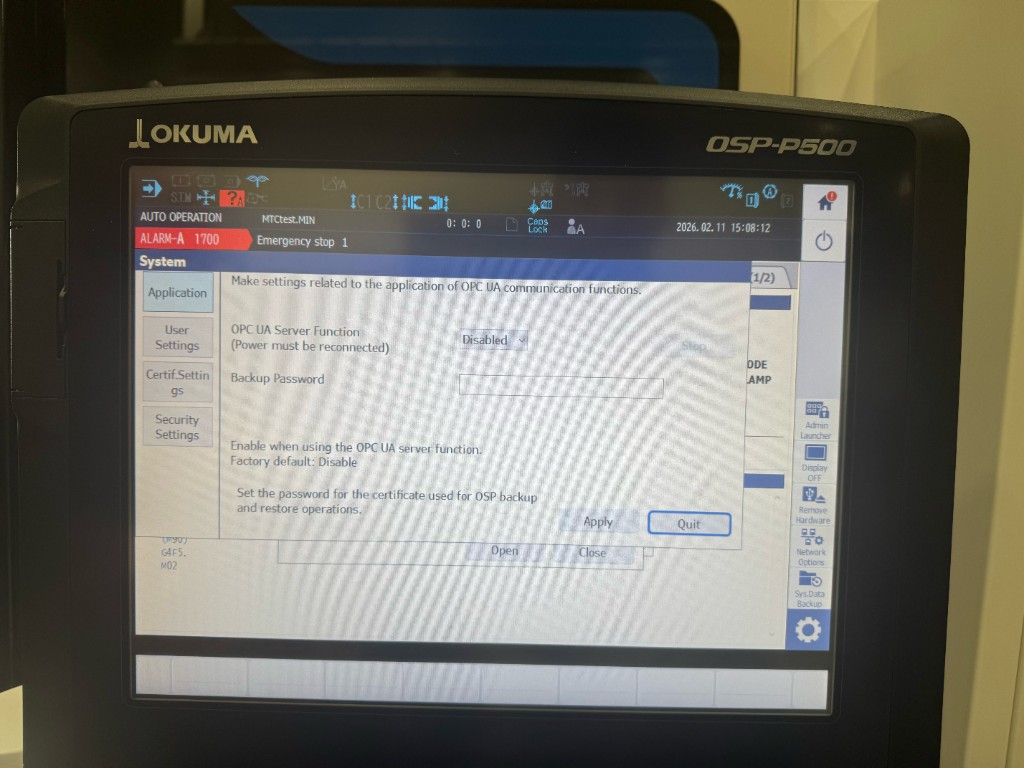
- Select Application in the left sidebar
- Locate the OPC UA Server Function dropdown
- Change the value from Disabled to Enabled
- Press Apply
Step 7: Configure User Settings
- Select User Settings in the left sidebar
- In the User Management tab, click Add to create a new user
- Assign the appropriate role (Observer, Operator, Engineer, Supervisor, Configure, Admin, or Security)
- Set the username and password for the OPC-UA client
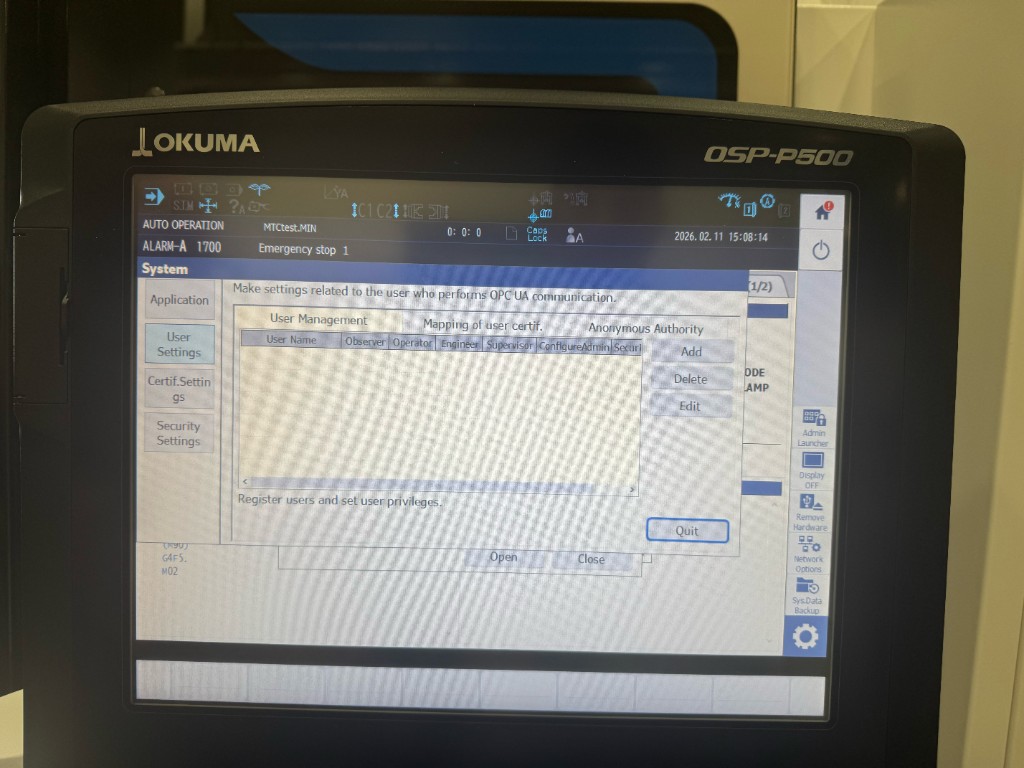
These credentials are entered in the MachineMetrics adapter script under the username and password fields, for example:
username: OpcUaClient
password: YourSecurePassword
Step 8: Configure Certificate Settings
- Navigate to Certificate Settings
- Authorize (trust) the certificate for this machine
- When an OPC-UA client connects for the first time, its certificate must be trusted here
- For initial testing, you may configure automatic certificate acceptance
- For production, manually trust specific client certificates
Step 9: Configure Security Settings
- Navigate to Security Settings
- Set the Security Mode:
| Mode | Use Case |
|---|---|
None | Testing only — not recommended for production |
Sign | Messages signed but not encrypted |
SignAndEncrypt | Recommended for production |
- Set the Security Policy (e.g.,
Basic256Sha256)
The security mode and policy set here must match what is configured in the MachineMetrics OPC-UA adapter script.
Step 10: Apply and Restart
- Click Apply to save all configuration changes
- Restart the control for OPC-UA to become active
Verification
- From a PC on the same network, open an OPC-UA client (e.g., UaExpert, Prosys OPC UA Browser)
- Connect to:
opc.tcp://<machine_ip>:4840 - Enter the username and password configured in Step 7 (User Settings)
- If prompted to trust the server certificate, accept it
- Browse the address space — you should see CNC data nodes
If connection fails:
- Confirm OPC-UA was enabled, Apply was clicked, and the control was restarted
- Check that Windows Firewall allows inbound traffic on port 4840
- Verify the security mode/policy in your client matches the machine configuration
- Confirm network connectivity between the client and the machine
Quick Reference — OSP-P500 OPC-UA
| Item | Value |
|---|---|
| Protocol | OPC-UA |
| Default Port | 4840 |
| Endpoint Format | opc.tcp://<ip>:4840 |
| Admin Launcher Path | CNC → Puzzle Icon → Gear → Admin Launcher |
| OPC-UA Config Path | Admin Launcher → Item #11 (OPC UA) → System → Open |
| Critical Steps | Enable OPC Function → Configure Users → Apply → Restart Control |
| Security Recommendation | SignAndEncrypt / Basic256Sha256 |