Kitamura Connectivity Guide
- Overview
- Identifying Your Control
- Arumatik-Mi: Enabling MTConnect via AnyWhere Remote
- Arumatik-Jr: Two Options
- Option 1: Mitsubishi IMA Standard Adapter
- Option 2: Upgrade the Controller
- Troubleshooting
- Additional Resources
Overview
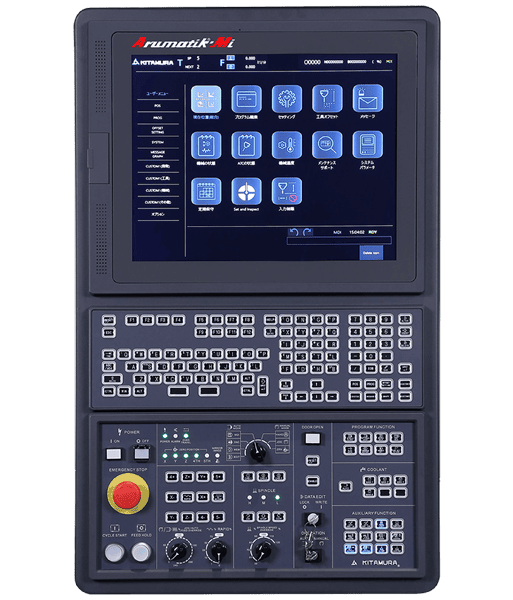
Kitamura Arumatik-Mi control. Kitamura machines with an Arumatik control connect to MachineMetrics over MTConnect.
Kitamura CNC machines connect to MachineMetrics using MTConnect. How you get an MTConnect stream off the machine depends on which Arumatik control it has.
This guide applies to Kitamura machines with a Kitamura Arumatik control. Kitamura machines equipped with a FANUC control connect over FOCAS instead — see the FOCAS (FANUC) Connectivity Guide.
Even though the Arumatik control is built on a Mitsubishi Electric NC, Kitamura machines must always be connected via MTConnect. Selecting the MachineMetrics Mitsubishi M70 / M700 adapter for a Kitamura machine results in incorrect or failed connectivity. See the Mitsubishi Connectivity Guide for where that adapter does apply.
Identifying Your Control
There are two versions of the Arumatik control, and they connect in different ways. The quickest way to tell them apart is screen size.
| Control | Screen size | Connection method |
|---|---|---|
| Arumatik-Mi | Large 19" screen | Built-in MTConnect via AnyWhere Remote |
| Arumatik-Jr | Smaller 15" screen | Mitsubishi IMA Standard Adapter or controller upgrade |
Arumatik-Mi: Enabling MTConnect via AnyWhere Remote
The Arumatik-Mi control includes Kitamura's AnyWhere Remote application, which provides a built-in MTConnect adapter. MTConnect is enabled from inside AnyWhere Remote and unlocked with a license file supplied by Kitamura.
Step 1: Open AnyWhere Remote
On the control, navigate to Custom → Option and locate the AnyWhere Remote icon.
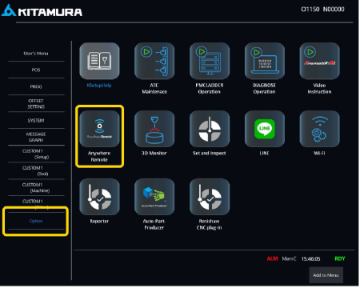
The AnyWhere Remote icon under Custom → Option on the Arumatik-Mi control.
Contact Kitamura. They can supply an installer (.exe) that you install on the control from a USB drive.
Step 2: Open the MTConnect settings
Inside AnyWhere Remote, select MTConnect FactoryWiz & A-R TV.
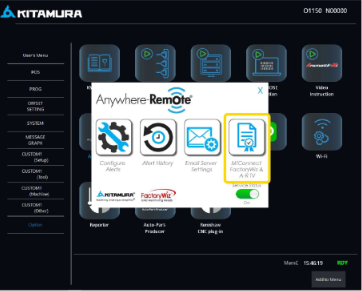
The MTConnect option inside the AnyWhere Remote window.
Step 3: Request and install the MTConnect license
The MTConnect adapter requires a license from Kitamura. The MTConnect window shows the current status — if it reads NOT ENABLED, work through the steps below.
- In the MTConnect window, select Save License Request.
- Save the generated
License.FWRequestfile to a USB drive. - Email the file to Kitamura.
- Kitamura emails back a
License.FWLicensefile. - Load the returned license file on the control using Load New License.
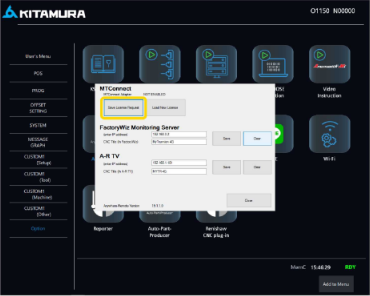
Use Save License Request to generate the license request file, and Load New License to install the file Kitamura sends back.
Step 4: Add the machine in MachineMetrics
Once MTConnect shows as enabled:
- Confirm the machine's IP address and the MTConnect agent port shown in the AnyWhere Remote MTConnect window. If the port is not listed, ask Kitamura to confirm it for your control version.
- From a PC on the same network, browse to
http://<machine-ip>:<agent-port>/current. XML output confirms the agent is serving data. - Add the machine in MachineMetrics as a standard MTConnect connection.
Follow Adding the Machine in MachineMetrics in the MTConnect guide for the full walkthrough.
Arumatik-Jr: Two Options
The Arumatik-Jr control does not include AnyWhere Remote, so there is no built-in MTConnect adapter. There are two paths:
- Mitsubishi IMA Standard Adapter — a Windows application that reads the CNC and publishes MTConnect. Recommended.
- Upgrade the controller — contact Kitamura about moving to a newer control that supports AnyWhere Remote.
Option 1: Mitsubishi IMA Standard Adapter
The Arumatik-Jr is built on a Mitsubishi Electric NC, so it can be connected with the Mitsubishi Integrated Machine Analytics (IMA) Standard Adapter V3.3 — a Windows application that reads data from the CNC and publishes it to a listening MTConnect Agent. The IMA installer packages both the adapter and an MTConnect Agent in a single executable. IMA V3.3 is compliant with version 2.2 of the MTConnect Standard.
The installer, license keys, and the IMA Installation, Configuration, and User Guides all come from Mitsubishi Electric Automation: software.solutions@meau.com or 847-478-2100.
The IMA adapter produces an MTConnect stream that MachineMetrics reads over HTTP. You are not using the MachineMetrics Mitsubishi adapter — in MachineMetrics you add the machine as an MTConnect machine pointing at the IMA agent.
Compatibility: read this first
The IMA adapter supports CNC machines with standard Mitsubishi Electric NCs:
- M800 / M80 series
- M700 / M70 series
Confirm the NC series on the Arumatik-Jr with Kitamura before ordering a license.
Support is not available for Mitsubishi Electric controls on machines from these tool builders:
| Tool builder | Supported by IMA adapter? |
|---|---|
| Mazak | ❌ No |
| Citizen | ❌ No (except M800 / M80 series and newer) |
| Traub | ❌ No |
| DMG MORI | ❌ No (except M730 and newer) |
These builders use customized Mitsubishi controls that the standard IMA adapter cannot read. If a shop wants to connect one of these machines with this adapter, stop — it will not work.
Host PC requirements
The adapter must run continuously to stream machine data. Install it on a dedicated PC or server in a server room with 24/7 access to the machine network. If the host sleeps, shuts down, or leaves the network, data collection stops.
- Windows 8 or newer
- Static IPv4 address on the same network as the CNC — the first three octets must match the CNC (for example,
192.168.200.###) - Powered on and network-connected 24/7
Licensing
The adapter is a CNC-specific application: each installation is licensed against one CNC's NC serial number. The installer validates the license key against the serial number you enter, and the Install button only becomes enabled once verification passes.
The serial number is used throughout the install — it becomes part of the batch file names, the Windows service identity, and the MTConnect device and data item names. Record it accurately.
Data packages: purchase Package #4
The IMA license is sold as a base package plus optional add-on packages. Only the data items in the packages you purchase are published by the adapter. Decide which packages you need before ordering, because adding one later requires a new license key from Mitsubishi Electric Automation.
Program Comment and Program Comment: Active are in Package #4 (Program #1 Option), not the base package. Without Package #4, the IMA adapter does not publish program comment data, so MachineMetrics cannot run Automatic Production Monitoring (APM) on the machine.
Purchase Package #4 alongside the base package when you order the IMA license.
What MachineMetrics recommends at minimum: Base Package plus Package #4. Packages #6 (Spindle), #7 (Load), and #3 (Assets) are worth adding if you want spindle speed and load, or tool number reporting.
Available packages:
| Package | Data items |
|---|---|
| Base Package | Availability, Controller Mode, Emergency Stop, Execution State, Override (Programmed Path Feedrate, Rapid Path Feedrate, Rotary Velocity), Message, Part Count (All, Remaining, Target), Process Timer, Program (Active, Main), Serial Number, Wait State, Alarms/Conditions |
| #1 Positioning | Angle (Actual, Commanded), Direction (Linear, Rotary), Path Feedrate (Actual, Programmed), Path Position Commanded, Position (Actual, Programmed) |
| #2 Overrides | Dry Run, Machine Axis Lock, Single Block |
| #3 Assets | Tool Asset ID, Tool Number, Tool Number Standby |
| #4 Program #1 (required for APM) | Block, Line Label, Line Number Absolute, Program Comment, Program Comment Active, Program Header, Program Header Active |
| #5 Program #2 | Program Edit, Program Edit Name |
| #6 Spindle | Direction Rotary, Rotary Mode, Rotary Velocity (Actual, Commanded, Programmed) |
| #7 Load | Load |
| #8 Status | Active Axes, Equipment Mode (Feeding, Rapid, Tapping, Threading) |
| #9 Timers | Accumulated Time (Automatic, Cycle Start, MTB Ext. Time #1, MTB Ext. Time #2), Equipment Timer (Loaded, Powered), Clock Time |
Notes on package availability:
- Packages are available with IMA version 3.3.9 and newer.
- MTB (machine tool builder) alarms are not supported by the base package Alarms/Conditions item.
- The Edit value for Controller Mode, and Program Edit Name in Package #5, are only supported on standard M8 series NCs.
Confirm the package list and pricing with Mitsubishi Electric Automation: software.solutions@meau.com or 847-478-2100.
CNC parameters
Before connecting, verify the following parameters on the control (refer to the machine manual for parameter access):
| Parameter # | Name | Purpose |
|---|---|---|
| 1925 | Ethernet | Enables the Ethernet connection |
| 1926 | Global IP Address | IP address of the CNC on the network |
| 1927 | Global Subnet Mask | IP network grouping |
| 1928 | Global Gateway | IP address of the router or forwarding host |
Write down parameter #1926 — you enter it during the install and use it to test connectivity.
Installation walkthrough
Run IMA Standard Adapter Setup on the host PC, with all other applications closed.
Step 1: Choose the installation location.
The default is C:\Program Files (x86)\IMA_Standard_Adapter.
When installing multiple adapters or agents on the same PC, each installation must go in its own directory. Include the machine ID and the NC serial number in the path, for example C:\Program Files (x86)\IMA_MYCENTER-1_<SN>\.
If a Standard_Adapter.exe already exists in the selected directory, the installer warns you that a copy of the software is already installed. Clicking OK updates the existing install in place. If you are adding a second machine, do not click OK — that overwrites the first machine's adapter. Click Cancel and choose a new directory. Only click OK when you are intentionally updating an existing installation.
Step 2: Choose components.
| Install option | What it installs |
|---|---|
| Everything | Adapter + runtime library + MTConnect Agent |
| Adapter (only) | Adapter + runtime library |
| Agent (only) | MTConnect Agent only |
| Custom | User-selected components |
For a standard single-PC install, choose Everything. Accept both license agreements when prompted.
Step 3: Set the adapter service name and port.
The installer prompts for an Adapter Service Name (default IMA Standard Adapter) and an Adapter Port (default 7878).
Windows will not run two services with the same name, and two programs cannot bind the same port. If the installer warns about a duplicate name or an occupied port, do not click through it — go back and change the value.
Put both a machine ID and the NC serial number in every service name. The serial number keeps the name unique and ties the service to its license, but most people don't know a machine by its serial number. Adding the machine ID — the same name the machine has in MachineMetrics, or the asset tag on the machine itself — is what lets someone find and restart the right service months from now.
Recommended convention when hosting multiple machines on one PC:
| Machine | Adapter service name | Adapter port | Agent service name | Agent port |
|---|---|---|---|---|
MYCENTER-1 | IMA Standard Adapter MYCENTER-1 <SN1> | 7878 | MTConnect Agent MYCENTER-1 <SN1> | 5000 |
MYCENTER-2 | IMA Standard Adapter MYCENTER-2 <SN2> | 7879 | MTConnect Agent MYCENTER-2 <SN2> | 5001 |
HX400 | IMA Standard Adapter HX400 <SN3> | 7880 | MTConnect Agent HX400 <SN3> | 5002 |
Step 4: Set the agent service name and port.
The same uniqueness rules and naming convention apply. The default agent name is MTConnect Agent and the default port is 5000. The agent port is the port MachineMetrics (or a browser) queries.
Step 5: Enter the CNC settings.
Enter the CNC's IP address (parameter #1926) and select the NC type and series from the CNC Configuration drop-down that matches the machine's Mitsubishi control.
Step 6: Enter licensing details.
Enter the NC Serial Number and the License Key. Once verified, click Install, then Finish.
Post-install: know your batch files
The install directory contains batch files keyed to the NC serial number. Run them as Administrator (right-click → Run as Administrator):
| File | What it does |
|---|---|
configure_<SN>.bat | Opens the configuration file (Adapter Configuration.ini) in Notepad |
install_<SN>_service.bat | Applies the configuration file settings to the Windows service |
start_<SN>_service.bat | Starts the adapter Windows service |
stop_<SN>_service.bat | Stops the adapter Windows service |
restart_<SN>_service.bat | Stops the service, applies config settings, and starts it again |
debug_<SN>.bat | Runs the adapter in a console window with debug-level logging |
Always stop the service → run install_<SN>_service.bat → start the service. Config changes are not picked up until the settings are re-installed.
The Windows services install with Automatic startup and Service Restart enabled by default, so the adapter survives PC reboots — one more reason this belongs on a server rather than a laptop.
Testing: verify every layer before leaving site
Test in this order. Each step proves one layer, so when something fails you know exactly where.
Test 1: The PC can reach the CNC (network layer).
On the host PC, open Command Prompt:
ping <CNC IP address from parameter #1926>
- Pass: replies with
bytes=,time=, andTTL=, at 0% loss. - Fail:
Destination host unreachable,Request timed out(100% loss), orGeneral failure. Fix the network before continuing — check parameter #1925 (Ethernet enabled), the cable, and that the PC and CNC are on the same subnet.
A short ping proves the network works right now. If the machine connects but drops offline intermittently, run a sustained ping instead — see Intermittent drops.
Test 2: The adapter is running and gathering data (adapter layer).
Option A — run the adapter in debug mode and watch the console:
debug_<SN>.bat
You should see pipe-delimited data streaming in the format Timestamp | Data Item Name | Data Item Value. An empty console means the adapter is bound to the port but not connected to the CNC — recheck the host IP and model in the config file. Close the console and start the Windows service when you are done.
Option B — telnet the adapter port (Telnet must be enabled in Windows Features):
telnet 127.0.0.1 7878
- Pass: pipe-delimited data appears.
Connect failed: nothing is bound to the port — the adapter service isn't running, or it's on a different port.- Connected but empty: the adapter is running but is not talking to the CNC.
Test 3: The agent is serving MTConnect data (agent layer).
On the host PC, open a browser to http://localhost:<agent port>/current (for example, http://localhost:5000/current).
ERR_CONNECTION_REFUSED: the agent isn't running, or it's on a different port.- Find the Availability data item in the XML:
AVAILABLE— the adapter is running and connected to the CNC.UNAVAILABLE— the adapter is not running, or is running but can't reach the CNC. Go back to Tests 1 and 2.
Test 4: The agent is reachable from the network (MachineMetrics layer).
From another machine on the network, such as the Edge device, browse to http://<host-pc-ip>:<agent port>/current.
- Pass: the same XML as Test 3.
- Fail while Test 3 passes: Windows Firewall is blocking the agent port. Add an inbound rule allowing the agent port.
Test 5: It survives a reboot.
Reboot the host PC, wait for it to come back up without logging in, and repeat Test 4. The adapter and agent services should start automatically. If they don't, check that the service startup type is set to Automatic.
Only after all five tests pass, add the machine in MachineMetrics as an MTConnect connection pointing at http://<host-pc-ip>:<agent port>. See Adding the Machine in MachineMetrics.
Logging
Adapter logs are written to the install directory as sAdapter_<log number>.log, in the format Timestamp | Severity | Message. Severity levels from lowest to highest are trace, debug, info, warning, and fatal. Log rotation defaults to 2 MB per file and 10 MB total, deleting the oldest file first. These logs are the first place to look when troubleshooting remotely.
Intermittent drops: the machine keeps going offline
When machines drop offline and come back, and the MTConnect agent shows Availability = UNAVAILABLE during the drops, it almost always means the IMA adapter is losing its connection to the CNC intermittently. Work through the checks below in order — they are listed by likelihood.
1. Confirm where the adapter is running.
It needs to be on a dedicated PC or server that is on 24/7 and on wired Ethernet — not a laptop, and not a desktop that sleeps. On that machine:
- Set the Windows power plan to never sleep.
- In Device Manager, open the network adapter's Power Management tab and uncheck Allow the computer to turn off this device to save power.
2. Pull the adapter logs.
In the adapter install directory you will find sAdapter_1.log, sAdapter_2.log, and so on. Note the timestamps when machines drop and read what was logged at that moment.
If the logging severity in the config file is set to warning or fatal, change it to info so connection events are captured, then stop the service → run install_<SN>_service.bat as Administrator → start the service. Config changes do not take effect until the settings are re-installed.
3. Enable Close After Disconnect in the config file.
Open configure_<SN>.bat and, in the [Adapter] section, set:
Close After Disconnect = enabled
This is disabled by default, and when the adapter hits network error 0x8202000A it can get stuck instead of reconnecting. If your logs show that error code, this is very likely the fix. Apply it with the same stop → install → start sequence.
4. Run a long ping test during production.
From the adapter PC, run a sustained ping and let it go for a full shift:
ping -t <CNC IP address> > ping_log.txt
Intermittent timeouts in the log point to a physical or network problem rather than the adapter: a flaky cable to the machine, a failing switch port, or an IP conflict on the machine network.
5. Check whether the adapter service itself is crashing.
The service restarts automatically by default, which can hide crashes. In Windows Event Viewer, open the System log and filter for Service Control Manager events around the drop times.
Option 2: Upgrade the Controller
Contact Kitamura about upgrading the Arumatik-Jr to a newer control that supports AnyWhere Remote. Once the machine is upgraded, follow the Arumatik-Mi instructions above — no separate host PC or adapter software is needed.
Troubleshooting
| Symptom | Likely cause | Action |
|---|---|---|
| AnyWhere Remote icon missing (Mi) | App not installed on the control | Contact Kitamura for the USB installer |
| MTConnect shows NOT ENABLED (Mi) | License not installed | Complete the license request and install steps above |
| Ping fails to the CNC IP (Jr) | Network or parameter issue | Check parameters 1925–1928, cabling, and subnet match |
Telnet Connect failed on 7878 (Jr) | Adapter service not running, or wrong port | Start the service and confirm the port in the config file |
| Telnet connects but shows nothing (Jr) | Adapter can't reach the CNC | Verify host IP and model in Adapter Configuration.ini |
ERR_CONNECTION_REFUSED on the agent URL (Jr) | Agent not running, or wrong port | Check the agent service and port number |
Availability = UNAVAILABLE (Jr) | Adapter not running, or can't reach the CNC | Work back through Tests 1 and 2 |
| Machine drops offline and comes back (Jr) | Adapter losing its CNC connection intermittently | Work through Intermittent drops |
Adapter log shows network error 0x8202000A (Jr) | Adapter stuck instead of reconnecting | Set Close After Disconnect = enabled in the config file, then stop, re-install settings, and start the service |
| Works locally, not from the network (Jr) | Windows Firewall | Allow inbound traffic on the agent port |
| Adapter service won't start (Jr) | Port or service-name conflict | Ensure unique ports, service names, and directories per machine |
| Config changes not taking effect (Jr) | Settings not re-installed | Stop the service, run install_<SN>_service.bat, then start the service |
| Silent-install failures (Jr) | See the installer log | Check IMA Standard Adapter – Installer.log next to the installer executable |
For MTConnect problems that are not specific to Kitamura, see Troubleshooting in the MTConnect guide and Machine Not Reporting.
Additional Resources
Related Guides:
- MTConnect Connectivity Guide — adding and configuring an MTConnect machine
- FOCAS (FANUC) Connectivity Guide — for Kitamura machines with a FANUC control
- Mitsubishi Connectivity Guide — where the MachineMetrics Mitsubishi adapter does apply
- Machine Settings Guide — configuring machine settings and part counting
- Connectivity Overview — choosing the right protocol
Vendor Contacts:
- Kitamura (AnyWhere Remote installer and MTConnect license) — contact Kitamura directly.
- Mitsubishi Electric Automation (IMA adapter installer, license keys, and guides): software.solutions@meau.com or 847-478-2100
Getting Help:
- MachineMetrics Support: support@machinemetrics.com
- Include in your support request:
- Machine make and model
- Arumatik control version (Mi or Jr)
- IP address and MTConnect agent port
- Whether
http://<ip>:<port>/currentreturns XML - Screenshots of any connection errors