Haas Connectivity Guide
- Overview
- Determining Your Haas Control Type
- Method 1: MTConnect (Next Generation Controls)
- Method 2: Haas Serial (Classic Controls)
- Part Count Setup
- Macro and System Variables
- DPRNT: Sending Custom Data from Programs
- Using Both MTConnect and Serial Together
- Troubleshooting
- Additional Resources
Overview
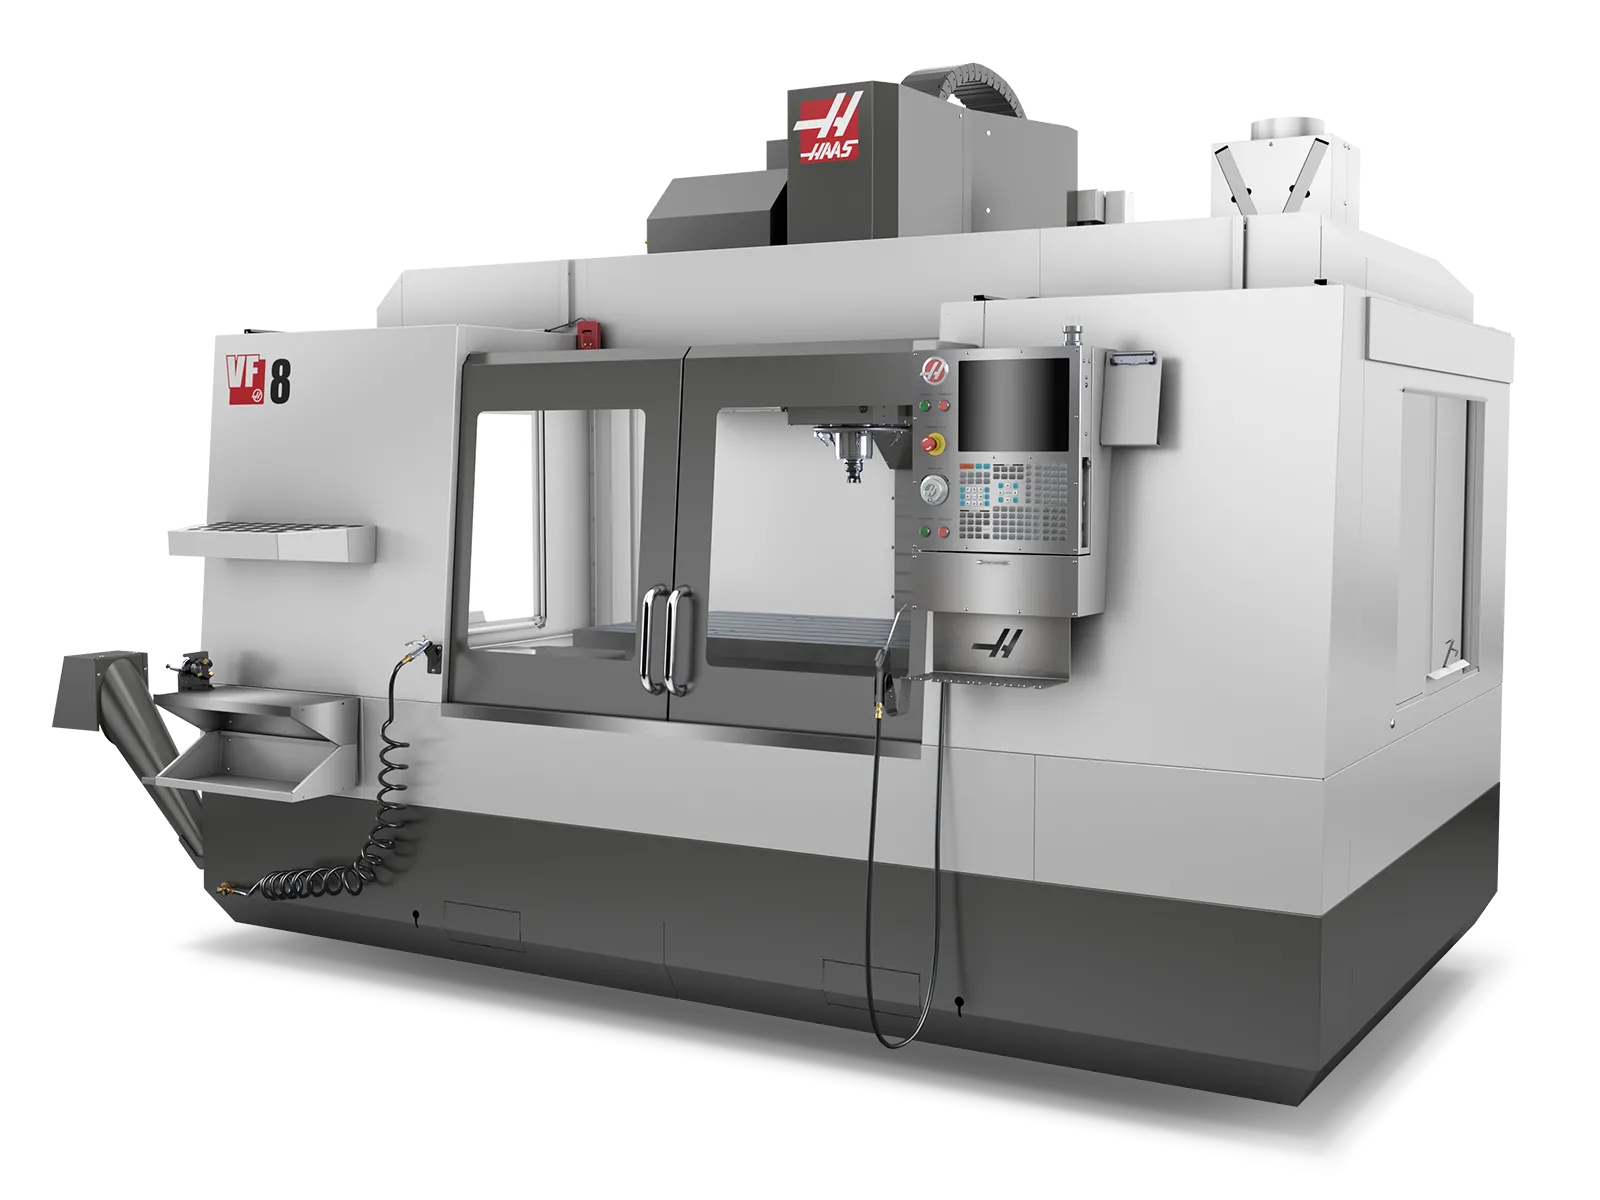
Haas CNC control panel. Haas machines connect via MTConnect (Next Generation controls) or Haas Serial/DPRNT (Classic controls), providing real-time production data and machine status.
MachineMetrics connects to Haas machines using two primary methods depending on your control type:
| Control Type | Connectivity Method | Port | Hardware Required |
|---|---|---|---|
| Next Generation (2017+) | MTConnect | 8082 | Ethernet only |
| Next Generation (2017+) | Haas Serial (MDC) | 4001 | Ethernet only |
| Classic Control (pre-2017) | Haas Serial (MDC) | 4001 | Moxa serial-to-Ethernet converter |
| Very Old (pre-2001) | Digital I/O | N/A | LabJack I/O module, sensors, wiring |
Recommended Approach:
- Next Gen Controls: Use MTConnect (primary) + Haas Serial (secondary) for macro variables
- Classic Controls: Use Haas Serial with Moxa converter
- Pre-2001 Machines: Use Digital I/O (no Setting 143 available)
Determining Your Haas Control Type
Use these methods to identify which type of Haas control you have:
Visual Identification
Next Generation Control (2017+):
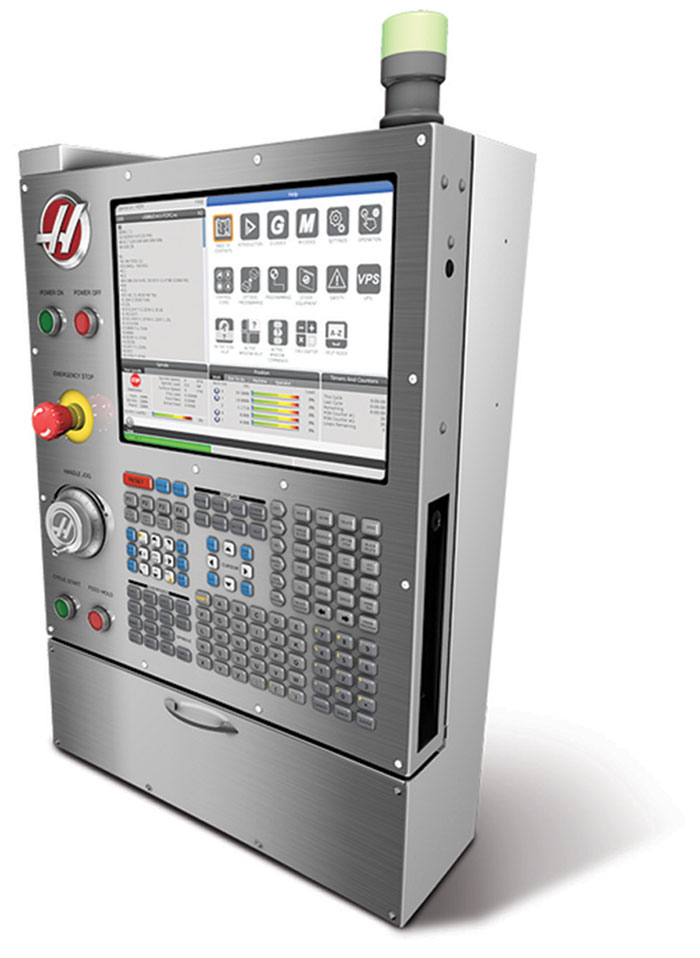
Haas Next Generation control with modern touchscreen interface. Features graphical menus, network settings, and MTConnect capability.
Classic Control (pre-2017) with MDC:
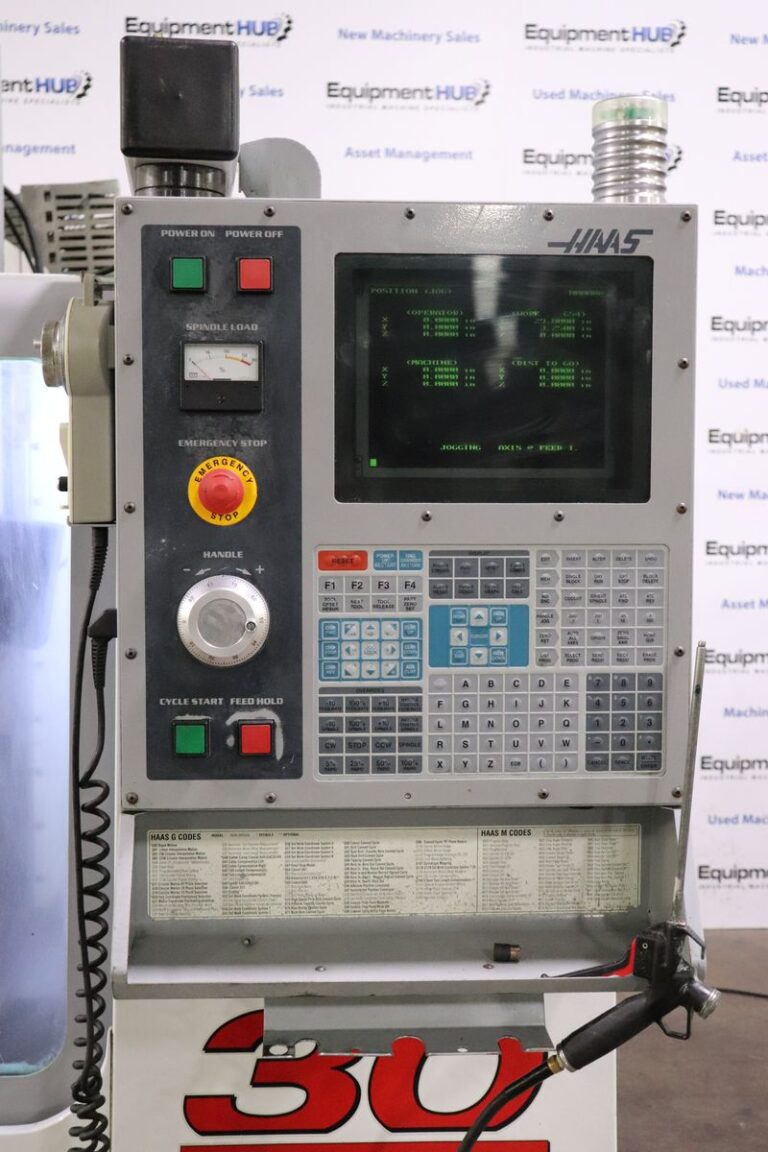
Haas Classic control with text-based interface. Uses Haas Serial (MDC) over RS-232 with Moxa converter.
Classic Control (showing I/O Settings):
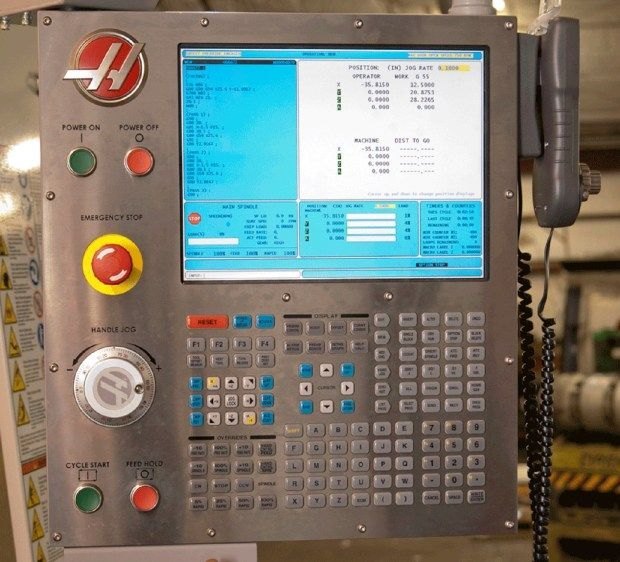
Haas Classic control showing Setting 143 (MACHINE DATA COLLECT) as ON/OFF toggle, indicating Classic control series.
Quick Identification Methods
Method 1: Visual Inspection
- Modern touchscreen with graphical interface = Next Generation Control (2017+)
- Text-based green/blue screen = Classic Control (pre-2017)
- Large touch display with icons = Next Generation Control
Method 2: Check Operator's Manual
- Cover states "Next Generation Control" → Use MTConnect
- No "Next Generation" label → Likely Classic control
Method 3: Check Network Settings
- Press SETTINGS button
- Navigate to NETWORK → WIRED CONNECTION
- Modern network interface with Ethernet settings = Next Gen
- No network section or basic interface = Classic
Method 4: Check Setting 143 (MACHINE DATA COLLECT)
- Press SETTINGS button
- Navigate to I/O or MISCELLANEOUS page
- Find Setting 143 - MACHINE DATA COLLECT
- Numerical value (e.g., 4001): Next Gen Control → Can use MTConnect or Ethernet Serial
- ON/OFF toggle: Classic Control → Use RS-232 Serial with Moxa converter
- Not present: Very old machine → Use Digital I/O instead

Classic control I/O settings page. Setting 143 appears as an ON/OFF toggle — this confirms you have a Classic control and should use Haas Serial via RS-232. A Next Gen control would show a port number (4001) here instead.
Method 1: MTConnect (Next Generation Controls)
Best option for Next Gen Haas machines. Provides comprehensive data with no additional hardware.
Prerequisites
- Haas machine with Next Generation control (2017+)
- Ethernet connection capability
- Network access between machine and Edge device
- MTConnect enabled on machine (usually enabled by default)
Configure Haas Next Gen Control
Step 1: Enable MTConnect
- Press SETTINGS button
- Navigate to NETWORK → WIRED CONNECTION
- Configure network settings:
- IP Address: Set static IP or note DHCP address
- Subnet Mask: Match your network (typically 255.255.255.0)
- Gateway: Your network gateway
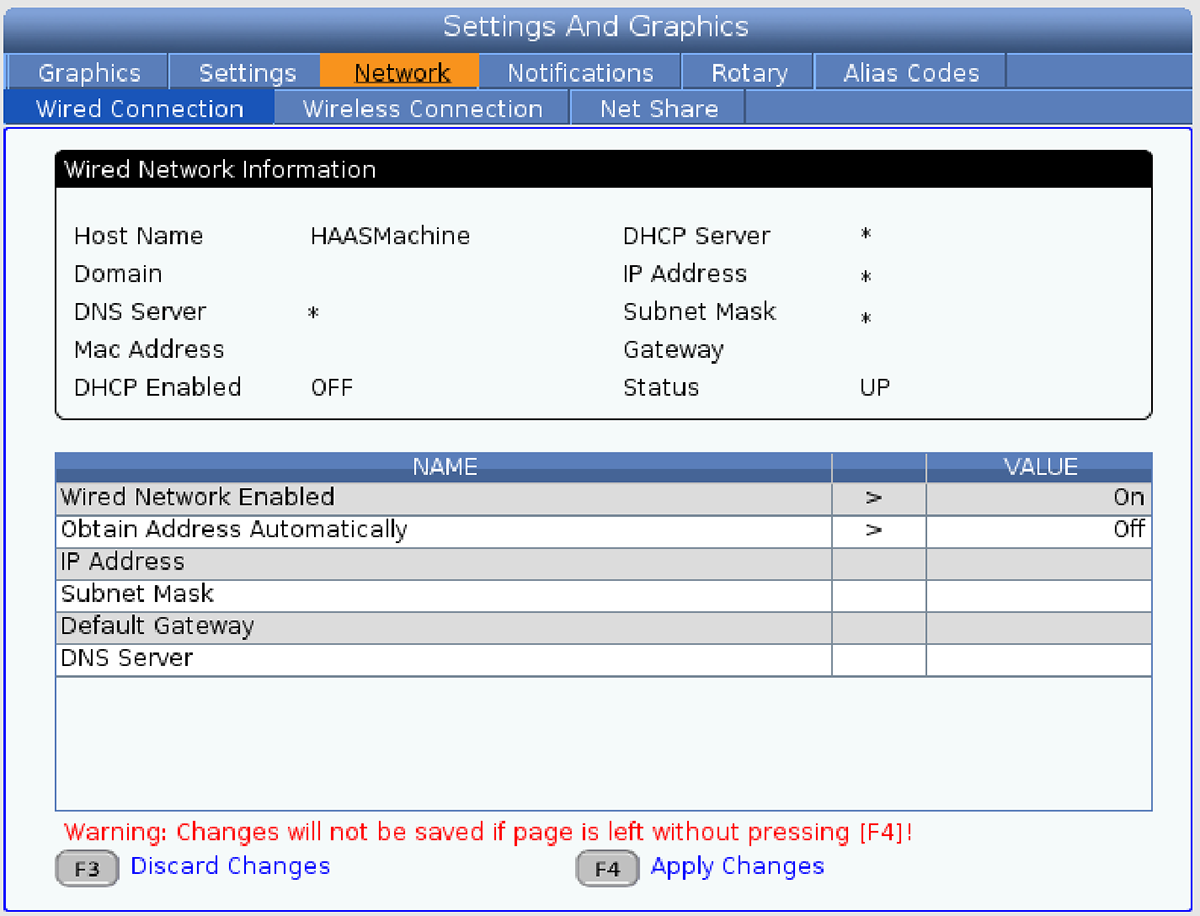
Haas NGC Wired Connection screen. Enter IP Address, Subnet Mask, Default Gateway, and DNS Server, then press [F4] Apply Changes. Changes are lost if you navigate away without pressing F4.
- Navigate to NETWORK → MTCONNECT
- Verify settings:
- MTConnect: ON
- Port: 8082 (default)
- Adapter: AGENT (default)
Step 2: Test MTConnect Connection
From a computer on the same network, open a web browser:
http://[MACHINE-IP]:8082/current
Replace [MACHINE-IP] with your machine's IP address.
Expected Response: You should see XML data showing machine information and data items.
Add MTConnect Adapter in MachineMetrics
-
Log into MachineMetrics
-
Go to Assets → Machines
-
Click Add Machine
-
Enter machine details:
- Machine Name: (e.g., "Haas VF-2")
- Make: Haas
- Model: (e.g., "VF-2")
- Edge Device: Select your Edge
-
Click Next
-
Select adapter type: MTConnect Agent
-
Enter connection details:
- Connection address:
[IP-ADDRESS]:[PORT](e.g.,10.26.5.142:8082)- Format is IP address followed by colon and port number
- Port 8082 is the standard MTConnect port for Haas Next Gen
- Adapter IP/Port: Will auto-populate (e.g.,
supervisor:8022) - Adapter version: Will auto-populate after connection
- Connection address:
-
Click Test Connection
-
If successful, click Save
Example:
- Connection address:
192.168.1.100:8082 - This connects to machine at IP 192.168.1.100 on MTConnect port 8082
Available MTConnect Data Items
Next Gen Haas machines provide via MTConnect:
- Execution State (execution) - ACTIVE, READY, INTERRUPTED, etc.
- Controller Mode (mode) - AUTO, MANUAL, MDI, JOG, etc.
- Program Name (program)
- Tool Number (tool)
- Spindle Speed (Sspeed)
- Spindle Load (Sload)
- Axis Positions (Xabs, Yabs, Zabs, etc.)
- Feed Rate (Fovr, path_feedrate)
- Part Count (PartCountAct)
- Alarms (message)
- And many more...
Method 2: Haas Serial (Classic Controls)
Haas Serial uses the MDC (Machine Data Collection) protocol, also known as DPRNT, to communicate with Haas machines.
When to Use Haas Serial
Classic Controls (pre-2017):
- This is your PRIMARY and ONLY connection method
- Classic controls do not have MTConnect
- Uses RS-232 serial port with Moxa serial-to-Ethernet converter
- Provides execution state, program data, and system variables
Next Gen Controls (2017+):
- Use MTConnect as your PRIMARY connection (see Method 1)
- Only add Haas Serial as SECONDARY if you need specific macro/system variables not available via MTConnect
- Next Gen Haas Serial uses Ethernet directly (no Moxa needed)
- Most customers only need MTConnect for Next Gen machines
⚠️ Important: If you have a Next Gen control, start with MTConnect (Method 1). Only add Haas Serial if MTConnect doesn't provide the specific data you need.
Two Physical Connection Types
| Connection Type | Control Type | Primary or Secondary | Physical Hardware | Port |
|---|---|---|---|---|
| RS-232 (via Moxa) | Classic (pre-2017) | Primary - your only option | RS-232 serial cable + Moxa NPort 5110 converter | 4001 (on Moxa) |
| Ethernet Direct | Next Gen (2017+) | Secondary - only for macro/system variables | Ethernet cable only | 4001 |
Both use the same Haas MDC protocol, just different physical connections.
Option A: Classic Controls - Haas Serial via RS-232 (Primary Connection)
For Classic Haas controls (pre-2017) - This is your primary and only connection method.
Prerequisites
- Haas machine with Classic control (pre-2017)
- Setting 143 available (ON/OFF type)
- RS-232 serial port on machine (typically DB-9 connector on control panel)
- Moxa NPort 5110 serial-to-Ethernet converter (provided by MachineMetrics)
- Serial cable (DB-9 female to DB-9 male)
- Network access between Moxa and Edge device
Configure Haas Classic Control
Step 1: Set RS-232 Parameters
- Press SETTINGS button
- Navigate to I/O page
- Configure RS-232 settings:
- Baud Rate: 38400
- Parity: EVEN
- Stop Bits: 1
- Data Bits: 7
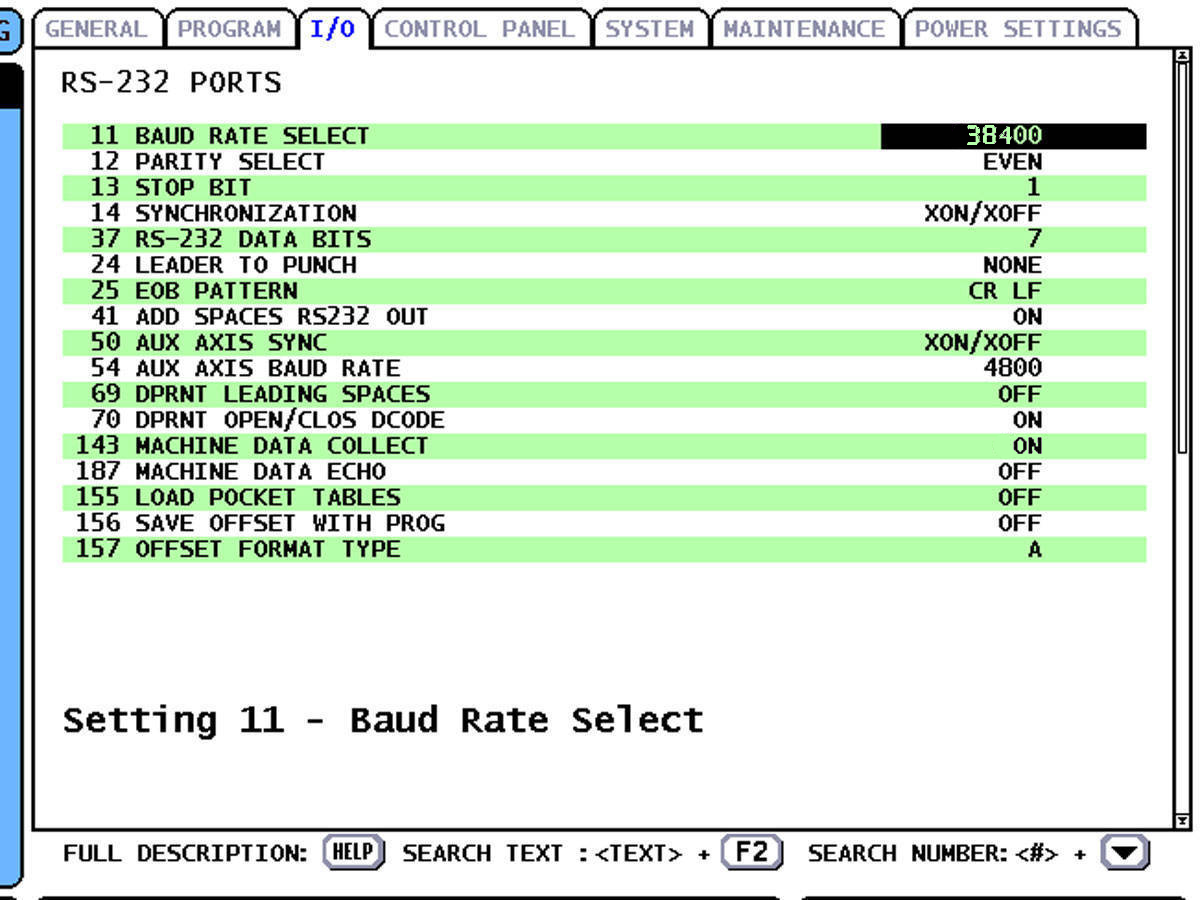
Classic control I/O settings with correct RS-232 parameters for MachineMetrics: Baud Rate 38400, Parity EVEN, Stop Bit 1, Data Bits 7, and Setting 143 set to ON.
Step 2: Enable Machine Data Collect
- Navigate to I/O or MISCELLANEOUS page
- Find Setting 143 - MACHINE DATA COLLECT
- Set to ON
Step 3: Connect Hardware
- Connect DB-9 serial cable from machine's RS-232 port to Moxa converter
- Connect Ethernet cable from Moxa to your network switch
- Power on Moxa converter
- Note Moxa IP address (check label or use Moxa discovery tool)
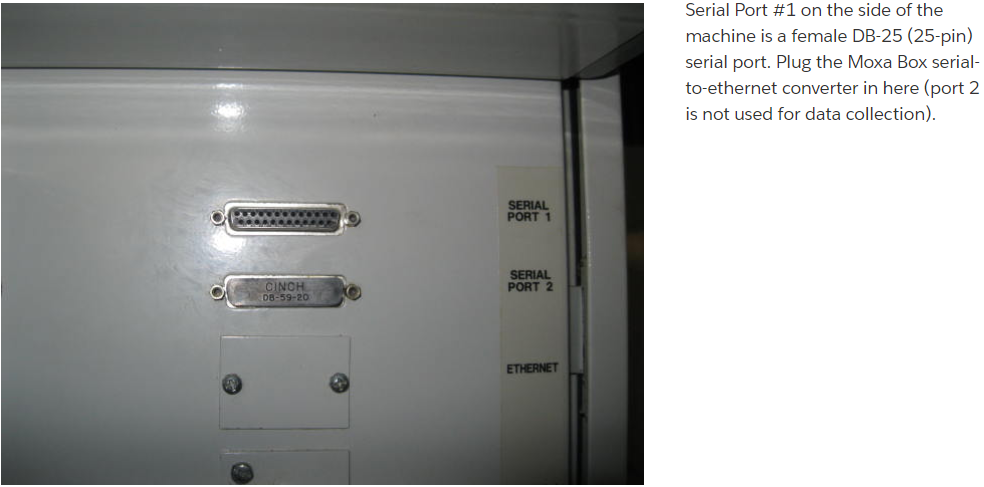
Serial Port #1 on the side of the machine is a female DB-25 (25-pin) serial port. Plug the Moxa Box serial-to-Ethernet converter here — port 2 is not used for data collection.
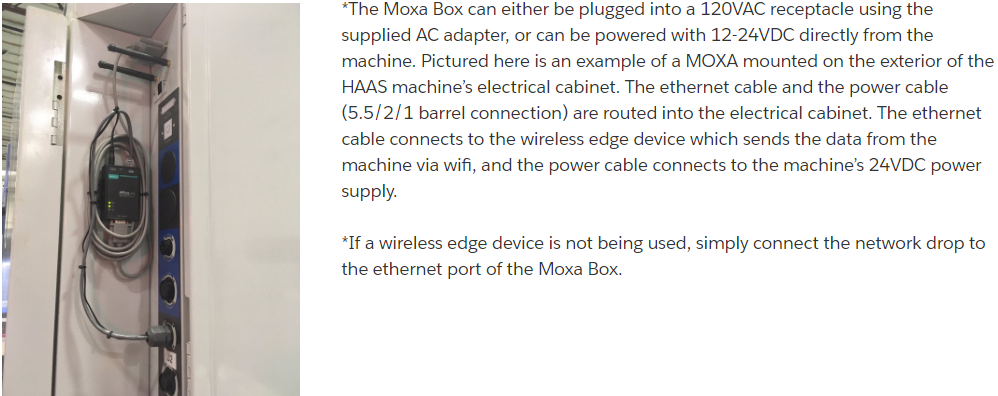
Moxa box mounted on the exterior of the Haas electrical cabinet. The Ethernet cable connects to your network (or wireless Edge device) and the power cable connects to the machine's 24VDC supply inside the cabinet. If a wired network drop is available, connect Ethernet directly to the switch.
Setting the Moxa IP Address (First-Time Setup)
If your Moxa NPort is new or has been reset to factory defaults, it ships with a default IP of 192.168.127.254 — which won't be reachable on your network. Use the Moxa Device Search Utility (DSU) to find the device and assign it a correct IP before proceeding.
1. Download and install DSU
- Download the Device Search Utility from moxa.com
- DSU v3.x runs as a web-based app in Chrome, Firefox, or Edge on Windows
2. Search for your device
- Open DSU and click Search
- DSU will broadcast-search your network and list any Moxa devices it finds
- If connecting to a live company network, configure one device at a time to avoid confusion
3. Unlock the device
- Select your device in the list and click Unlock
- On first login, you'll be prompted to create an account and password
- If the device has been used before, use username
adminand passwordmoxa
4. Open the web console
- Click Console — this opens the Moxa device's web interface in your browser
5. Set the IP address
- Navigate to Network Settings
- Enter the IP address, subnet mask, and default gateway for your network
- Save the settings and restart the device from the web interface
6. Confirm the new IP
- Once the device restarts, click Search in DSU again
- The device should now appear with its new IP address
7. Continue with operating mode setup
- With the correct IP confirmed, proceed with the configuration steps below
Connect the Moxa directly to your PC via Ethernet and temporarily set your PC's IP to 192.168.127.x (e.g., 192.168.127.1). You can then reach the device's default address directly in your browser at http://192.168.127.254.
Configure Moxa NPort Converter
-
Open web browser and navigate to Moxa IP address
-
Login (default: admin/admin or root/root)
-
Configure serial port (typically Port 1):
- Baud Rate: 38400
- Data Bits: 7
- Stop Bits: 1
- Parity: Even
- Flow Control: None
- Operation Mode: TCP Server
- TCP Port: 4001
-
Save settings and reboot Moxa
Add Haas Serial Adapter in MachineMetrics
-
Go to Assets → Machines
-
Click Add Machine
-
Select adapter type: Haas Serial
-
Enter connection details:
- Connection address:
[MOXA-IP]:[PORT](e.g.,10.26.5.200:4001)- Use Moxa converter IP address (not machine IP)
- Port 4001 is configured on the Moxa device
- Connection address:
-
Click Test Connection
-
If successful, click Save
Example:
- Connection address:
192.168.1.200:4001 - This connects to Moxa converter at IP 192.168.1.200 which is connected to the machine via RS-232
Option B: Next Gen Controls - Haas Serial via Ethernet (Secondary Connection Only)
For Next Gen machines (2017+) when you need macro/system variables not available via MTConnect.
⚠️ Important: This should only be used as a secondary adapter alongside MTConnect. MTConnect must be your primary connection for Next Gen controls.
When to Use This
Only add Haas Serial to a Next Gen machine if:
- You need specific macro variables (e.g., #3901, #3027, #13013)
- You need system variables not exposed by MTConnect
- MTConnect is already configured as your primary adapter
If you just need basic machine data, use MTConnect only.
Configure Haas Next Gen Control
- Press SETTINGS button
- Navigate to I/O or MISCELLANEOUS page
- Find Setting 143 - MACHINE DATA COLLECT
- Set value to 4001 (port number)
Add Haas Serial Adapter in MachineMetrics
-
Go to Assets → Machines
-
Select your existing Haas machine (with MTConnect already configured)
-
Click Add Secondary Adapter
-
Select adapter type: Haas Serial
-
Enter connection details:
- Connection address:
[IP-ADDRESS]:[PORT](e.g.,10.26.5.142:4001)- Use same machine IP as MTConnect
- Port 4001 is the Haas Serial/MDC port
- Connection address:
-
Click Test Connection
-
If successful, click Save
Example:
- Connection address:
192.168.1.100:4001 - This connects to machine at IP 192.168.1.100 on Haas Serial port 4001
- MTConnect on same machine uses port 8082
Part Count Setup
This section applies to both Classic Serial and NextGen controls.
Default — Single Cycle
By default, a Haas CNC increments the part count when it reaches M30. This is most common on milling machines or single-spindle lathes.
Under Machine Settings > Data Rules, select the part option M30 Counter 1. Without this setting, you may get a double count.
Continuous Looping Programs with M99
Where programs loop with an M99 and a part is made each loop, you can enable the CNC to count on M99 by enabling Setting 118.
Enabling Setting 118 can cause unwanted counts when using some programs.
You can also write directly to the counter using a system variable macro. This updates the counter on the home screen:
#3901=#3901+1
M99
Intermittent Looping Programs and then M30
In scenarios where a program loops and then stops — such as a bar puller cycle — you only want the machine to count each loop, not on the M30. Use a macro variable to avoid an extra count on M30.
Put the following code before the M99:
#500=#500+1
M99
Variable #500 is used as an example. You can use any spare variable between 500–999.
Multiple Parts Per Cycle
When more than one part is made per cycle, use a macro variable and increment it by the number of parts produced per cycle. For example, if 5 parts are made per cycle:
#500=#500+5
M30
To learn about how to read Haas macro variables into the MachineMetrics adapter, see Configure Macro Variables in Adapter.
Macro and System Variables
Newer generations of Haas NGC software output macro variables directly through the MTConnect adapter as MacroRange arrays — no secondary Haas Serial adapter is needed. See Macro Variable Collection Methods by Control Generation below to determine which method applies to your machine.
The Haas Serial adapter + macros JSON configuration is required when:
- Your NGC control does not output MacroRange data via MTConnect (older NGC software generations)
- You need a specific system variable that is not included in the MacroRange blocks (e.g.
#3027spindle RPM,#3901M30 count)
If Setting 143 is not set to 4001, the Haas Serial adapter will not connect and macro variables will not be readable via that method.
Haas machines support reading macro and system variables via the Serial (DPRNT/MDC) connection. This is useful for accessing data not available via MTConnect, such as specific timers, counters, or custom machine settings.
Available Variable Types
Haas machines provide hundreds of macro and system variables. Below is a comprehensive reference of available system and macro variables that can be read from Haas NGC controllers.
Complete Haas System & Macro Variables Reference
| NGC Variable | Legacy Variable | Usage |
|---|---|---|
| #1-#33 | #1-#33 | Macro call arguments |
| #10000-#10149 | #100-#149 | General-purpose variables saved on power off |
| #10150-#10199 | #150-#199 | Probe values (if installed) |
| #10200-#10399 | N/A | General-purpose variables saved on power off |
| #10400-#10499 | N/A | General-purpose variables saved on power off |
| #10500-#10549 | #500-#549 | General-purpose variables saved on power off |
| #10550-#10599 | #550-#599 | Probe calibration data (if installed) |
| #10600-#10699 | #600-#699 | General-purpose variables saved on power off |
| #10700-#10799 | N/A | General-purpose variables saved on power off |
| #700-#749 | #700-#749 | Hidden variables for internal use only |
| #709 | #709 | Used for Fixture Clamp Input. Do not use for general purpose. |
| #10800-#10999 | #800-#999 | General-purpose variables saved on power off |
| #11000-#11063 | N/A | 64 discrete inputs (read only) |
| #1064-#1068 | #1064-#1068 | Maximum axis loads for X, Y, Z, A, and B axes |
| #1080-#1087 | #1080-#1087 | Raw analog to digital inputs (read only) |
| #1090-#1098 | #1090-#1098 | Filtered analog to digital inputs (read only) |
| #1098 | #1098 | Spindle load with Haas vector drive (read only) |
| #1264-#1268 | #1264-#1268 | Maximum axis loads for C, U, V, W, and T-axes |
| #1601-#1800 | #1601-#1800 | Number of flutes on tools #1 through 200 |
| #1801-#2000 | #1801-#2000 | Maximum recorded vibrations of tools 1 through 200 |
| #2001-#2200 | #2001-#2200 | Tool length offsets |
| #2201-#2400 | #2201-#2400 | Tool length wear |
| #2401-#2600 | #2401-#2600 | Tool diameter/radius offsets |
| #2601-#2800 | #2601-#2800 | Tool diameter/radius wear |
| #3000 | #3000 | Programmable alarm |
| #3001 | #3001 | Millisecond timer |
| #3002 | #3002 | Hour timer |
| #3003 | #3003 | Single block suppression |
| #3004 | #3004 | Override [FEED HOLD] control |
| #3006 | #3006 | Programmable stop with message |
| #3011 | #3011 | Year, month, day |
| #3012 | #3012 | Hour, minute, second |
| #3020 | #3020 | Power on timer (read only) |
| #3021 | #3021 | Cycle start timer |
| #3022 | #3022 | Feed timer |
| #3023 | #3023 | Present part timer (read only) |
| #3024 | #3024 | Last complete part timer (read only) |
| #3025 | #3025 | Previous part timer (read only) |
| #3026 | #3026 | Tool in spindle (read only) |
| #3027 | #3027 | Spindle RPM (read only) |
| #3028 | #3028 | Number of pallets loaded on receiver |
| #3030 | #3030 | Single block |
| #3032 | #3032 | Block delete |
| #3033 | #3033 | Opt stop |
| #3034 | N/A | Safe Run (read only) |
| #3196 | #3196 | Cell safe timer |
| #3201-#3400 | #3201-#3400 | Actual diameter for tools 1 through 200 |
| #3401-#3600 | #3401-#3600 | Programmable coolant positions for tools 1 through 200 |
| #3901 | #3901 | M30 count 1 |
| #3902 | #3902 | M30 count 2 |
| #4001-#4021 | #4001-#4021 | Previous block G-code group codes |
| #4101-#4126 | #4101-#4126 | Previous block address codes |
| #5001-#5006 | #5001-#5006 | Previous block end position |
| #5021-#5026 | #5021-#5026 | Present machine coordinate position |
| #5041-#5046 | #5041-#5046 | Present work coordinate position |
| #5061-#5069 | #5061-#5069 | Present skip signal position -X, Y, Z, A, B, C, U, V, W |
| #5081-#5086 | #5081-#5086 | Present tool offset |
| #5201-#5206 | #5201-#5206 | G52 work offsets |
| #5221-#5226 | #5221-#5226 | G54 work offsets |
| #5241-#5246 | #5241-#5246 | G55 work offsets |
| #5261-#5266 | #5261-#5266 | G56 work offsets |
| #5281-#5286 | #5281-#5286 | G57 work offsets |
| #5301-#5306 | #5301-#5306 | G58 work offsets |
| #5321-#5326 | #5321-#5326 | G59 work offsets |
| #5401-#5500 | #5401-#5500 | Tool feed timers (seconds) |
| #5501-#5600 | #5501-#5600 | Total tool timers (seconds) |
| #5601-#5699 | #5601-#5699 | Tool life monitor limit |
| #5701-#5800 | #5701-#5800 | Tool life monitor counter |
| #5801-#5900 | #5801-#5900 | Tool load monitor maximum load sensed so far |
| #5901-#6000 | #5901-#6000 | Tool load monitor limit |
| #6001-#6999 | #6001-#6999 | Reserved. Do not use. |
| #6198 | #6198 | NGC/CF flag |
| #7001-#7006 | #7001-#7006 | G110 (G154 P1) additional work offsets |
| #7021-#7026 | #7021-#7026 | G111 (G154 P2) additional work offsets |
| #7041-#7386 | #7041-#7386 | G112-G129 (G154 P3-P20) additional work offsets |
| #7501-#7506 | #7501-#7506 | Pallet priority |
| #7601-#7606 | #7601-#7606 | Pallet status |
| #7701-#7706 | #7701-#7706 | Part program numbers assigned to pallets |
| #7801-#7806 | #7801-#7806 | Pallet usage count |
| #8500 | #8500 | Advanced Tool Management (ATM) group ID |
| #8501 | #8501 | ATM percent of available tool life of all tools in the group |
| #8502 | #8502 | ATM total available tool usage count in the group |
| #8503 | #8503 | ATM total available tool hole count in the group |
| #8504 | #8504 | ATM total available tool feed time (in seconds) in the group |
| #8505 | #8505 | ATM total available tool total time (in seconds) in the group |
| #8510 | #8510 | ATM next tool number to be used |
| #8511 | #8511 | ATM percent of available tool life of the next tool |
| #8512 | #8512 | ATM available usage count of the next tool |
| #8513 | #8513 | ATM available hole count of the next tool |
| #8514 | #8514 | ATM available feed time of the next tool (in seconds) |
| #8515 | #8515 | ATM available total time of the next tool (in seconds) |
| #8550 | #8550 | Individual tool ID |
| #8551 | #8551 | Number of flutes of tools |
| #8552 | #8552 | Maximum recorded vibrations |
| #8553 | #8553 | Tool length offsets |
| #8554 | #8554 | Tool length wear |
| #8555 | #8555 | Tool diameter offsets |
| #8556 | #8556 | Tool diameter wear |
| #8557 | #8557 | Actual diameter |
| #8558 | #8558 | Programmable coolant position |
| #8559 | #8559 | Tool feed timer (seconds) |
| #8560 | #8560 | Total tool timers (seconds) |
| #8561 | #8561 | Tool life monitor limit |
| #8562 | #8562 | Tool life monitor counter |
| #8563 | #8563 | Tool load monitor maximum load sensed so far |
| #8564 | #8564 | Tool load monitor limit |
| #9000 | #9000 | Thermal comp accumulator |
| #9000-#9015 | #9000-#9015 | Reserved (duplicate of axis thermal accumulator) |
| #9016 | #9016 | Thermal spindle comp accumulator |
| #9016-#9031 | #9016-#9031 | Reserved (duplicate of axis thermal accumulator from spindle) |
| #10000-#10999 | N/A | General purpose variables |
| #11000-#11255 | N/A | 256 discrete inputs (read only) |
| #12000-#12255 | N/A | Discrete outputs |
| #13000-#13063 | N/A | Filtered analog to digital inputs (read only) |
| #13013 | N/A | Coolant level |
| #14001-#14006 | N/A | G110 (G154 P1) additional work offsets |
| #14021-#14026 | N/A | G110 (G154 P2) additional work offsets |
| #14041-#14386 | N/A | G110 (G154 P3-G154 P20) additional work offsets |
| #14401-#14406 | N/A | G110 (G154 P21) additional work offsets |
| #14421-#15966 | N/A | G110 (G154 P22-G154 P99) additional work offsets |
| #20000-#29999 | N/A | Settings |
| #30000-#39999 | N/A | Parameters |
| #32014 | N/A | Machine Serial Number |
| #50001-#50200 | N/A | Tool Type |
| #50201-#50400 | N/A | Tool material |
| #50401-#50600 | N/A | Tool Offset Point |
| #50601-#50800 | N/A | Estimated RPM |
| #50801-#51000 | N/A | Estimated Feedrate |
| #51001-#51200 | N/A | Offset Pitch |
| #51201-#51400 | N/A | Actually VPS Estimated RPM |
| #51401-#51600 | N/A | Work Material |
| #51601-#51800 | N/A | VPS Feedrate |
| #51801-#52000 | N/A | Approximate length |
| #52001-#52200 | N/A | Approximate diameter |
| #52201-#52400 | N/A | Edge Measure height |
| #52401-#52600 | N/A | Tool Tolerance |
| #52601-#52800 | N/A | Probe Type |
Bold entries indicate commonly used variables for production monitoring.
Note: Variable addresses for older Haas controllers can be found in the "Legacy Variable" column. NGC (Next Generation Control) variables are shown in the first column.
Configure Macro Variables in Adapter
To read macro variables, add a macros section to your Haas Serial adapter configuration. Do not add this to the MTConnect adapter — it will not work there.
{
  "adapter": {
    "mdcEnabled": 1
  },
  "macros": {
    "opt-stop": 3033,
    "last-m-code": 4113,
    "part-timer": 3023,
    "spindle-rpm": 3027,
    "coolant-level": 13013,
    "g54-x-offset": 5221,
    "tool-1-life": 5701
  }
}
How to Configure:
- On the Haas NGC control, verify Setting 143 is set to
4001- If it is not, set it now — without this, the Haas Serial adapter cannot connect
- In MachineMetrics, go to Assets → Machines
- Select your Haas machine
- If you have not already added a Haas Serial adapter, click Add Secondary Adapter and select Haas Serial with connection address
[MACHINE-IP]:4001 - Click on the Haas Serial adapter (not the MTConnect adapter)
- Add the JSON configuration above in the adapter settings JSON field
- Customize the macro names and variable numbers as needed
- Save changes
Macro Configuration Format:
- Key (left side): Data item name that will appear in MachineMetrics (use lowercase with hyphens)
- Value (right side): Haas macro variable number
Common Useful Variables:
{
  "adapter": {
    "mdcEnabled": 1
  },
  "macros": {
    "opt-stop-enabled": 3033,
    "block-delete-enabled": 3032,
    "single-block-enabled": 3030,
    "m30-count": 3901,
    "part-timer-seconds": 3023,
    "last-part-timer-seconds": 3024,
    "current-tool": 3026,
    "spindle-rpm-actual": 3027,
    "power-on-hours": 3020,
    "cycle-start-timer": 3021,
    "feed-timer": 3022,
    "coolant-level-percent": 13013
  }
}
These macro variables will appear as data items in MachineMetrics alongside other machine data.
Tool Life Monitoring Example:
For tracking tool life counters and presets, use the tool life monitoring variables:
{
  "adapter": {
    "mdcEnabled": 1
  },
  "macros": {
    "TLM_1_COUNT": 5701,
    "TLM_1_PRESET": 5601,
    "TLM_2_COUNT": 5702,
    "TLM_2_PRESET": 5602,
    "TLM_3_COUNT": 5703,
    "TLM_3_PRESET": 5603,
    "TLM_4_COUNT": 5704,
    "TLM_4_PRESET": 5604,
    "TLM_5_COUNT": 5705,
    "TLM_5_PRESET": 5605
  }
}
Variable Explanation:
- #5601-#5699: Tool life monitor limit (preset/maximum)
- #5701-#5800: Tool life monitor counter (current usage)
Example:
TLM_1_COUNT(Macro #5701) = Current count for Tool 1TLM_1_PRESET(Macro #5601) = Preset limit for Tool 1
If COUNT = 150 and PRESET = 500:
- Tool 1 is at 30% used (70% remaining)
Note: For detailed tool life monitoring setup and configuration, see the Tool Life Monitoring Guide.
Macro Variable Collection Methods by Control Generation
The method used to collect macro variables from a Haas NGC control depends on the vintage of the NGC machine's software. There are two approaches:
- Method 1 — Haas Serial Secondary Adapter (described above): Older NGC software versions expose macro variables individually via the Serial/MDC adapter. You request specific variables by number in the JSON configuration. This is the method described in the section above.
- Method 2 — MTConnect MacroRange Arrays (newer NGC software): Newer NGC software versions output macro variables in bulk directly through the MTConnect adapter, as large comma-separated arrays. These appear in MachineMetrics Data Mapping as items named
MacroRange1throughMacroRange6, each containing hundreds of values representing a contiguous block of macro variable addresses.
If you see MacroRange items in your Data Mapping tab, your machine uses Method 2.
[haas-macrorange-data-mapping.png placeholder]
Understanding MacroRange Layout
Each MacroRange covers a contiguous block of macro variable addresses. The ranges follow this pattern, based on Haas NGC variable numbering (where legacy 3-digit variables like #151 are stored internally as #10151):
| MacroRange | Variable Range (Legacy) | Variable Range (NGC) | Notes |
|---|---|---|---|
| MacroRange1 | #1–#33 | #1–#33 | Local/call arguments — typically NaN when no program is running |
| MacroRange2 | #100–#199 | #10100–#10199 | General purpose + probe values |
| MacroRange3 | #200–#399 | #10200–#10399 | General purpose |
| MacroRange4 | #400–#599 | #10400–#10599 | General purpose + probe calibration |
| MacroRange5 | #600–#799 | #10600–#10799 | General purpose |
| MacroRange6 | #800–#999 | #10800–#10999 | General purpose |
The exact boundaries may vary between machines. If you are unsure which range contains a variable, pull http://[machine-ip]:8082/probe and inspect the MacroRange startIndex attributes in the XML response.
Finding the Index for a Specific Variable
The index of a macro variable within its MacroRange is calculated as:
index = variable_number - range_start
Example: To find macro variable #531:
#531falls in MacroRange4 (starts at 400)- Index = 531 − 400 = 131
You can verify by inspecting the live value string in Data Mapping — count to position 131 (0-based) in the comma-separated list to confirm the expected value is present.
Reading a MacroRange Variable in an Adapter Script
Use pattern-match with a regex that skips the first N comma-separated values:
var531:
  - source: MacroRange4
  - pattern-match:
      pattern: /^(?:[^,]*,){131}([^,]+)/
      group: 1
The {131} skips 131 values (0-based) to land on index 131. Adjust the number and source MacroRange for any variable you need.
DPRNT: Sending Custom Data from Programs
Haas machines do not expose certain information over MDC (Machine Data Collection) by default — things like operation names, job numbers, custom counters, or calculated values. To capture this extra information, the MachineMetrics Haas connector can receive data directly from the CNC program using DPRNT statements with a known prefix.
DPRNT header support requires Haas Connector version 2.32.0.0 or above. Machines added after February 2024 have this version by default. If you need to confirm, contact support@machinemetrics.com.
DPRNT constraints:
DPRNTmust be the only command in the block (no other G/M codes on the same line)- Valid characters in the data value: A–Z,
+,-,/,*, and space
Sending Program Headers via DPRNT
The program header lets you pass an operation name from the CNC program to MachineMetrics. The connector uses the reserved prefix MMPHDR* to identify header messages.
CNC program syntax:
DPRNT[MMPHDR*OPERATION_NAME];
Replace OPERATION_NAME with the intended operation name (e.g., OP10, BORE_FINISH, PART_A).
Example:
DPRNT[MMPHDR*OP10_ROUGH_MILL];
Placement: The DPRNT statement can go anywhere in the program. By convention, place it near the top where it is easy to find and clearly associated with the executing program.
No adapter configuration is needed for program headers — the MMPHDR* prefix is recognized automatically.
Sending Generic Data via DPRNT
For any other custom data (job numbers, operator IDs, process values, etc.), choose your own unique prefix and configure the adapter to map it to a data item key.
CNC program syntax:
DPRNT[MMPREFIX*DATA_VALUE];
Where MMPREFIX is any distinct prefix string you choose, and DATA_VALUE is the value to send. Use * as a word separator within the data value.
Example:
DPRNT[MMMYSTRING*This*is*my*data*string];
Adapter configuration:
Add a dprnt section to your Haas Serial adapter configuration in MachineMetrics, mapping each prefix to a data item key:
{
  "dprnt": {
    "MMMYSTRING": { "metricKey": "my_string_key" }
  }
}
Sending Numeric Data via DPRNT
Numeric values can be sent and typed explicitly so MachineMetrics treats them as numbers rather than strings. Set the type field to INTEGER or REAL:
{
  "dprnt": {
    "MMMYINT":  { "metricKey": "my_int_key",  "type": "INTEGER" },
    "MMMYREAL": { "metricKey": "my_real_key", "type": "REAL" }
  }
}
DPRNT on Next-Gen Controls (NGC)
On Next-Gen Controls, DPRNT and MDC are served on separate ports. MachineMetrics handles this by running two data collectors on the same machine.
Step 1 — Configure the NGC Control
Before MachineMetrics can receive DPRNT data, the NGC control must be configured to transmit it over TCP. Navigate to Settings on the Haas control and set the following:
| Setting | Value | Purpose |
|---|---|---|
| Setting 261 | Port | Enables DPRNT output over TCP (vs. serial) |
| Setting 263 | 8001 | Sets the TCP port DPRNT data is transmitted on |
The location of these settings varies by model — they are typically found under the I/O or Network settings tab.
These settings are specific to NGC controls. Classic controls do not use Settings 261/263 — they transmit DPRNT over the physical RS-232 serial port via the Moxa converter.
Step 2 — Configure MachineMetrics
Add a Haas Serial adapter with mdcEnabled: 0 and connect it to [MACHINE-IP]:8001.
| Collector | Purpose | Configuration |
|---|---|---|
| Collector 1 | MDC data (machine state, macro variables) | Normal MDC connection — mdcEnabled: 1 (default) |
| Collector 2 | DPRNT data (program-injected values) | mdcEnabled: 0 — connects to the DPRNT port (8001) |
Configure the DPRNT collector by disabling MDC data collection and connecting to the DPRNT port:
{
  "adapter": {
    "mdcEnabled": 0
  }
}
The DPRNT port is 8001 (as configured in Setting 263 above).
Using Both MTConnect and Serial Together
For Next Gen Haas machines, the recommended setup is to use MTConnect as the primary adapter and Haas Serial as a secondary adapter to access macro variables.
Why Use Both?
- MTConnect provides comprehensive machine data (execution, program, speeds, positions, etc.)
- Haas Serial provides access to macro variables and system variables not exposed via MTConnect
- Combine to get the most complete data set
Setup Process
Step 1: Add MTConnect Adapter (Primary)
- Go to Assets → Machines
- Click Add Machine
- Configure as MTConnect (see Method 1 above)
- Connect to port 8082
- Save and verify data collection
Step 2: Add Haas Serial Adapter (Secondary)
- On the same machine, click Add Secondary Adapter
- Select adapter type: Haas Serial
- Enter connection details:
- Connection address:
[MACHINE-IP]:4001(e.g.,10.26.5.142:4001)- Use same machine IP as MTConnect, but port 4001
- Connection address:
- Enable Setting 143 on machine (set to 4001)
- Add macro variables configuration (JSON)
- Save adapter
Step 3: Create Transform to Prevent Conflicts
The Haas Serial connection may provide a RunStatus data item that conflicts with MTConnect's execution data item. Use a transform adapter to filter it out.
Create Transform Adapter:
- On the same machine, click Add Secondary Adapter
- Select adapter type: Transform
- Add this configuration:
version: 2

# Do NOT pass all data through automatically (use false to control what passes)
mtconnect-passthrough: false

# Deny the RunStatus from Haas Serial to prevent conflict with MTConnect execution
deny-keys:
  - RunStatus

# Pull data items from parent adapters (MTConnect and Haas Serial)
declare-keys:
  - execution  # From MTConnect (primary execution state)
  - program    # From MTConnect
  - tool       # From MTConnect
  - Sspeed     # From MTConnect (spindle speed)
  - opt-stop-enabled        # From Haas Serial (macro variable)
  - part-timer-seconds      # From Haas Serial (macro variable)
  - spindle-rpm-actual      # From Haas Serial (macro variable)
  - coolant-level-percent   # From Haas Serial (macro variable)

# Output all declared data items
data-items:
  - execution
  - program
  - tool
  - Sspeed
  - opt-stop-enabled
  - part-timer-seconds
  - spindle-rpm-actual
  - coolant-level-percent
Important:
mtconnect-passthrough: falsemeans only declared keys are passed throughmtconnect-passthrough: truemeans all parent data passes through automatically (in addition to declared keys)- Use
falsewhen you want explicit control over which data items are output
- Save transform adapter
Result:
- MTConnect provides execution state (primary)
- Haas Serial provides macro variables
RunStatusis blocked to prevent conflicts- All data flows to MachineMetrics cleanly
Data Flow Diagram
Haas Next Gen Machine
  │
  ├─→ Port 8082 (MTConnect)
  │     └─→ execution, program, tool, speeds, positions, etc.
  │
  └─→ Port 4001 (Haas Serial/MDC)
        └─→ opt-stop, part-timer, macro variables
              │
              └─→ Transform Adapter
                    └─→ Denies: RunStatus
                    └─→ Passes: macro variables

Final Output: Complete machine data from both sources
Troubleshooting
MTConnect Issues
Problem: Cannot reach MTConnect on port 8082
Solutions:
- Verify machine has Next Gen control
- Check MTConnect is enabled in machine settings
- Verify IP address is correct
- Test from browser:
http://[MACHINE-IP]:8082/current - Check firewall allows port 8082
- Ensure machine and Edge are on same network or routable
Problem: MTConnect shows "UNAVAILABLE" for many data items
Solutions:
- Machine may be powered off or in alarm state
- Wait for machine to fully boot up
- Clear any active alarms on machine
- Cycle power on machine control
Problem: Part count not incrementing
Solutions:
- Check Setting 57 (parts counter reset) on machine
- Verify machine is actually counting parts on screen
- Part counter may need to be configured in machine M-code program
- See Haas manual for part counter setup
Problem: Double counting on M30
If you are seeing double part counts, check Machine Settings > Data Rules and ensure the part option is set to M30 Counter 1. Using a different setting can cause the machine to count twice per cycle.
Use the Connectivity Validation Guide to visually confirm part count behavior on the Timeline — including how to identify suspect counts from sporadic events and sub-second cycle times.
Haas Serial Issues
Problem: No data from Haas Serial connection
Solutions:
- Next Gen: Verify Setting 143 is set to 4001 (not ON/OFF)
- Classic: Verify Setting 143 is ON
- Check IP address and port 4001 are correct
- Test connection with telnet:
telnet [IP] 4001 - Verify serial parameters match (38400, Even, 7, 1)
- Classic only: Check Moxa converter is powered and connected
Problem: Moxa converter not responding (Classic controls)
Solutions:
- Verify Moxa has power (LED should be lit)
- Check Ethernet cable connection to Moxa
- Use Moxa Device Search Utility to find Moxa IP
- Reset Moxa to factory defaults (hold reset button 10 seconds)
- Verify Moxa serial port settings match machine settings
Problem: Data comes through but looks garbled
Solutions:
- Serial parameters mismatch - verify all settings match exactly
- Check cable is not damaged
- Verify baud rate is 38400 on both machine and Moxa/adapter
- Ensure parity is EVEN (not NONE or ODD)
- Verify data bits are 7 (not 8)
Problem: Macro variables show "UNAVAILABLE"
Solutions:
- Check JSON configuration syntax is correct
- Verify macro variable numbers are valid (see reference)
- Some variables are read-only and may show UNAVAILABLE if condition not met
- Test with common variables like #3027 (spindle RPM) to verify connection
Connection Conflicts
Problem: Both MTConnect and Haas Serial show execution state but they conflict
Solution:
- Use transform adapter to deny
RunStatusfrom Haas Serial - Let MTConnect provide
executionas primary state - See "Using Both MTConnect and Serial Together" section above
Problem: Duplicate data items from MTConnect and Serial
Solution:
- Use transform adapter with
deny-keysto block duplicates - Decide which source is authoritative for each data item
- Keep MTConnect data for standard items, Serial only for macros
Additional Resources
Official Documentation
- Haas Operator's Manual - System Variables Reference (included with machine)
Related MachineMetrics Guides
- MTConnect Connectivity Guide - General MTConnect setup
- Transform Adapter Scripts Guide - Creating transforms to filter/combine data
- Machine Settings Guide - Configuring data mapping in MachineMetrics
Haas Resources
- Haas Operator's Manual (included with machine)
- Haas Setting 143 documentation
- Haas MTConnect implementation guide
Hardware Resources
- Hardware Buying Guide - Order Moxa converters and Edge devices
- Moxa NPort 5110 User Manual
- Moxa Device Search Utility (Windows software)
Quick Reference: Haas Connection Decision Tree
Do you have a Haas machine?
  │
  ├─→ YES: What control type?
  │    │
  │    ├─→ Next Generation Control (2017+)
  │    │     │
  │    │     ├─→ Primary: MTConnect (port 8082)
  │    │     │     └─→ Provides: execution, program, speeds, positions, alarms
  │    │     │
  │    │     └─→ Secondary (optional): Haas Serial (port 4001)
  │    │           └─→ Provides: macro variables, system variables
  │    │           └─→ Add transform to deny RunStatus
  │    │
  │    ├─→ Classic Control (pre-2017)
  │    │     └─→ Haas Serial via RS-232 + Moxa converter
  │    │           └─→ Setting 143 ON, 38400 baud, Even parity
  │    │           └─→ Configure macro variables for additional data
  │    │
  │    └─→ Very Old (no Setting 143)
  │          └─→ Use Digital I/O connectivity instead
  │
  └─→ NO: See other connectivity guides
Need help? Contact MachineMetrics Support at support@machinemetrics.com or ask Max AI in-app.