Adding Users Guide
- Overview
- Before You Begin
- Quick Start: Adding Your First Users
- Step-by-Step: Inviting a New User
- Managing Pending Invitations
- Operators vs System Users
- Common User Setup Scenarios
- Best Practices
- Troubleshooting
- Next Steps
- Need More Details?
Overview
Adding users to MachineMetrics is one of your first steps after initial setup. This quick guide will help you invite team members and assign appropriate access levels so they can start using the platform.
What you'll learn:
- How to invite new users to your MachineMetrics account
- How to choose the right access level for each user
- The difference between system users and operators
- Best practices for user management
Before You Begin
Who Can Add Users
Only users with the following access levels can invite and manage users:
- Executive - Full user management capabilities
- Manager - Can invite users (some restrictions)
- IT Admin - Full user management capabilities
If you don't have these permissions, contact your MachineMetrics administrator.
Understanding Access Levels
MachineMetrics has five primary access levels. Choose the appropriate level based on what each user needs to do:
| Access Level | Best For | Key Capabilities |
|---|---|---|
| Kiosk | Shop floor operators | View machine status, log downtime/quality, start/stop jobs |
| Supervisor | Shift supervisors, team leads | Kiosk + view reports, manage operator activities |
| Manager | Production managers, engineers | Supervisor + create reports, manage settings, configure machines |
| Executive | Plant managers, executives | Manager + analytics, company-wide visibility, user management |
| IT Admin | IT staff, system administrators | Executive + Edge device management, integrations, system configuration |
Quick Tip: Start with the minimum access level needed. You can always elevate permissions later.
Planning Your User List
Before inviting users, create a list with:
- Name and email address for each person
- Appropriate MachineMetrics access level (see table above)
Common starting users:
- Production Manager (Manager or Executive)
- Shift Supervisors (Supervisor)
- Quality Engineer (Manager)
- IT Contact (IT Admin)
- Plant Manager (Executive)
Quick Start: Adding Your First Users
If you're just getting started, follow this quick workflow:
- Go to Settings → Users in the left navigation menu
- Click "Invite Others" at the bottom right of the Invites section
- Enter email address(es) - one per line for multiple users
- Select the appropriate role from the dropdown
- Click "Send" to issue the invitations
- Inform users to check their email (including spam folder)
- Monitor the Invites table to see when users accept
That's it! Users will receive an email with instructions to create their account.
Step-by-Step: Inviting a New User
Step 1: Access the Users Page
- Click Settings in the left sidebar
- Click Users from the settings menu
- You'll see two sections:
- Users Table - Currently active users
- Invites Table - Pending invitations
Step 2: Send an Invitation
- Click the Invite Others button (bottom right of Invites table)
- A dialog box will appear
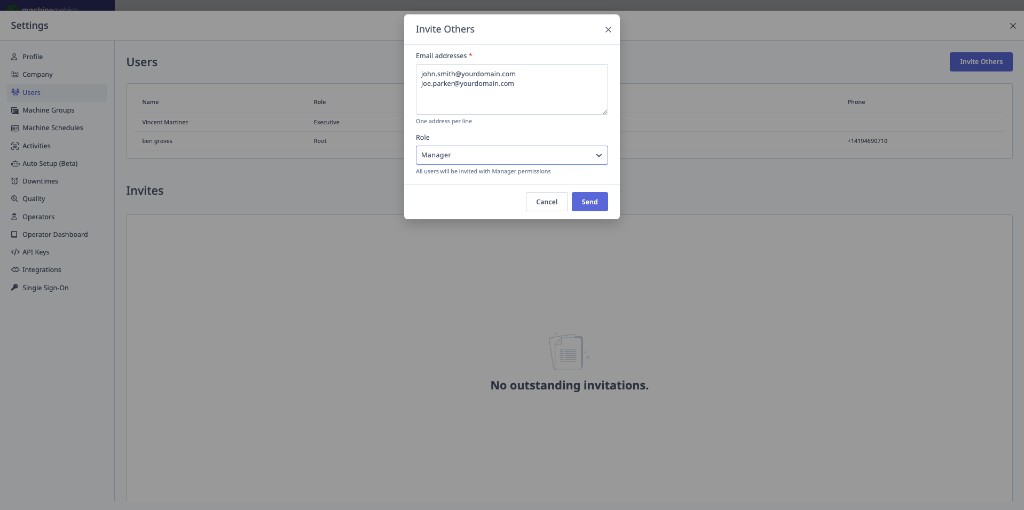
Step 3: Enter User Information
For a single user:
- Enter their email address
- Select their role from the dropdown
For multiple users:
- Enter one email address per line
- All users added together must have the same role
- If you need to assign different roles, send separate invitations
Step 4: Send the Invitation
- Review the email addresses and role
- Click Send
- The invitation will appear in the Invites table
Step 5: What Happens Next
The invited user will:
- Receive an email invitation to join MachineMetrics
- Click the link in the email to create their account
- Set up their password and profile
- Gain immediate access based on their assigned role
You will see:
- The invitation listed in the Invites table
- Once accepted, the user moves to the Users table
- An email notification when the user accepts (optional)
Managing Pending Invitations
Viewing Pending Invites
The Invites Table shows all users who haven't yet accepted their invitation:
- Email address
- Assigned role
- Date sent
- Actions (Resend, Cancel)
Resending an Invitation
If a user didn't receive the email:
- Locate the user in the Invites table
- Click the Resend button
- Ask the user to check their spam/junk folder
- Verify the email address is correct
Canceling an Invitation
To revoke an invitation before it's accepted:
- Locate the invitation in the Invites table
- Click the Cancel button
- Confirm the cancellation
- The invitation link will no longer work
Common Issues
"User says they didn't get the email"
- Check spam/junk folders
- Verify email address is correct
- Resend the invitation
- Check with IT that emails from machinemetrics.com aren't blocked
"Invitation expired"
- Invitations expire after 7 days
- Simply resend the invitation
- User can use the new link to accept
Operators vs System Users
Important Distinction
System Users (added via Settings → Users):
- Log in to the full MachineMetrics web application
- Supervisors, Managers, Executives, IT Admins
- Have access to reports, dashboards, settings
- Added through the Users page
Operators (added via Settings → Operators):
- Use the ShopPulse Interface on tablets
- Shop floor personnel who log production data
- Limited interface focused on machine operation
- Added through a different page in Settings
⚠️ Important: Do NOT invite shop floor operators through the Users page. They are managed separately.
See the Operators & OpDash Settings guide for operator setup.
Common User Setup Scenarios
Setting Up a New Production Manager
Access Level: Manager or Executive (depending on responsibilities)
Steps:
- Invite with Manager role to start
- Once accepted, they can:
- Create custom reports
- Configure machine settings
- Set up workflows and alerts
- Manage machine groups
- Elevate to Executive if they need to:
- Manage users
- Access financial/ROI metrics
- Configure company-wide settings
Setting Up a New Shift Supervisor
Access Level: Supervisor
Steps:
- Invite with Supervisor role
- They can:
- View all production reports
- Review operator activities
- Categorize downtime
- Monitor shift performance
- Cannot modify system settings (preventing accidental changes)
Setting Up IT Admin Access
Access Level: IT Admin
Steps:
- Invite with IT Admin role
- Coordinate with them to:
- Set up Edge devices
- Configure network access
- Manage API keys and integrations
- Set up SSO if needed
- They'll have full system access for technical configuration
Best Practices
Start Small
- Begin with 3-5 key stakeholders during initial setup
- Add more users after the system is configured and stable
- Gradually expand access as adoption grows
Use Minimum Necessary Access
- Start with lower access levels and elevate as needed
- Reduces risk of accidental misconfiguration
- Easier to grant additional access than remove it
Document Your Users
- Keep a list of who has what access level
- Note why certain access was granted
- Review access levels quarterly
- Remove access for departed employees promptly
Communicate Expectations
- Tell users what to expect in the invitation email
- Provide context for their role in using MachineMetrics
- Share relevant training resources
- Set up a welcome meeting for new users
Security Considerations
- Use work email addresses, not personal emails
- Enable MFA (multi-factor authentication) for sensitive roles
- Review user access regularly
- Remove inactive users
- Use SSO if your organization supports it
Onboarding New Users
- Send invitation before their start date
- Provide quick start guide or documentation
- Schedule training session
- Assign a "buddy" who knows the system
- Start with view-only access during learning period
Troubleshooting
"I don't see the Invite Others button"
Cause: You don't have permission to invite users
Solution:
- Contact your MachineMetrics administrator
- Request Executive, Manager, or IT Admin access
- Verify you're logged in with the correct account
"Error when trying to send invitation"
Possible causes:
- Email address is invalid or malformed
- User already has an account or pending invitation
- Network connectivity issue
Solutions:
- Verify email address is correct
- Check if user already exists in Users table
- Try again in a few minutes
- Contact support if problem persists
"User accepted but can't see any machines"
Cause: User doesn't have access to machine groups
Solution:
- Go to Assets → Machines
- Assign user to appropriate machine groups
- See Machine Groups, Schedules & Settings
"User needs different access level"
Solution:
- Go to Settings → Users
- Find the user in the Users table
- Click the edit icon next to their role
- Select the new role
- Click Save
- Changes take effect immediately
Next Steps
After adding your initial users:
-
Configure Machine Access
- Assign users to machine groups if needed
- See Machine Groups, Schedules & Settings
-
Set Up Notifications
- Configure email preferences for each user
- Set up workflow alerts for relevant team members
-
Provide Training
- Share knowledge base articles
- Schedule live training sessions
- Create internal documentation for your workflows
-
Add Operators Separately
- Set up operator profiles for tablet users
- See Operators & OpDash Settings
-
Review Security Settings
- Enable MFA if required
- Set up SSO for enterprise
- See Accessing MachineMetrics & Support
Need More Details?
This guide covers the basics of adding users to get you started quickly. For comprehensive user management information, including:
- Detailed role permissions
- Editing existing users
- Removing users
- Bulk user management
- SSO configuration
- Advanced security settings
- Operator management
See the complete User Management & Access guide in the System Settings section.
Other Helpful Resources:
- Accessing MachineMetrics & Support - Login, access levels, and getting help
- Quick Start Checklist - Complete first-day setup guide
- Operators & OpDash Settings - Setting up shop floor operators
Need Help?
- Email: support@machinemetrics.com
- Contact your Solution Delivery Manager (SDM) during onboarding